容器接口 以SpringBoot的启动类为例:
1
2
3
4
5
6
@SpringBootApplication public class A01 { public static void main (String[] args) { SpringApplication.run(A01.class, args); } }
容器启动的run()方法是有返回值的:
1 ConfigurableApplicationContext context = SpringApplication.run(A01.class, args);
在 IDEA 中使用快捷键Ctrl +Alt +U查看 ConfigurableApplicationContext 类的类图:
ConfigurableApplicationContext接口继承了ApplicationContext接口,而
ApplicationContext 接口又间接地继承了BeanFactory 接口,除此之外还继承了其他很多接口,相当于对BeanFactory 进行了拓展。
到底什么是 BeanFactory?
它是 ApplicationContext 的父接口
它才是 Spring 的核心容器, 主要的 ApplicationContext 实现都组合 了它的功能
举一个例子:
使用context根据名称获取Bean:
1 Object bean = context.getBean("Bean" );
Ctrl +Alt +B查看实现类:
进入到了AbstractApplicationContext类中的方法,我们发现首先获取BeanFactory,再调用BeanFactory的getBean()方法获取Bean,说明BeanFactory更加核心。
1
2
3
4
public Object getBean (String name) throws BeansException { this .assertBeanFactoryActive(); return this .getBeanFactory().getBean(name); }
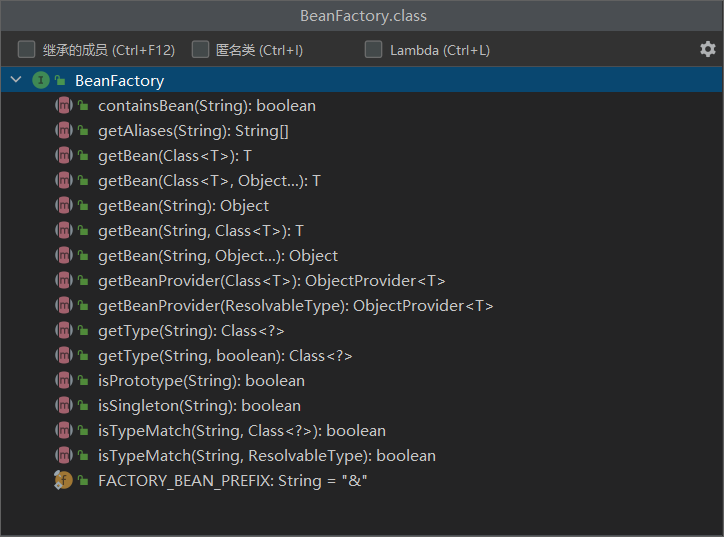
BeanFactory的功能 进入BeanFactory接口,在IDEA中使用快捷键Ctrl + F12查看这个接口中所有的方法定义:
BeanFactory能干点啥?
表面上只有getBean()功能
实际上控制反转、基本的依赖注入、直至 Bean 的生命周期的各种功能 , 都由它的实现类提供
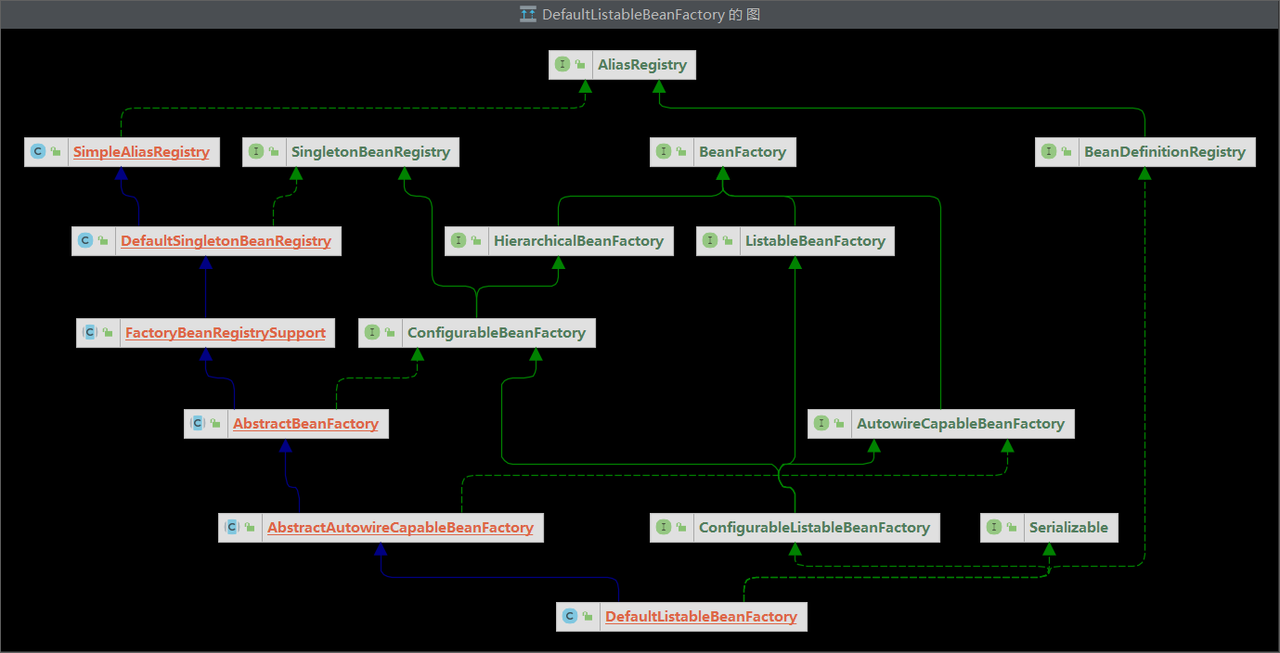
打开 BeanFactory 的实现类 DefaultListableBeanFactory,查看其类图:
DefaultListableBeanFactory实现了BeanFactory 接口,它能管理Spring中所有的Bean,当然也包含Spring容器中的那些单例对象。
DefaultListableBeanFactory还继承了DefaultSingletonBeanRegistry类,这个类就是用来管理Spring 容器中的单例对象。
在IDEA提供的类图中选中 DefaultSingletonBeanRegistry,然后按下F4进入这个类。它有一个Map类型的成员变量singleton0bjects :
1 private final Map<String, Object> singletonObjects = new ConcurrentHashMap (256 );
Map的key就是Bean的名字,而value是对应的Bean,即单例对象。
现有如下两个Bean:
1
2
3
4
5
6
7
@Component public class Component1 {} @Component public class Component2 {}
查看singletonObjects中是否存在这两个Bean的信息:
1 2 3 4 5 6 7 8 9 Field singletonObjects = DefaultSingletonBeanRegistry.class.getDeclaredField("singletonObjects" );singletonObjects.setAccessible(true ); ConfigurableListableBeanFactory beanFactory = context.getBeanFactory();Map<String, Object> map = (Map<String, Object>) singletonObjects.get(beanFactory); map.entrySet().stream().filter(e -> e.getKey().startsWith("component" )) .forEach(e -> { System.out.println(e.getKey() + "=" + e.getValue()); });
运行main()方法后,控制台打印出:
1
2
component1=com.itheima.a01.Component1@59498d94 component2=com.itheima.a01.Component2@35bfa1bb
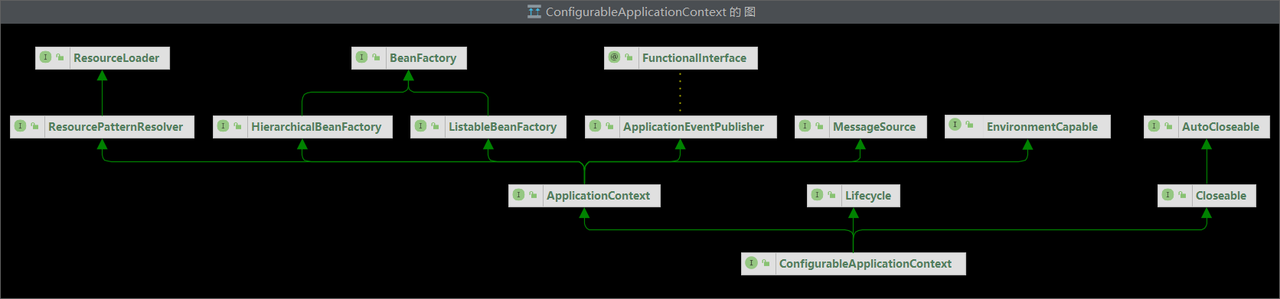
ApplicationContext的扩展功能 回顾ConfigurableApplicationContext类的类图:
ApplicationContext除了继承BeanFactory外,还继承了∶
MessageSource:使其具备处理国际化资源的能力ResourcePatternResolver:使其具备使用通配符进行资源匹配的能力EnvironmentCapable:使其具备读取Spring环境信息、配置文件信息的能力ApplicationEventPublisher:使其具备发布事件的能力
MessageSource MessageSource具备处理国际化资源的能力。
在SpringBoot项目的resources目录下创建messages.properties、messages_en.properties、
messages_ja.properties、messages_zh.properties四个国际化文件,除messages.properties外,其余三个文件内容如下:
测试MessageSource接口中getMessage()方法的使用:
1 2 3 System.out.println(context.getMessage("hi" , null , Locale.CHINA)); System.out.println(context.getMessage("hi" , null , Locale.ENGLISH)); System.out.println(context.getMessage("hi" , null , Locale.JAPANESE));
运行main()方法后,控制台打印出:
国际化资源由 ResourceBundleMessageSource 进行处理,我们也可以使用”干净”的Spring容器GenericApplicationcontext,但需要手动注册MessageSource类型的Bean:
1 2 3 4 5 6 7 8 9 10 11 12 13 14 15 16 17 18 public class TestMessageSource { public static void main (String[] args) { GenericApplicationContext context = new GenericApplicationContext (); context.registerBean("messageSource" , MessageSource.class, () -> { ResourceBundleMessageSource ms = new ResourceBundleMessageSource (); ms.setDefaultEncoding("utf-8" ); ms.setBasename("messages" ); return ms; }); context.refresh(); System.out.println(context.getMessage("hi" , null , Locale.ENGLISH)); System.out.println(context.getMessage("hi" , null , Locale.CHINESE)); System.out.println(context.getMessage("hi" , null , Locale.JAPANESE)); } }
运行main()方法后,控制台打印出:
ResourcePatternResolver ResourcePatternResolver具备使用通配符进行资源匹配的能力。
1 2 3 4 5 6 7 8 9 10 11 12 Resource[] resourceList = context.getResources("classpath:application.properties" ); for (Resource resource : resourceList) { System.out.println(resource); } Resource[] resources = context.getResources("classpath*:META-INF/spring.factories" ); for (Resource resource : resources) { System.out.println(resource); }
控制台输出:
1 2 3 4 5 6 7 8 class path resource [application.properties] URL [file:/F:/Java/%e9%bb%91%e9%a9%ac%e5%85%a8%e5%a5%97java%e6%95%99%e7%a8%8b/%e7%ac%ac2%e9%98%b6%e6%ae%b5%e4%bc%81%e4%b8%9a%e7%ba%a7%e5%bc%80%e5%8f%91%e2%80%94%e5%9f%ba%e7%a1%80%e6%a1%86%e6%9e%b6/7%e3%80%81spring%e9%ab%98%e7%ba%a745%e8%ae%b2/%e4%bb%a3%e7%a0%81/%e4%bb%a3%e7%a0%81/show/target/classes/META-INF/spring.factories] URL [jar:file:/C:/Users/WolfMan/.m2/repository/com/alibaba/druid-spring-boot-starter/1.2.8/druid-spring-boot-starter-1.2.8.jar!/META-INF/spring.factories] URL [jar:file:/C:/Users/WolfMan/.m2/repository/org/springframework/spring-test/5.3.10/spring-test-5.3.10.jar!/META-INF/spring.factories] URL [jar:file:/C:/Users/WolfMan/.m2/repository/org/springframework/boot/spring-boot/2.5.5/spring-boot-2.5.5.jar!/META-INF/spring.factories] URL [jar:file:/C:/Users/WolfMan/.m2/repository/org/springframework/boot/spring-boot-autoconfigure/2.5.5/spring-boot-autoconfigure-2.5.5.jar!/META-INF/spring.factories] URL [jar:file:/C:/Users/WolfMan/.m2/repository/org/mybatis/spring/boot/mybatis-spring-boot-autoconfigure/2.2.0/mybatis-spring-boot-autoconfigure-2.2.0.jar!/META-INF/spring.factories] URL [jar:file:/C:/Users/WolfMan/.m2/repository/org/springframework/spring-beans/5.3.10/spring-beans-5.3.10.jar!/META-INF/spring.factories]
EnvironmentCapable EnvironmentCapable其具备读取Spring环境信息、配置文件信息的能力 。
java_home是从环境变量中读取, properties.name则是从application.yml配置文件中读取。
1 2 System.out.println(context.getEnvironment().getProperty("java_home" )); System.out.println(context.getEnvironment().getProperty("server.port" ));
控制台输出:
ApplicationEventPublisher ApplicationEventPublisher具备发布事件的能力。
注册事件,需要继承ApplicationEvent ,source为事件源(谁发的事件):
1 2 3 4 5 public class UserRegisteredEvent extends ApplicationEvent { public UserRegisteredEvent (Object source) { super (source); } }
使用context发送事件:
1 context.publishEvent(new UserRegisteredEvent (context));
再Component中接收事件:
1 2 3 4 5 6 7 8 9 10 11 12 13 14 15 @Component public class Component2 { private static final Logger log = LoggerFactory.getLogger(Component2.class); @EventListener public void aaa (UserRegisteredEvent event) { log.debug("{}" , event); log.debug("发送短信" ); } }
控制台输出:
1 [DEBUG] 15:43:30.940 [main] com.itheima.a01.Component2 - com.itheima.a01.UserRegisteredEvent[source=com.itheima.a01.Component1@26e8ff8c]
可以看到component2监听到了事件
事件的发布与监听主要用于解耦,比如用户注册和发送短信。例如component1发送用户注册事件,component2监听事件并发送短信:
1 2 3 4 5 6 7 8 9 10 11 12 13 14 15 16 17 18 19 20 21 22 23 24 25 26 @Component public class Component1 { private static final Logger log = LoggerFactory.getLogger(Component1.class); @Autowired private ApplicationEventPublisher context; public void register () { log.debug("用户注册" ); context.publishEvent(new UserRegisteredEvent (this )); } } @Component public class Component2 { private static final Logger log = LoggerFactory.getLogger(Component2.class); @EventListener public void aaa (UserRegisteredEvent event) { log.debug("{}" , event); log.debug("发送短信" ); } }
控制台打印:
1 2 3 [DEBUG] 15:43:30.939 [main] com.itheima.a01.Component1 - 用户注册 [DEBUG] 15:43:30.940 [main] com.itheima.a01.Component2 - com.itheima.a01.UserRegisteredEvent[source=com.itheima.a01.Component1@26e8ff8c] [DEBUG] 15:43:30.943 [main] com.itheima.a01.Component2 - 发送短信
容器接口总结
BeanFactory与ApplicationContext 并不仅仅是简单接口继承的关系, ApplicationContext 组合并扩展了BeanFactory的功能又新学一种代码之间解耦途径,即通过事件发布与监听
容器实现 BeanFactory的实现 首先了解BeanFactory最重要的实现DefaultListableBeanFactory,使用DefaultListableBeanFactory创建对象,我们需要告诉它Bean的信息,例如Bean的class、scope、初始化、销毁等…
1 2 3 4 5 6 7 8 9 10 11 12 13 14 15 16 17 18 19 20 21 22 23 24 25 26 27 28 29 30 31 32 33 34 35 36 37 38 39 40 41 42 43 44 45 46 47 48 49 50 51 public class TestBeanFactory { public static void main (String[] args) { DefaultListableBeanFactory beanFactory = new DefaultListableBeanFactory (); AbstractBeanDefinition beanDefinition = BeanDefinitionBuilder.genericBeanDefinition(Config.class).setScope("singleton" ).getBeanDefinition(); beanFactory.registerBeanDefinition("config" , beanDefinition); for (String name : beanFactory.getBeanDefinitionNames()) { System.out.println(name); } } @Configuration static class Config { @Bean public Bean1 bean1 () { return new Bean1 (); } @Bean public Bean2 bean2 () { return new Bean2 (); } } static class Bean1 { private static final Logger log = LoggerFactory.getLogger(Bean1.class); @Autowired private Bean2 bean2; public Bean1 () { log.debug("构造 Bean1()" ); } public Bean2 getBean2 () { return bean2; } } static class Bean2 { private static final Logger log = LoggerFactory.getLogger(Bean2.class); public Bean2 () { log.debug("构造 Bean2()" ); } } }
控制台输出:
通过上面的运行示例我们发现,即使Config类上添加了@Configuration注解,其内部也有两个添加了@Bean注解的方法,beanFactory中也只有一个Bean实例。说明DefaultListableBeanFactory本身不具有解析注解的能力。
我们可以通过AnnotationConfigUtils工具类给DefaultListableBeanFactory添加后处理器,以扩展DefaultListableBeanFactory的功能。
我们给DefaultListableBeanFactory添加后处理器:
1 2 AnnotationConfigUtils.registerAnnotationConfigProcessors(beanFactory);
再次查看控制台:
1 2 3 4 5 6 config org.springframework.context.annotation.internalConfigurationAnnotationProcessor org.springframework.context.annotation.internalAutowiredAnnotationProcessor org.springframework.context.annotation.internalCommonAnnotationProcessor org.springframework.context.event.internalEventListenerProcessor org.springframework.context.event.internalEventListenerFactory
我们发现多了很多的Bean,其中org.springframework.context.annotation.internalConfigurationAnnotationProcessor就是用来处理@Configuration、@Bean等注解的类。
AnnotationConfigUtils.registerAnnotationConfigProcessors(beanFactory)只是给beanFactory添加了后处理器,但是没有使用这些处理器的功能,下面我们获取这些处理器,并且使用它们:
1 2 3 4 beanFactory.getBeansOfType(BeanFactoryPostProcessor.class).values().forEach(beanFactoryPostProcessor -> { beanFactoryPostProcessor.postProcessBeanFactory(beanFactory); });
再次查看控制台:
1 2 3 4 5 6 7 8 config org.springframework.context.annotation.internalConfigurationAnnotationProcessor org.springframework.context.annotation.internalAutowiredAnnotationProcessor org.springframework.context.annotation.internalCommonAnnotationProcessor org.springframework.context.event.internalEventListenerProcessor org.springframework.context.event.internalEventListenerFactory bean1 bean2
我们打印了bean1和bean2,说明注解已经被解析并且生效。
我们执行以下代码:
1 System.out.println(beanFactory.getBean(Bean1.class).getBean2());
查看控制台打印:
1 2 3 4 5 6 7 8 9 10 config org.springframework.context.annotation.internalConfigurationAnnotationProcessor org.springframework.context.annotation.internalAutowiredAnnotationProcessor org.springframework.context.annotation.internalCommonAnnotationProcessor org.springframework.context.event.internalEventListenerProcessor org.springframework.context.event.internalEventListenerFactory bean1 bean2 [DEBUG] 22:14:07.212 [main] c.itheima.a02.TestBeanFactory$Bean1 - 构造 Bean1() null
发现虽然调用了Bean1的构造方法,但是Bean2却没有被注入,说明此时的@Autowired并没有生效。其实依赖注入的功能是由Bean的后处理器(注意与BeanFactory的后处理器区分)来处理的。例如:
internalAutowiredAnnotationProcessor:解析@Autowired注解。internalCommonAnnotationProcessor:解析@Resource注解
我们使用Bean的后处理器:
1 2 beanFactory.getBeansOfType(BeanPostProcessor.class).values().forEach(beanFactory::addBeanPostProcessor);
控制台输出:
1 2 3 4 5 6 7 8 9 10 11 config org.springframework.context.annotation.internalConfigurationAnnotationProcessor org.springframework.context.annotation.internalAutowiredAnnotationProcessor org.springframework.context.annotation.internalCommonAnnotationProcessor org.springframework.context.event.internalEventListenerProcessor org.springframework.context.event.internalEventListenerFactory bean1 bean2 [DEBUG] 22:26:30.567 [main] c.itheima.a02.TestBeanFactory$Bean1 - 构造 Bean1() [DEBUG] 22:26:30.591 [main] c.itheima.a02.TestBeanFactory$Bean2 - 构造 Bean2() com.itheima.a02.TestBeanFactory$Bean2@795509d9
我们发现Bean2成功被注入到了Bean1中。
通过以上示例我们发现,只有getBean()并使用Bean的时候spring才会去初始化真正的实例。
说明只有在我们用到实例对象的时候,spring才会去实例化这些对象,有延迟加载的效果。对于单例对象,我们一般更希望,spring在初始化时就给我们创建这些对象,可以使用preInstantiateSingletons()方法:
1 2 3 beanFactory.preInstantiateSingletons(); System.out.println(">>>>>>>>>>>>>>>>>>>>>>>>>>>>>>>>>>>> " ); System.out.println(beanFactory.getBean(Bean1.class).getBean2());
观察控制台:
1 2 3 4 5 ... [DEBUG] 22:36:13.682 [main] c.itheima.a02.TestBeanFactory$Bean1 - 构造 Bean1() [DEBUG] 22:36:13.702 [main] c.itheima.a02.TestBeanFactory$Bean2 - 构造 Bean2() >>>>>>>>>>>>>>>>>>>>>>>>>>>>>>>>>>>> com.itheima.a02.TestBeanFactory$Bean2@196a42c3
我们发现在调用beanFactory.preInstantiateSingletons()之后就已经调用了Bean1和Bean2的构造方法,实现了预先加载的功能。
我们进入AnnotationConfigUtils.registerAnnotationConfigProcessors()方法中,
1 2 3 public static void registerAnnotationConfigProcessors (BeanDefinitionRegistry registry) { registerAnnotationConfigProcessors(registry, (Object)null ); }
再进入registerAnnotationConfigProcessors(registry, (Object)null)方法:
1 2 3 4 5 6 7 8 9 10 11 12 13 14 15 16 17 18 19 20 21 22 23 24 25 26 27 28 29 30 31 32 33 34 35 36 37 38 39 40 41 42 43 44 45 46 47 48 49 50 51 52 53 54 55 56 57 58 59 public static Set<BeanDefinitionHolder> registerAnnotationConfigProcessors (BeanDefinitionRegistry registry, @Nullable Object source) { DefaultListableBeanFactory beanFactory = unwrapDefaultListableBeanFactory(registry); if (beanFactory != null ) { if (!(beanFactory.getDependencyComparator() instanceof AnnotationAwareOrderComparator)) { beanFactory.setDependencyComparator(AnnotationAwareOrderComparator.INSTANCE); } if (!(beanFactory.getAutowireCandidateResolver() instanceof ContextAnnotationAutowireCandidateResolver)) { beanFactory.setAutowireCandidateResolver(new ContextAnnotationAutowireCandidateResolver ()); } } Set<BeanDefinitionHolder> beanDefs = new LinkedHashSet (8 ); RootBeanDefinition def; if (!registry.containsBeanDefinition("org.springframework.context.annotation.internalConfigurationAnnotationProcessor" )) { def = new RootBeanDefinition (ConfigurationClassPostProcessor.class); def.setSource(source); beanDefs.add(registerPostProcessor(registry, def, "org.springframework.context.annotation.internalConfigurationAnnotationProcessor" )); } if (!registry.containsBeanDefinition("org.springframework.context.annotation.internalAutowiredAnnotationProcessor" )) { def = new RootBeanDefinition (AutowiredAnnotationBeanPostProcessor.class); def.setSource(source); beanDefs.add(registerPostProcessor(registry, def, "org.springframework.context.annotation.internalAutowiredAnnotationProcessor" )); } if (jsr250Present && !registry.containsBeanDefinition("org.springframework.context.annotation.internalCommonAnnotationProcessor" )) { def = new RootBeanDefinition (CommonAnnotationBeanPostProcessor.class); def.setSource(source); beanDefs.add(registerPostProcessor(registry, def, "org.springframework.context.annotation.internalCommonAnnotationProcessor" )); } if (jpaPresent && !registry.containsBeanDefinition("org.springframework.context.annotation.internalPersistenceAnnotationProcessor" )) { def = new RootBeanDefinition (); try { def.setBeanClass(ClassUtils.forName("org.springframework.orm.jpa.support.PersistenceAnnotationBeanPostProcessor" , AnnotationConfigUtils.class.getClassLoader())); } catch (ClassNotFoundException var6) { throw new IllegalStateException ("Cannot load optional framework class: org.springframework.orm.jpa.support.PersistenceAnnotationBeanPostProcessor" , var6); } def.setSource(source); beanDefs.add(registerPostProcessor(registry, def, "org.springframework.context.annotation.internalPersistenceAnnotationProcessor" )); } if (!registry.containsBeanDefinition("org.springframework.context.event.internalEventListenerProcessor" )) { def = new RootBeanDefinition (EventListenerMethodProcessor.class); def.setSource(source); beanDefs.add(registerPostProcessor(registry, def, "org.springframework.context.event.internalEventListenerProcessor" )); } if (!registry.containsBeanDefinition("org.springframework.context.event.internalEventListenerFactory" )) { def = new RootBeanDefinition (DefaultEventListenerFactory.class); def.setSource(source); beanDefs.add(registerPostProcessor(registry, def, "org.springframework.context.event.internalEventListenerFactory" )); } return beanDefs; }
这里注册了很多后处理器,其中包括解析@Autowired注解的AutowiredAnnotationBeanPostProcessor以及解析@Resource注解的CommonAnnotationBeanPostProcessor。
那么在依赖注入的时候既加了@Autowired又加了@Resource,谁会优先生效呢?准备以下代码:
1 2 3 4 5 6 7 8 9 10 11 12 13 14 15 16 17 18 19 20 21 22 23 24 25 26 27 28 29 30 31 32 33 34 35 36 37 38 39 40 41 42 interface Inter {} static class Bean3 implements Inter {} static class Bean4 implements Inter {} static class Bean1 { private static final Logger log = LoggerFactory.getLogger(Bean1.class); public Bean1 () { log.debug("构造 Bean1()" ); } @Autowired private Bean2 bean2; public Bean2 getBean2 () { return bean2; } @Autowired @Resource(name = "bean4") private Inter bean3; public Inter getInter () { return bean3; } } static class Bean2 { private static final Logger log = LoggerFactory.getLogger(Bean2.class); public Bean2 () { log.debug("构造 Bean2()" ); } }
@Autowired首先判断依赖注入的类型,如果有同类型的Bean,那么再判断属性的名称,例如:
1 2 @Autowired private Inter bean3;
将会注入Bean3:
1 com.itheima.a02.TestBeanFactory$Bean3@2af004b
@Resource首先判断名称,如果没有给name属性的话在判断类型,如果有多个类型再判断属性的名称,例如:
1 2 @Resource(name = "bean4") private Inter bean3;
将会注入Bean4:
1 com.itheima.a02.TestBeanFactory$Bean4@663c9e7a
当同时加@Autowired与@Resource(name = "bean4"):
1 2 3 @Autowired @Resource(name = "bean4") private Inter bean3;
我们发现注入的是Bean3:
1 com.itheima.a02.TestBeanFactory$Bean3@2af004b
为什么呢?
由于Bean处理器与其注册的顺序有关,AutowiredAnnotationBeanPostProcessor比CommonAnnotationBeanPostProcessor优先注册,因此优先级更高。
我们可以编码查看:
1 2 3 4 beanFactory.getBeansOfType(BeanPostProcessor.class).values().forEach(beanPostProcessor -> { System.out.println(">>>>" + beanPostProcessor); beanFactory.addBeanPostProcessor(beanPostProcessor); });
控制台输出:
1 2 >>>>org.springframework.beans.factory.annotation.AutowiredAnnotationBeanPostProcessor@1e1a0406 >>>>org.springframework.context.annotation.CommonAnnotationBeanPostProcessor@3cebbb30
我们可以通过添加比较器的方式手动调整Bean的顺序:
1 2 3 4 5 6 beanFactory.getBeansOfType(BeanPostProcessor.class).values().stream() .sorted(beanFactory.getDependencyComparator()) .forEach(beanPostProcessor -> { System.out.println(">>>>" + beanPostProcessor); beanFactory.addBeanPostProcessor(beanPostProcessor); });
重新运行代码,查看控制台:
1 2 3 4 >>>>org.springframework.context.annotation.CommonAnnotationBeanPostProcessor@6253c26 >>>>org.springframework.beans.factory.annotation.AutowiredAnnotationBeanPostProcessor@49049a04 ... com.itheima.a02.TestBeanFactory$Bean4@548d708a
我们发现处理器的顺序发生了改变,同时注入的Bean对象也改变了。
我们通过beanFactory.getDependencyComparator()获取了一个比较器,说明在beanFactory初始化的时候设置了比较器。其实比较器是通过AnnotationConfigUtils.registerAnnotationConfigProcessors(beanFactory)设置的,进入方法:
1 2 3 public static void registerAnnotationConfigProcessors (BeanDefinitionRegistry registry) { registerAnnotationConfigProcessors(registry, (Object)null ); }
再次进入registerAnnotationConfigProcessors(registry, (Object)null)方法:
1 2 3 4 5 6 7 8 9 10 11 DefaultListableBeanFactory beanFactory = unwrapDefaultListableBeanFactory(registry);if (beanFactory != null ) { if (!(beanFactory.getDependencyComparator() instanceof AnnotationAwareOrderComparator)) { beanFactory.setDependencyComparator(AnnotationAwareOrderComparator.INSTANCE); } if (!(beanFactory.getAutowireCandidateResolver() instanceof ContextAnnotationAutowireCandidateResolver)) { beanFactory.setAutowireCandidateResolver(new ContextAnnotationAutowireCandidateResolver ()); } }
加粗部分就是在设置比较器,我们进入AnnotationAwareOrderComparator.INSTANCE:
1 public static final AnnotationAwareOrderComparator INSTANCE = new AnnotationAwareOrderComparator ();
发现是一个通过”饿汉式”初始化的比较器。
我们发现AnnotationAwareOrderComparator 继承了OrderComparator:
1 public class AnnotationAwareOrderComparator extends OrderComparator
进入OrderComparator类:
1 public class OrderComparator implements Comparator <Object>
发现OrderComparator实现了Comparator<Object>接口,查看compare()方法:
1 2 3 public int compare (@Nullable Object o1, @Nullable Object o2) { return this .doCompare(o1, o2, (OrderSourceProvider)null ); }
进入this.doCompare(o1, o2, (OrderSourceProvider)null)方法中:
1 2 3 4 5 6 7 8 9 10 11 12 13 private int doCompare (@Nullable Object o1, @Nullable Object o2, @Nullable OrderSourceProvider sourceProvider) { boolean p1 = o1 instanceof PriorityOrdered; boolean p2 = o2 instanceof PriorityOrdered; if (p1 && !p2) { return -1 ; } else if (p2 && !p1) { return 1 ; } else { int i1 = this .getOrder(o1, sourceProvider); int i2 = this .getOrder(o2, sourceProvider); return Integer.compare(i1, i2); } }
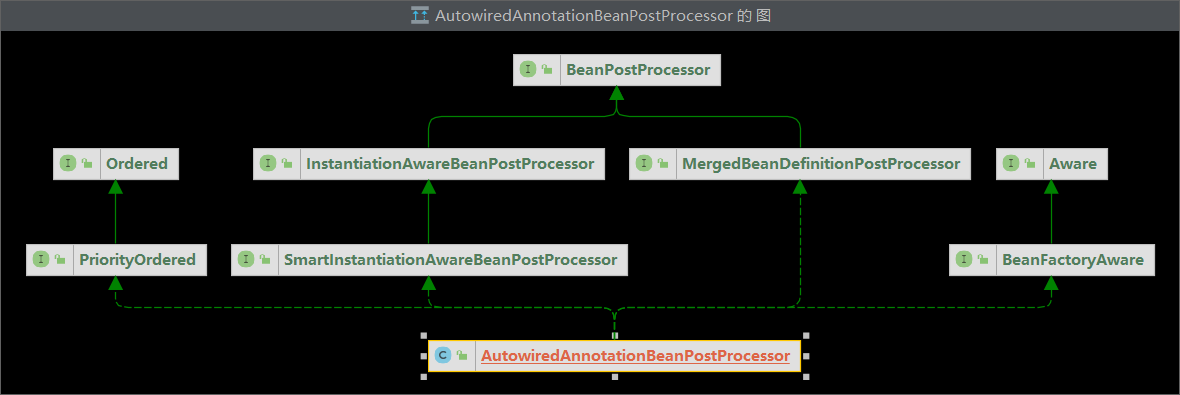
查看AutowiredAnnotationBeanPostProcessor 类图:
查看CommonAnnotationBeanPostProcessor 类图:
因为AutowiredAnnotationBeanPostProcessor 和CommonAnnotationBeanPostProcessor 都直接或间接地实现了PriorityOrdered接口,因此p1和p2都为true。
接下来进入this.getOrder()方法:
1 2 3 4 5 6 7 8 9 10 11 12 13 14 15 16 17 18 19 20 21 22 23 24 private int getOrder (@Nullable Object obj, @Nullable OrderSourceProvider sourceProvider) { Integer order = null ; if (obj != null && sourceProvider != null ) { Object orderSource = sourceProvider.getOrderSource(obj); if (orderSource != null ) { if (orderSource.getClass().isArray()) { Object[] var5 = ObjectUtils.toObjectArray(orderSource); int var6 = var5.length; for (int var7 = 0 ; var7 < var6; ++var7) { Object source = var5[var7]; order = this .findOrder(source); if (order != null ) { break ; } } } else { order = this .findOrder(orderSource); } } } return order != null ? order : this .getOrder(obj); }
由于sourceProvider==null,因此进入this.getOrder()方法:
1 2 3 4 5 6 7 8 9 10 protected int getOrder (@Nullable Object obj) { if (obj != null ) { Integer order = this .findOrder(obj); if (order != null ) { return order; } } return Integer.MAX_VALUE; }
进入this.findOrder(obj)方法,实际上是进入AnnotationAwareOrderComparator的findOrder(obj)方法:
1 2 3 4 5 @Nullable protected Integer findOrder (Object obj) { Integer order = super .findOrder(obj); return order != null ? order : this .findOrderFromAnnotation(obj); }
首先调用父类OrderComparator的findOrder(obj)方法:
1 2 3 4 @Nullable protected Integer findOrder (Object obj) { return obj instanceof Ordered ? ((Ordered)obj).getOrder() : null ; }
AutowiredAnnotationBeanPostProcessor 和CommonAnnotationBeanPostProcessor 都直接或间接地实现了PriorityOrdered接口,而PriorityOrdered继承了Ordered 接口,因此调用实现类的getOrder()方法。
查看AutowiredAnnotationBeanPostProcessor 的getOrder()方法:
1 2 3 4 private int order = 2147483645 ;public int getOrder () { return this .order; }
查看CommonAnnotationBeanPostProcessor的setOrder()方法:
1 2 3 4 this .setOrder(2147483644 );public void setOrder (int order) { this .order = order; }
因此根据AnnotationAwareOrderComparator排序CommonAnnotationBeanPostProcessor要小于AutowiredAnnotationBeanPostProcessor。
BeanFactory和SpringApplicationContext的区别?
不会主动调用BeanFactory后处理器
不会主动添加Bean后处理器
不会主动初始化单例
不会解析beanFactory
不会解析${}与#{}等表达式
bean后处理器会有排序的逻辑
ApplicationContext的实现 接下来介绍ApplicationContext四个比较典型的实现类:
ClassPathXmlApplicationContext:️较为经典的容器, 基于classpath下xml格式的配置文件来创建。FileSystemXmlApplicationContext:基于磁盘路径下xml格式的配置文件来创建。AnnotationConfigApplicationContext:较为经典的容器, 基于java配置类来创建。AnnotationConfigServletWebServerApplicationContext:较为经典的容器, 基于java配置类来创建, 用于web环境。
ClassPathXmlApplicationContext
使用演示
准备两个类:
1 2 3 4 5 6 7 8 9 10 11 12 13 14 15 static class Bean1 {} static class Bean2 { private Bean1 bean1; public void setBean1 (Bean1 bean1) { this .bean1 = bean1; } public Bean1 getBean1 () { return bean1; } }
编写a02.xml配置文件:
1 2 3 4 5 6 7 8 9 10 11 12 13 14 <?xml version="1.0" encoding="UTF-8" ?> <beans xmlns ="http://www.springframework.org/schema/beans" xmlns:xsi ="http://www.w3.org/2001/XMLSchema-instance" xsi:schemaLocation ="http://www.springframework.org/schema/beans http://www.springframework.org/schema/beans/spring-beans.xsd" > <bean id ="bean1" class ="com.itheima.a02.A02.Bean1" /> <bean id ="bean2" class ="com.itheima.a02.A02.Bean2" > <property name ="bean1" ref ="bean1" /> </bean > </beans >
读取classpath下xml格式的配置文件,获取Bean:
1 2 3 4 5 6 7 8 9 10 11 private static void testClassPathXmlApplicationContext () { ClassPathXmlApplicationContext context = new ClassPathXmlApplicationContext ("a02.xml" ); for (String name : context.getBeanDefinitionNames()) { System.out.println(name); } System.out.println(context.getBean(Bean2.class).getBean1()); }
控制台输出:
1 2 3 bean1 bean2 com.itheima.a02.A02$Bean1@1de5f259
我们发现Bean已经成功地被注入。
源码剖析
首先进入ClassPathXmlApplicationContext的构造方法:
1 2 3 public ClassPathXmlApplicationContext (String configLocation) throws BeansException { this (new String []{configLocation}, true , (ApplicationContext)null ); }
进入重载的构造方法:
1 2 3 4 5 6 7 8 public ClassPathXmlApplicationContext (String[] configLocations, boolean refresh, @Nullable ApplicationContext parent) throws BeansException { super (parent); this .setConfigLocations(configLocations); if (refresh) { this .refresh(); } }
进入refresh()方法:
1 2 3 4 5 6 7 8 9 10 11 public void refresh () throws BeansException, IllegalStateException { synchronized (this .startupShutdownMonitor) { StartupStep contextRefresh = this .applicationStartup.start("spring.context.refresh" ); this .prepareRefresh(); ConfigurableListableBeanFactory beanFactory = this .obtainFreshBeanFactory(); this .prepareBeanFactory(beanFactory); } }
我们主要关注beanFactory的构造,进入this.obtainFreshBeanFactory()方法:
1 2 3 4 protected ConfigurableListableBeanFactory obtainFreshBeanFactory () { this .refreshBeanFactory(); return this .getBeanFactory(); }
进入this.refreshBeanFactory()方法,其实进入的是AbstractRefreshableApplicationContext类的refreshBeanFactory()方法:
1 2 3 4 5 6 7 8 9 10 11 12 13 14 15 16 17 18 protected final void refreshBeanFactory () throws BeansException { if (this .hasBeanFactory()) { this .destroyBeans(); this .closeBeanFactory(); } try { DefaultListableBeanFactory beanFactory = this .createBeanFactory(); beanFactory.setSerializationId(this .getId()); this .customizeBeanFactory(beanFactory); this .loadBeanDefinitions(beanFactory); this .beanFactory = beanFactory; } catch (IOException var2) { throw new ApplicationContextException ("I/O error parsing bean definition source for " + this .getDisplayName(), var2); } }
进入this.loadBeanDefinitions(beanFactory),实际上是进入AbstractXmlApplicationContext的loadBeanDefinitions(DefaultListableBeanFactory beanFactory)方法,我们看看spring如何解析配置文件:
1 2 3 4 5 6 7 8 9 10 protected void loadBeanDefinitions (DefaultListableBeanFactory beanFactory) throws BeansException, IOException { XmlBeanDefinitionReader beanDefinitionReader = new XmlBeanDefinitionReader (beanFactory); beanDefinitionReader.setEnvironment(this .getEnvironment()); beanDefinitionReader.setResourceLoader(this ); beanDefinitionReader.setEntityResolver(new ResourceEntityResolver (this )); this .initBeanDefinitionReader(beanDefinitionReader); this .loadBeanDefinitions(beanDefinitionReader); }
进入this.loadBeanDefinitions(beanDefinitionReader)方法:
1 2 3 4 5 6 7 8 9 10 11 12 protected void loadBeanDefinitions (XmlBeanDefinitionReader reader) throws BeansException, IOException { Resource[] configResources = this .getConfigResources(); if (configResources != null ) { reader.loadBeanDefinitions(configResources); } String[] configLocations = this .getConfigLocations(); if (configLocations != null ) { reader.loadBeanDefinitions(configLocations); } }
进入reader.loadBeanDefinitions(configLocations)方法:
1 2 3 4 5 6 7 8 9 10 11 12 13 public int loadBeanDefinitions (String... locations) throws BeanDefinitionStoreException { Assert.notNull(locations, "Location array must not be null" ); int count = 0 ; String[] var3 = locations; int var4 = locations.length; for (int var5 = 0 ; var5 < var4; ++var5) { String location = var3[var5]; count += this .loadBeanDefinitions(location); } return count; }
进入this.loadBeanDefinitions(location)方法:
1 2 3 public int loadBeanDefinitions (String location) throws BeanDefinitionStoreException { return this .loadBeanDefinitions(location, (Set)null ); }
进入重载的this.loadBeanDefinitions(location, (Set)null)方法:
1 2 3 4 5 6 7 8 9 10 11 12 13 14 15 16 17 18 19 20 21 22 23 24 25 26 27 public int loadBeanDefinitions (String location, @Nullable Set<Resource> actualResources) throws BeanDefinitionStoreException { ResourceLoader resourceLoader = this .getResourceLoader(); if (resourceLoader == null ) { throw new BeanDefinitionStoreException ("Cannot load bean definitions from location [" + location + "]: no ResourceLoader available" ); } else { int count; if (resourceLoader instanceof ResourcePatternResolver) { try { Resource[] resources = ((ResourcePatternResolver)resourceLoader).getResources(location); count = this .loadBeanDefinitions(resources); if (actualResources != null ) { Collections.addAll(actualResources, resources); } if (this .logger.isTraceEnabled()) { this .logger.trace("Loaded " + count + " bean definitions from location pattern [" + location + "]" ); } return count; } catch (IOException var6) { throw new BeanDefinitionStoreException ("Could not resolve bean definition resource pattern [" + location + "]" , var6); } } else { } } }
进入this.loadBeanDefinitions(resources)方法:
1 2 3 4 5 6 7 8 9 10 11 12 13 public int loadBeanDefinitions (Resource... resources) throws BeanDefinitionStoreException { Assert.notNull(resources, "Resource array must not be null" ); int count = 0 ; Resource[] var3 = resources; int var4 = resources.length; for (int var5 = 0 ; var5 < var4; ++var5) { Resource resource = var3[var5]; count += this .loadBeanDefinitions((Resource)resource); } return count; }
进入this.loadBeanDefinitions((Resource)resource)方法,实际上进入的是XmlBeanDefinitionReader的loadBeanDefinitions(Resource resource)方法:
1 2 3 public int loadBeanDefinitions (Resource resource) throws BeanDefinitionStoreException { return this .loadBeanDefinitions(new EncodedResource (resource)); }
进入重载的this.loadBeanDefinitions(new EncodedResource(resource))方法:
1 2 3 4 5 6 7 8 9 10 11 12 13 14 15 16 17 18 19 20 21 22 23 24 25 26 27 28 29 30 31 32 33 34 35 36 37 public int loadBeanDefinitions (EncodedResource encodedResource) throws BeanDefinitionStoreException { Assert.notNull(encodedResource, "EncodedResource must not be null" ); if (this .logger.isTraceEnabled()) { this .logger.trace("Loading XML bean definitions from " + encodedResource); } Set<EncodedResource> currentResources = (Set)this .resourcesCurrentlyBeingLoaded.get(); if (!currentResources.add(encodedResource)) { throw new BeanDefinitionStoreException ("Detected cyclic loading of " + encodedResource + " - check your import definitions!" ); } else { int var6; try { InputStream inputStream = encodedResource.getResource().getInputStream(); Throwable var4 = null ; try { InputSource inputSource = new InputSource (inputStream); if (encodedResource.getEncoding() != null ) { inputSource.setEncoding(encodedResource.getEncoding()); } var6 = this .doLoadBeanDefinitions(inputSource, encodedResource.getResource()); } catch (Throwable var24) { var4 = var24; throw var24; } finally { } } catch (IOException var26) { throw new BeanDefinitionStoreException ("IOException parsing XML document from " + encodedResource.getResource(), var26); } finally { } return var6; } }
进入this.doLoadBeanDefinitions(inputSource, encodedResource.getResource())方法:
1 2 3 4 5 6 7 8 9 10 11 12 13 14 15 16 17 18 19 20 21 22 23 protected int doLoadBeanDefinitions (InputSource inputSource, Resource resource) throws BeanDefinitionStoreException { try { Document doc = this .doLoadDocument(inputSource, resource); int count = this .registerBeanDefinitions(doc, resource); if (this .logger.isDebugEnabled()) { this .logger.debug("Loaded " + count + " bean definitions from " + resource); } return count; } catch (BeanDefinitionStoreException var5) { throw var5; } catch (SAXParseException var6) { throw new XmlBeanDefinitionStoreException (resource.getDescription(), "Line " + var6.getLineNumber() + " in XML document from " + resource + " is invalid" , var6); } catch (SAXException var7) { throw new XmlBeanDefinitionStoreException (resource.getDescription(), "XML document from " + resource + " is invalid" , var7); } catch (ParserConfigurationException var8) { throw new BeanDefinitionStoreException (resource.getDescription(), "Parser configuration exception parsing XML from " + resource, var8); } catch (IOException var9) { throw new BeanDefinitionStoreException (resource.getDescription(), "IOException parsing XML document from " + resource, var9); } catch (Throwable var10) { throw new BeanDefinitionStoreException (resource.getDescription(), "Unexpected exception parsing XML document from " + resource, var10); } }
进入this.registerBeanDefinitions(doc, resource)方法:
1 2 3 4 5 6 public int registerBeanDefinitions (Document doc, Resource resource) throws BeanDefinitionStoreException { BeanDefinitionDocumentReader documentReader = this .createBeanDefinitionDocumentReader(); int countBefore = this .getRegistry().getBeanDefinitionCount(); documentReader.registerBeanDefinitions(doc, this .createReaderContext(resource)); return this .getRegistry().getBeanDefinitionCount() - countBefore; }
进入documentReader.registerBeanDefinitions(doc, this.createReaderContext(resource))方法:
1 2 3 4 public void registerBeanDefinitions (Document doc, XmlReaderContext readerContext) { this .readerContext = readerContext; this .doRegisterBeanDefinitions(doc.getDocumentElement()); }
进入this.doRegisterBeanDefinitions(doc.getDocumentElement())方法:
1 2 3 4 5 6 7 8 9 10 11 12 13 14 15 16 17 18 19 20 21 22 protected void doRegisterBeanDefinitions (Element root) { BeanDefinitionParserDelegate parent = this .delegate; this .delegate = this .createDelegate(this .getReaderContext(), root, parent); if (this .delegate.isDefaultNamespace(root)) { String profileSpec = root.getAttribute("profile" ); if (StringUtils.hasText(profileSpec)) { String[] specifiedProfiles = StringUtils.tokenizeToStringArray(profileSpec, ",; " ); if (!this .getReaderContext().getEnvironment().acceptsProfiles(specifiedProfiles)) { if (this .logger.isDebugEnabled()) { this .logger.debug("Skipped XML bean definition file due to specified profiles [" + profileSpec + "] not matching: " + this .getReaderContext().getResource()); } return ; } } } this .preProcessXml(root); this .parseBeanDefinitions(root, this .delegate); this .postProcessXml(root); this .delegate = parent; }
进入this.parseBeanDefinitions(root, this.delegate)方法:
1 2 3 4 5 6 7 8 9 10 11 12 13 14 15 16 17 18 19 20 protected void parseBeanDefinitions (Element root, BeanDefinitionParserDelegate delegate) { if (delegate.isDefaultNamespace(root)) { NodeList nl = root.getChildNodes(); for (int i = 0 ; i < nl.getLength(); ++i) { Node node = nl.item(i); if (node instanceof Element) { Element ele = (Element)node; if (delegate.isDefaultNamespace(ele)) { this .parseDefaultElement(ele, delegate); } else { delegate.parseCustomElement(ele); } } } } else { delegate.parseCustomElement(root); } }
进入this.parseDefaultElement(ele, delegate)方法:
1 2 3 4 5 6 7 8 9 10 11 12 private void parseDefaultElement (Element ele, BeanDefinitionParserDelegate delegate) { if (delegate.nodeNameEquals(ele, "import" )) { this .importBeanDefinitionResource(ele); } else if (delegate.nodeNameEquals(ele, "alias" )) { this .processAliasRegistration(ele); } else if (delegate.nodeNameEquals(ele, "bean" )) { this .processBeanDefinition(ele, delegate); } else if (delegate.nodeNameEquals(ele, "beans" )) { this .doRegisterBeanDefinitions(ele); } }
我们可以看到,这里开始解析各种标签,如import、alias、bean等…
进入解析Bean标签的this.processBeanDefinition(ele, delegate)方法:
1 2 3 4 5 6 7 8 9 10 11 12 13 14 15 16 17 protected void processBeanDefinition (Element ele, BeanDefinitionParserDelegate delegate) { BeanDefinitionHolder bdHolder = delegate.parseBeanDefinitionElement(ele); if (bdHolder != null ) { bdHolder = delegate.decorateBeanDefinitionIfRequired(ele, bdHolder); try { BeanDefinitionReaderUtils.registerBeanDefinition(bdHolder, this .getReaderContext().getRegistry()); } catch (BeanDefinitionStoreException var5) { this .getReaderContext().error("Failed to register bean definition with name '" + bdHolder.getBeanName() + "'" , ele, var5); } this .getReaderContext().fireComponentRegistered(new BeanComponentDefinition (bdHolder)); } }
首先进入delegate.parseBeanDefinitionElement(ele)方法:
1 2 3 4 @Nullable public BeanDefinitionHolder parseBeanDefinitionElement (Element ele) { return this .parseBeanDefinitionElement(ele, (BeanDefinition)null ); }
再进入重载的this.parseBeanDefinitionElement(ele, (BeanDefinition)null)方法:
1 2 3 4 5 6 7 8 9 10 11 12 13 14 15 16 17 18 19 20 21 22 23 24 25 26 27 28 29 30 31 32 33 34 35 36 37 38 39 40 41 42 43 44 45 46 47 48 49 50 51 52 53 @Nullable public BeanDefinitionHolder parseBeanDefinitionElement (Element ele, @Nullable BeanDefinition containingBean) { String id = ele.getAttribute("id" ); String nameAttr = ele.getAttribute("name" ); List<String> aliases = new ArrayList (); if (StringUtils.hasLength(nameAttr)) { String[] nameArr = StringUtils.tokenizeToStringArray(nameAttr, ",; " ); aliases.addAll(Arrays.asList(nameArr)); } String beanName = id; if (!StringUtils.hasText(id) && !aliases.isEmpty()) { beanName = (String)aliases.remove(0 ); if (this .logger.isTraceEnabled()) { this .logger.trace("No XML 'id' specified - using '" + beanName + "' as bean name and " + aliases + " as aliases" ); } } if (containingBean == null ) { this .checkNameUniqueness(beanName, aliases, ele); } AbstractBeanDefinition beanDefinition = this .parseBeanDefinitionElement(ele, beanName, containingBean); if (beanDefinition != null ) { if (!StringUtils.hasText(beanName)) { try { if (containingBean != null ) { beanName = BeanDefinitionReaderUtils.generateBeanName(beanDefinition, this .readerContext.getRegistry(), true ); } else { beanName = this .readerContext.generateBeanName(beanDefinition); String beanClassName = beanDefinition.getBeanClassName(); if (beanClassName != null && beanName.startsWith(beanClassName) && beanName.length() > beanClassName.length() && !this .readerContext.getRegistry().isBeanNameInUse(beanClassName)) { aliases.add(beanClassName); } } if (this .logger.isTraceEnabled()) { this .logger.trace("Neither XML 'id' nor 'name' specified - using generated bean name [" + beanName + "]" ); } } catch (Exception var9) { this .error(var9.getMessage(), ele); return null ; } } String[] aliasesArray = StringUtils.toStringArray(aliases); return new BeanDefinitionHolder (beanDefinition, beanName, aliasesArray); } else { return null ; } }
进入this.parseBeanDefinitionElement(ele, beanName, containingBean)方法:
1 2 3 4 5 6 7 8 9 10 11 12 13 14 15 16 17 18 19 20 21 22 23 24 25 26 27 28 29 30 31 32 33 34 35 36 37 38 39 40 41 42 43 @Nullable public AbstractBeanDefinition parseBeanDefinitionElement (Element ele, String beanName, @Nullable BeanDefinition containingBean) { this .parseState.push(new BeanEntry (beanName)); String className = null ; if (ele.hasAttribute("class" )) { className = ele.getAttribute("class" ).trim(); } String parent = null ; if (ele.hasAttribute("parent" )) { parent = ele.getAttribute("parent" ); } try { AbstractBeanDefinition bd = this .createBeanDefinition(className, parent); this .parseBeanDefinitionAttributes(ele, beanName, containingBean, bd); bd.setDescription(DomUtils.getChildElementValueByTagName(ele, "description" )); this .parseMetaElements(ele, bd); this .parseLookupOverrideSubElements(ele, bd.getMethodOverrides()); this .parseReplacedMethodSubElements(ele, bd.getMethodOverrides()); this .parseConstructorArgElements(ele, bd); this .parsePropertyElements(ele, bd); this .parseQualifierElements(ele, bd); bd.setResource(this .readerContext.getResource()); bd.setSource(this .extractSource(ele)); AbstractBeanDefinition var7 = bd; return var7; } catch (ClassNotFoundException var13) { this .error("Bean class [" + className + "] not found" , ele, var13); } catch (NoClassDefFoundError var14) { this .error("Class that bean class [" + className + "] depends on not found" , ele, var14); } catch (Throwable var15) { this .error("Unexpected failure during bean definition parsing" , ele, var15); } finally { this .parseState.pop(); } return null ; }
这个方法解析了bean标签,包括标签上的属性,以及子标签,最后返回了一个AbstractBeanDefinition。
回到DefaultBeanDefinitionDocumentReader类中的processBeanDefinition(Element ele, BeanDefinitionParserDelegate delegate)方法:
1 2 3 4 5 6 7 8 9 10 11 12 13 14 15 protected void processBeanDefinition (Element ele, BeanDefinitionParserDelegate delegate) { BeanDefinitionHolder bdHolder = delegate.parseBeanDefinitionElement(ele); if (bdHolder != null ) { bdHolder = delegate.decorateBeanDefinitionIfRequired(ele, bdHolder); try { BeanDefinitionReaderUtils.registerBeanDefinition(bdHolder, this .getReaderContext().getRegistry()); } catch (BeanDefinitionStoreException var5) { this .getReaderContext().error("Failed to register bean definition with name '" + bdHolder.getBeanName() + "'" , ele, var5); } this .getReaderContext().fireComponentRegistered(new BeanComponentDefinition (bdHolder)); } }
进入BeanDefinitionReaderUtils.registerBeanDefinition(bdHolder, this.getReaderContext().getRegistry())方法:
1 2 3 4 5 6 7 8 9 10 11 12 13 14 15 public static void registerBeanDefinition (BeanDefinitionHolder definitionHolder, BeanDefinitionRegistry registry) throws BeanDefinitionStoreException { String beanName = definitionHolder.getBeanName(); registry.registerBeanDefinition(beanName, definitionHolder.getBeanDefinition()); String[] aliases = definitionHolder.getAliases(); if (aliases != null ) { String[] var4 = aliases; int var5 = aliases.length; for (int var6 = 0 ; var6 < var5; ++var6) { String alias = var4[var6]; registry.registerAlias(beanName, alias); } } }
进入registry.registerBeanDefinition(beanName, definitionHolder.getBeanDefinition())方法:
1 2 3 4 5 6 7 8 9 10 11 12 13 14 15 16 17 18 19 20 21 22 23 24 25 26 27 28 29 30 31 32 33 34 35 36 37 38 39 40 41 42 43 44 45 46 47 48 49 50 51 52 53 54 55 56 57 58 59 public void registerBeanDefinition (String beanName, BeanDefinition beanDefinition) throws BeanDefinitionStoreException { Assert.hasText(beanName, "Bean name must not be empty" ); Assert.notNull(beanDefinition, "BeanDefinition must not be null" ); if (beanDefinition instanceof AbstractBeanDefinition) { try { ((AbstractBeanDefinition)beanDefinition).validate(); } catch (BeanDefinitionValidationException var8) { throw new BeanDefinitionStoreException (beanDefinition.getResourceDescription(), beanName, "Validation of bean definition failed" , var8); } } BeanDefinition existingDefinition = (BeanDefinition)this .beanDefinitionMap.get(beanName); if (existingDefinition != null ) { if (!this .isAllowBeanDefinitionOverriding()) { throw new BeanDefinitionOverrideException (beanName, beanDefinition, existingDefinition); } if (existingDefinition.getRole() < beanDefinition.getRole()) { if (this .logger.isInfoEnabled()) { this .logger.info("Overriding user-defined bean definition for bean '" + beanName + "' with a framework-generated bean definition: replacing [" + existingDefinition + "] with [" + beanDefinition + "]" ); } } else if (!beanDefinition.equals(existingDefinition)) { if (this .logger.isDebugEnabled()) { this .logger.debug("Overriding bean definition for bean '" + beanName + "' with a different definition: replacing [" + existingDefinition + "] with [" + beanDefinition + "]" ); } } else if (this .logger.isTraceEnabled()) { this .logger.trace("Overriding bean definition for bean '" + beanName + "' with an equivalent definition: replacing [" + existingDefinition + "] with [" + beanDefinition + "]" ); } this .beanDefinitionMap.put(beanName, beanDefinition); } else { if (this .hasBeanCreationStarted()) { synchronized (this .beanDefinitionMap) { this .beanDefinitionMap.put(beanName, beanDefinition); List<String> updatedDefinitions = new ArrayList (this .beanDefinitionNames.size() + 1 ); updatedDefinitions.addAll(this .beanDefinitionNames); updatedDefinitions.add(beanName); this .beanDefinitionNames = updatedDefinitions; this .removeManualSingletonName(beanName); } } else { this .beanDefinitionMap.put(beanName, beanDefinition); this .beanDefinitionNames.add(beanName); this .removeManualSingletonName(beanName); } this .frozenBeanDefinitionNames = null ; } if (existingDefinition == null && !this .containsSingleton(beanName)) { if (this .isConfigurationFrozen()) { this .clearByTypeCache(); } } else { this .resetBeanDefinition(beanName); } }
注意这两行代码:
1 2 this .beanDefinitionMap.put(beanName, beanDefinition);this .beanDefinitionNames.add(beanName);
就是将beanName与beanDefinition的映射放入beanDefinitionMap中,beanName放入beanDefinitionNames中,我们可以在DefaultListableBeanFactory类中通过这两个容器拿到对应属性。
FileSystemXmlApplicationContext
使用演示
1 2 3 4 5 6 7 8 9 10 11 12 13 14 15 16 private static void testFileSystemXmlApplicationContext () { FileSystemXmlApplicationContext context = new FileSystemXmlApplicationContext ( "src\\main\\resources\\a02.xml" ); for (String name : context.getBeanDefinitionNames()) { System.out.println(name); } System.out.println(context.getBean(Bean2.class).getBean1()); }
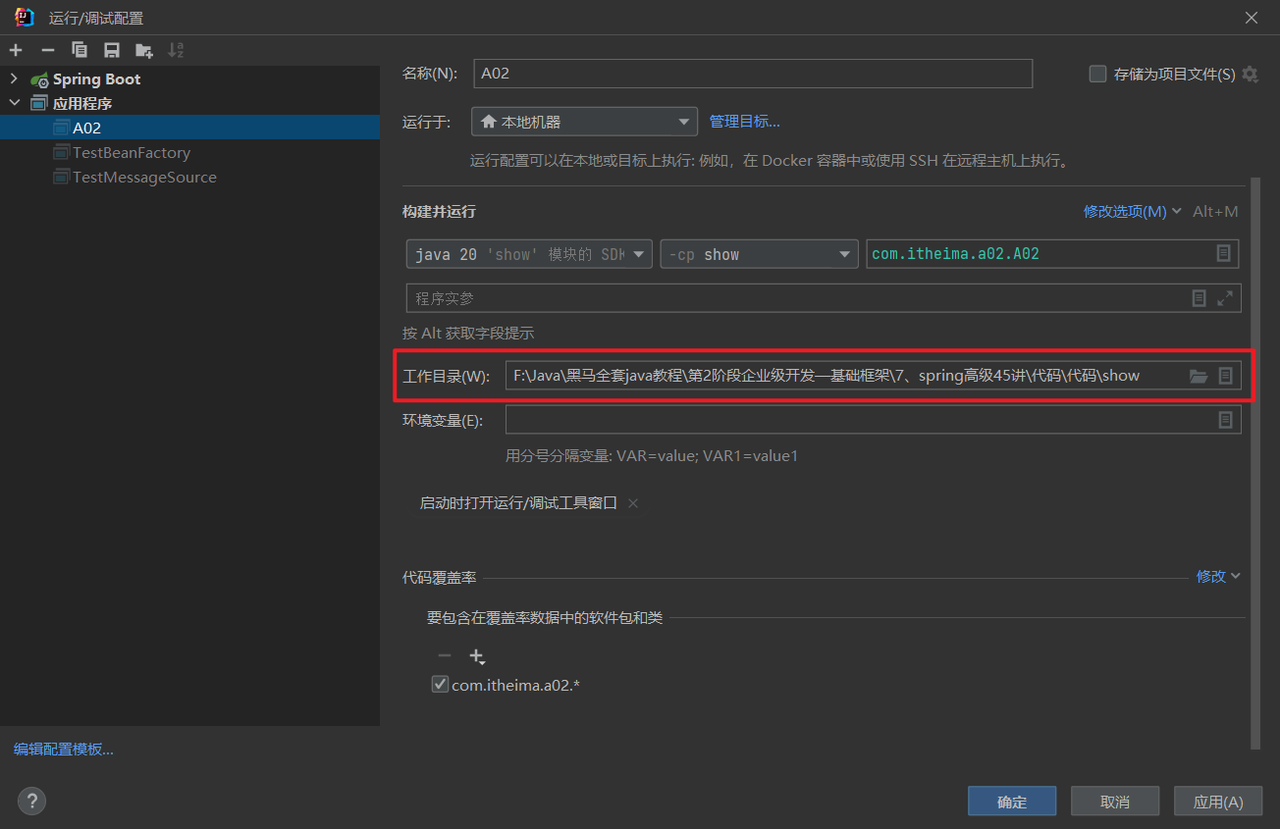
注意:使用相对路径时我们要指定工作目录为当前模块(默认为当前项目):
控制台输出:
1 2 3 bean1 bean2 com.itheima.a02.A02$Bean1@1de5f259
我们发现Bean已经成功地被注入。
源码剖析
大致步骤和ClassPathXmlApplicationContext加载配置文件过程类似,不同的是在AbstractXmlApplicationContext中的loadBeanDefinitions(DefaultListableBeanFactory beanFactory)方法:
1 2 3 4 5 6 7 8 protected void loadBeanDefinitions (DefaultListableBeanFactory beanFactory) throws BeansException, IOException { XmlBeanDefinitionReader beanDefinitionReader = new XmlBeanDefinitionReader (beanFactory); beanDefinitionReader.setEnvironment(this .getEnvironment()); beanDefinitionReader.setResourceLoader(this ); beanDefinitionReader.setEntityResolver(new ResourceEntityResolver (this )); this .initBeanDefinitionReader(beanDefinitionReader); this .loadBeanDefinitions(beanDefinitionReader); }
在beanDefinitionReader.setResourceLoader(this)时,使用ClassPathXmlApplicationContext则代表ClassPathXmlApplicationContext实例,使用FileSystemXmlApplicationContext时则代表FileSystemXmlApplicationContext实例。
进入this.loadBeanDefinitions(beanDefinitionReader)方法:
1 2 3 4 5 6 7 8 9 10 11 12 protected void loadBeanDefinitions (XmlBeanDefinitionReader reader) throws BeansException, IOException { Resource[] configResources = this .getConfigResources(); if (configResources != null ) { reader.loadBeanDefinitions(configResources); } String[] configLocations = this .getConfigLocations(); if (configLocations != null ) { reader.loadBeanDefinitions(configLocations); } }
再进入reader.loadBeanDefinitions(configLocations)方法:
1 2 3 4 5 6 7 8 9 10 11 12 13 public int loadBeanDefinitions (String... locations) throws BeanDefinitionStoreException { Assert.notNull(locations, "Location array must not be null" ); int count = 0 ; String[] var3 = locations; int var4 = locations.length; for (int var5 = 0 ; var5 < var4; ++var5) { String location = var3[var5]; count += this .loadBeanDefinitions(location); } return count; }
再进入this.loadBeanDefinitions(location)方法:
1 2 3 public int loadBeanDefinitions (String location) throws BeanDefinitionStoreException { return this .loadBeanDefinitions(location, (Set)null ); }
再进入this.loadBeanDefinitions(location, (Set)null)方法
1 2 3 4 5 6 7 8 9 10 11 12 13 14 15 16 17 18 19 20 21 22 23 24 25 26 27 28 29 30 public int loadBeanDefinitions (String location, @Nullable Set<Resource> actualResources) throws BeanDefinitionStoreException { ResourceLoader resourceLoader = this .getResourceLoader(); if (resourceLoader == null ) { throw new BeanDefinitionStoreException ("Cannot load bean definitions from location [" + location + "]: no ResourceLoader available" ); } else { int count; if (resourceLoader instanceof ResourcePatternResolver) { try { Resource[] resources = ((ResourcePatternResolver)resourceLoader).getResources(location); count = this .loadBeanDefinitions(resources); if (actualResources != null ) { Collections.addAll(actualResources, resources); } if (this .logger.isTraceEnabled()) { this .logger.trace("Loaded " + count + " bean definitions from location pattern [" + location + "]" ); } return count; } catch (IOException var6) { throw new BeanDefinitionStoreException ("Could not resolve bean definition resource pattern [" + location + "]" , var6); } } else { } } }
ClassPathXmlApplicationContext和FileSystemXmlApplicationContext既实现了ResourceLoader接口,又实现了ResourcePatternResolver接口
ClassPathXmlApplicationContext的类结构图:
FileSystemXmlApplicationContext的类结构图:
ClassPathXmlApplicationContext和FileSystemXmlApplicationContext的间接父类AbstractApplicationContext实现了getResources(location)方法:
1
2
3
public Resource[] getResources(String locationPattern) throws IOException { return this .resourcePatternResolver.getResources(locationPattern); }
进入this.resourcePatternResolver.getResources(locationPattern)方法(实际上进入的时PathMatchingResourcePatternResolver方法
1 2 3 4 5 6 7 8 9 public Resource[] getResources(String locationPattern) throws IOException { Assert.notNull(locationPattern, "Location pattern must not be null" ); if (locationPattern.startsWith("classpath*:" )) { return this .getPathMatcher().isPattern(locationPattern.substring("classpath*:" .length())) ? this .findPathMatchingResources(locationPattern) : this .findAllClassPathResources(locationPattern.substring("classpath*:" .length())); } else { int prefixEnd = locationPattern.startsWith("war:" ) ? locationPattern.indexOf("*/" ) + 1 : locationPattern.indexOf(58 ) + 1 ; return this .getPathMatcher().isPattern(locationPattern.substring(prefixEnd)) ? this .findPathMatchingResources(locationPattern) : new Resource []{this .getResourceLoader().getResource(locationPattern)}; } }
注意this.getResourceLoader().getResource(locationPattern),会调用DefaultResourceLoader类的getResource(locationPattern)方法:
1 2 3 4 5 6 7 8 9 10 11 12 13 14 15 16 17 18 19 20 21 22 23 24 25 26 27 28 29 public Resource getResource (String location) { Assert.notNull(location, "Location must not be null" ); Iterator var2 = this .getProtocolResolvers().iterator(); Resource resource; do { if (!var2.hasNext()) { if (location.startsWith("/" )) { return this .getResourceByPath(location); } if (location.startsWith("classpath:" )) { return new ClassPathResource (location.substring("classpath:" .length()), this .getClassLoader()); } try { URL url = new URL (location); return (Resource)(ResourceUtils.isFileURL(url) ? new FileUrlResource (url) : new UrlResource (url)); } catch (MalformedURLException var5) { return this .getResourceByPath(location); } } ProtocolResolver protocolResolver = (ProtocolResolver)var2.next(); resource = protocolResolver.resolve(location, this ); } while (resource == null ); return resource; }
ClassPathXmlApplicationContext使用的是DefaultResourceLoader类的getResourceByPath(location)方法:
1 2 3 4 5 6 7 8 9 10 11 12 13 14 15 16 17 18 19 20 21 22 23 24 25 protected Resource getResourceByPath (String path) { return new ClassPathContextResource (path, this .getClassLoader()); } protected static class ClassPathContextResource extends ClassPathResource implements ContextResource { public ClassPathContextResource (String path, @Nullable ClassLoader classLoader) { super (path, classLoader); } } public class ClassPathResource extends AbstractFileResolvingResource { public ClassPathResource (String path, @Nullable ClassLoader classLoader) { Assert.notNull(path, "Path must not be null" ); String pathToUse = StringUtils.cleanPath(path); if (pathToUse.startsWith("/" )) { pathToUse = pathToUse.substring(1 ); } this .path = pathToUse; this .classLoader = classLoader != null ? classLoader : ClassUtils.getDefaultClassLoader(); } }
而FileSystemXmlApplicationContext重写了getResourceByPath(location)方法:
1 2 3 4 5 6 7 8 9 10 11 12 13 14 15 16 17 18 19 20 21 22 23 protected Resource getResourceByPath (String path) { if (path.startsWith("/" )) { path = path.substring(1 ); } return new FileSystemResource (path); } public class FileSystemResource extends AbstractResource implements WritableResource { private final String path; @Nullable private final File file; private final Path filePath; public FileSystemResource (String path) { Assert.notNull(path, "Path must not be null" ); this .path = StringUtils.cleanPath(path); this .file = new File (path); this .filePath = this .file.toPath(); } }
ClassPathXmlApplicationContext与FileSystemXmlApplicationContext返回的是不同的Resource 。
AnnotationConfigApplicationContext
使用演示
准备配置类,并加上注解:
1 2 3 4 5 6 7 8 9 10 11 12 13 14 @Configuration static class Config { @Bean public Bean1 bean1 () { return new Bean1 (); } @Bean public Bean2 bean2 (Bean1 bean1) { Bean2 bean2 = new Bean2 (); bean2.setBean1(bean1); return bean2; } }
测试:
1 2 3 4 5 6 7 8 9 10 11 private static void testAnnotationConfigApplicationContext () { AnnotationConfigApplicationContext context = new AnnotationConfigApplicationContext (Config.class); for (String name : context.getBeanDefinitionNames()) { System.out.println(name); } System.out.println(context.getBean(Bean2.class).getBean1()); }
控制台输出:
1 2 3 4 5 6 7 8 9 org.springframework.context.annotation.internalConfigurationAnnotationProcessor org.springframework.context.annotation.internalAutowiredAnnotationProcessor org.springframework.context.annotation.internalCommonAnnotationProcessor org.springframework.context.event.internalEventListenerProcessor org.springframework.context.event.internalEventListenerFactory a02.Config bean1 bean2 com.itheima.a02.A02$Bean1@12591ac8
我们发现除了注入了添加了注解的Bean,还注入了一些后处理器,这是由Spring主动给我们注入的。
配置xml的时候也可以通过标签去加入这些后处理器:
1 <context:annotation-config />
源码剖析
AnnotationConfigServletWebServerApplicationContext
使用演示
准备配置类,并加上注解:
1 2 3 4 5 6 7 8 9 10 11 12 13 14 15 16 17 18 19 20 21 22 23 24 25 26 @Configuration static class WebConfig { @Bean public ServletWebServerFactory servletWebServerFactory () { return new TomcatServletWebServerFactory (); } @Bean public DispatcherServlet dispatcherServlet () { return new DispatcherServlet (); } @Bean public DispatcherServletRegistrationBean registrationBean (DispatcherServlet dispatcherServlet) { return new DispatcherServletRegistrationBean (dispatcherServlet, "/" ); } @Bean("/hello") public Controller controller1 () { return (request, response) -> { response.getWriter().print("hello" ); return null ; }; } }
控制台输出:
1 2 3 4 5 6 7 8 9 10 11 12 13 14 15 16 17 18 19 20 21 22 23 [INFO ] 15:18:51.535 [main] o.s.b.w.e.tomcat.TomcatWebServer - Tomcat initialized with port(s): 8080 (http) 3�� 26, 2023 3:18:51 ���� org.apache.coyote.AbstractProtocol init ��Ϣ: Initializing ProtocolHandler ["http-nio-8080"] 3�� 26, 2023 3:18:51 ���� org.apache.catalina.core.StandardService startInternal ��Ϣ: Starting service [Tomcat] 3�� 26, 2023 3:18:51 ���� org.apache.catalina.core.StandardEngine startInternal ��Ϣ: Starting Servlet engine: [Apache Tomcat/9.0.53] 3�� 26, 2023 3:18:51 ���� org.apache.catalina.core.ApplicationContext log ��Ϣ: Initializing Spring embedded WebApplicationContext [INFO ] 15:18:51.682 [main] o.s.b.w.s.c.ServletWebServerApplicationContext - Root WebApplicationContext: initialization completed in 814 ms 3�� 26, 2023 3:18:51 ���� org.apache.coyote.AbstractProtocol start ��Ϣ: Starting ProtocolHandler ["http-nio-8080"] [INFO ] 15:18:51.804 [main] o.s.b.w.e.tomcat.TomcatWebServer - Tomcat started on port(s): 8080 (http) with context path '' org.springframework.context.annotation.internalConfigurationAnnotationProcessor org.springframework.context.annotation.internalAutowiredAnnotationProcessor org.springframework.context.annotation.internalCommonAnnotationProcessor org.springframework.context.event.internalEventListenerProcessor org.springframework.context.event.internalEventListenerFactory a02.WebConfig servletWebServerFactory dispatcherServlet registrationBean /hello
我们发现tomcat也打印了很多日志,监听了8080端口,尝试访问localhost:8080/hello,浏览器返回:
说明生效了。
源码剖析
Bean的生命周期 Bean的生命周期 准备Component:
1 2 3 4 5 6 7 8 9 10 11 12 13 14 15 16 17 18 19 20 21 22 23 @Component public class LifeCycleBean { private static final Logger log = LoggerFactory.getLogger(LifeCycleBean.class); public LifeCycleBean () { log.debug("构造" ); } @Autowired public void autowire (@Value("${JAVA_HOME}") String home) { log.debug("依赖注入: {}" , home); } @PostConstruct public void init () { log.debug("初始化" ); } @PreDestroy public void destroy () { log.debug("销毁" ); } }
编写启动类:
1 2 3 4 5 6 7 @SpringBootApplication public class A03 { public static void main (String[] args) { ConfigurableApplicationContext context = SpringApplication.run(A03.class, args); context.close(); } }
运行main()方法,查看控制台输出:
1 2 3 4 5 6 //... [DEBUG] 15:30:04.169 [main] com.itheima.a03.LifeCycleBean - 构造 [DEBUG] 15:30:04.172 [main] com.itheima.a03.LifeCycleBean - 依赖注入: C:\Path\jdk-14.0.1 [DEBUG] 15:30:04.173 [main] com.itheima.a03.LifeCycleBean - 初始化 //... [DEBUG] 15:30:04.755 [main] com.itheima.a03.LifeCycleBean - 销毁
发现执行顺序是(即Bean生命周期的四个阶段):
构造方法
@Autowired依赖注入@PostConstruct初始化@PreDestroy销毁
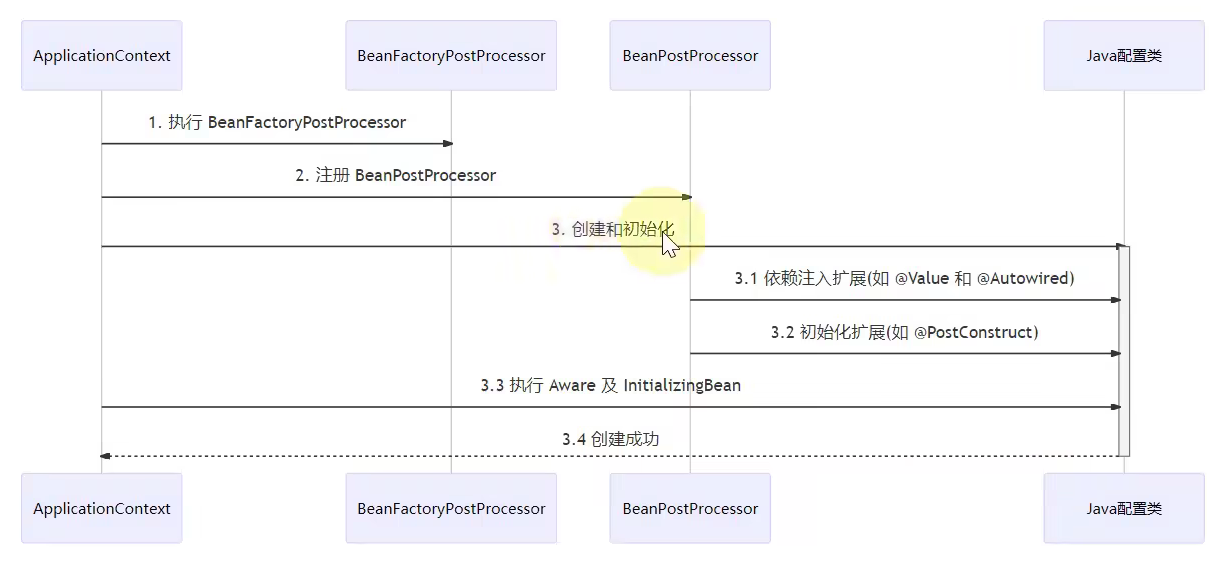
Spring的BeanFactory默认只有一些核心功能,扩展功能是通过后处理器来实现的。有BeanFacotry后处理器与Bean后处理器。BeanFactory后处理器主要补充BeanFactory的一些定义,Bean后处理器主要提供Bean的生命周期各个阶段的扩展。
这里主要演示Bean后处理器的使用:
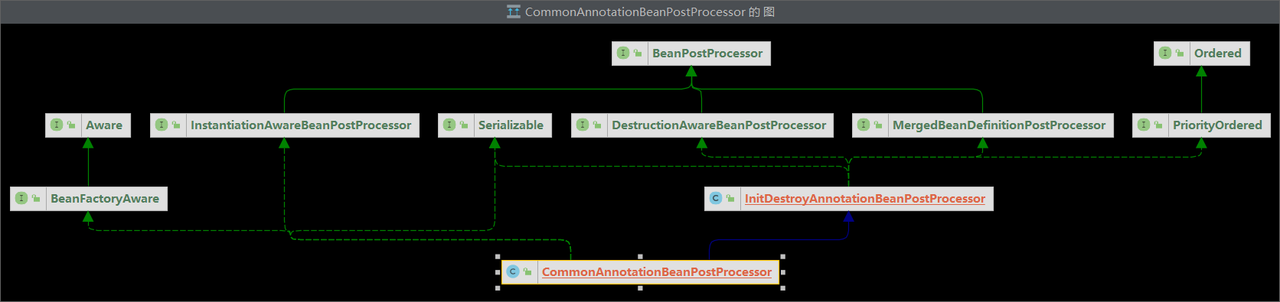
InstantiationAwareBeanPostProcessor类和DestructionAwareBeanPostProcessor类都继承了BeanPostProcessor接口
1 2 3 4 5 6 7 8 9 10 11 12 13 14 15 16 17 18 19 20 21 22 23 24 25 26 27 28 29 30 31 32 33 34 35 36 37 38 39 40 41 42 43 44 45 46 47 48 @Component public class MyBeanPostProcessor implements InstantiationAwareBeanPostProcessor , DestructionAwareBeanPostProcessor { private static final Logger log = LoggerFactory.getLogger(MyBeanPostProcessor.class); @Override public void postProcessBeforeDestruction (Object bean, String beanName) throws BeansException { if (beanName.equals("lifeCycleBean" )) log.debug("<<<<<< 销毁之前执行, 如 @PreDestroy" ); } @Override public Object postProcessBeforeInstantiation (Class<?> beanClass, String beanName) throws BeansException { if (beanName.equals("lifeCycleBean" )) log.debug("<<<<<< 实例化之前执行, 这里返回的对象会替换掉原本的 bean" ); return null ; } @Override public boolean postProcessAfterInstantiation (Object bean, String beanName) throws BeansException { if (beanName.equals("lifeCycleBean" )) { log.debug("<<<<<< 实例化之后执行, 这里如果返回 false 会跳过依赖注入阶段" ); } return true ; } @Override public PropertyValues postProcessProperties (PropertyValues pvs, Object bean, String beanName) throws BeansException { if (beanName.equals("lifeCycleBean" )) log.debug("<<<<<< 依赖注入阶段执行, 如 @Autowired、@Value、@Resource" ); return pvs; } @Override public Object postProcessBeforeInitialization (Object bean, String beanName) throws BeansException { if (beanName.equals("lifeCycleBean" )) log.debug("<<<<<< 初始化之前执行, 这里返回的对象会替换掉原本的 bean, 如 @PostConstruct、@ConfigurationProperties" ); return bean; } @Override public Object postProcessAfterInitialization (Object bean, String beanName) throws BeansException { if (beanName.equals("lifeCycleBean" )) log.debug("<<<<<< 初始化之后执行, 这里返回的对象会替换掉原本的 bean, 如代理增强" ); return bean; } }
运行main()方法,查看控制台输出:
1 2 3 4 5 6 7 8 9 10 11 [DEBUG] 15:42:57.321 [main] com.itheima.a03.MyBeanPostProcessor - <<<<<< 实例化之前执行, 这里返回的对象会替换掉原本的 bean [DEBUG] 15:42:57.323 [main] com.itheima.a03.LifeCycleBean - 构造 [DEBUG] 15:42:57.325 [main] com.itheima.a03.MyBeanPostProcessor - <<<<<< 实例化之后执行, 这里如果返回 false 会跳过依赖注入阶段 [DEBUG] 15:42:57.325 [main] com.itheima.a03.MyBeanPostProcessor - <<<<<< 依赖注入阶段执行, 如 @Autowired、@Value、@Resource [DEBUG] 15:42:57.326 [main] com.itheima.a03.LifeCycleBean - 依赖注入: C:\Path\jdk-14.0.1 [DEBUG] 15:42:57.328 [main] com.itheima.a03.MyBeanPostProcessor - <<<<<< 初始化之前执行, 这里返回的对象会替换掉原本的 bean, 如 @PostConstruct、@ConfigurationProperties [DEBUG] 15:42:57.328 [main] com.itheima.a03.LifeCycleBean - 初始化 [DEBUG] 15:42:57.328 [main] com.itheima.a03.MyBeanPostProcessor - <<<<<< 初始化之后执行, 这里返回的对象会替换掉原本的 bean, 如代理增强 //... [DEBUG] 15:42:57.972 [main] com.itheima.a03.MyBeanPostProcessor - <<<<<< 销毁之前执行, 如 @PreDestroy [DEBUG] 15:42:57.973 [main] com.itheima.a03.LifeCycleBean - 销毁
可以观察到功能增强方法调用的各个时机。
模板方法模式 准备类:
1 2 3 4 5 6 7 8 9 10 11 12 13 14 15 16 public class TestMethodTemplate { public static void main (String[] args) { } static class MyBeanFactory { public Object getBean () { Object bean = new Object (); System.out.println("构造 " + bean); System.out.println("依赖注入 " + bean); System.out.println("初始化 " + bean); return bean; } } }
以上类,如果我们想要增加getBean()方法的功能,我们必须要更改getBean()方法的代码,会使得getBean()方法越来越臃肿。
因此,我们可以在代码中织入可能增强的操作:
1 2 3 4 5 6 7 8 9 10 11 12 13 14 15 16 17 18 19 20 21 22 23 24 25 26 27 28 29 30 31 32 33 public class TestMethodTemplate { public static void main (String[] args) { MyBeanFactory beanFactory = new MyBeanFactory (); beanFactory.addBeanPostProcessor(bean -> System.out.println("解析 @Autowired" )); beanFactory.addBeanPostProcessor(bean -> System.out.println("解析 @Resource" )); beanFactory.getBean(); } static class MyBeanFactory { public Object getBean () { Object bean = new Object (); System.out.println("构造 " + bean); System.out.println("依赖注入 " + bean); for (BeanPostProcessor processor : processors) { processor.inject(bean); } System.out.println("初始化 " + bean); return bean; } private List<BeanPostProcessor> processors = new ArrayList <>(); public void addBeanPostProcessor (BeanPostProcessor processor) { processors.add(processor); } } static interface BeanPostProcessor { public void inject (Object bean) ; } }
不变的代码是模板,可变的就是增强的功能,这就是模板方法模式。
Bean后处理器 常见的Bean后处理器 这里介绍常见的三个Bean后处理器:
AutowiredAnnotationBeanPostProcessor:主要用来解析@Autowired、@Value等注解。CommonAnnotationBeanPostProcessor:主要用来解析@Resource、@PostConstruct、@PreDestroy等注解。ConfigurationPropertiesBindingPostProcessor:主要提供属性绑定的功能。
准备类:
1 2 3 4 5 6 7 8 9 10 11 12 13 14 15 16 17 18 19 20 21 22 23 24 25 26 27 28 29 30 31 32 33 34 35 36 37 38 39 40 41 42 43 44 45 46 47 48 49 50 51 52 53 public class Bean1 { private static final Logger log = LoggerFactory.getLogger(Bean1.class); private Bean2 bean2; @Autowired public void setBean2 (Bean2 bean2) { log.debug("@Autowired 生效: {}" , bean2); this .bean2 = bean2; } @Autowired private Bean3 bean3; @Resource public void setBean3 (Bean3 bean3) { log.debug("@Resource 生效: {}" , bean3); this .bean3 = bean3; } private String home; @Autowired public void setHome (@Value("${JAVA_HOME}") String home) { log.debug("@Value 生效: {}" , home); this .home = home; } @PostConstruct public void init () { log.debug("@PostConstruct 生效" ); } @PreDestroy public void destroy () { log.debug("@PreDestroy 生效" ); } @Override public String toString () { return "Bean1{" + "bean2=" + bean2 + ", bean3=" + bean3 + ", home='" + home + '\'' + '}' ; } } public class Bean2 {} public class Bean3 {}
编写启动类:
1 2 3 4 5 6 7 8 9 10 11 12 13 14 15 16 17 18 19 public class A04 { public static void main (String[] args) { GenericApplicationContext context = new GenericApplicationContext (); context.registerBean("bean1" , Bean1.class); context.registerBean("bean2" , Bean2.class); context.registerBean("bean3" , Bean3.class); context.refresh(); context.close(); } }
启动main()方法,发现控制台输出为空,说明Bean1中的注解都没有生效。这是因为我们没有添加Bean的后处理器。
AutowiredAnnotationBeanPostProcessor
AutowiredAnnotationBeanPostProcessor主要用来解析@Autowired、@Value等注解。
我们添加以下代码:
1 2 3 4 context.getDefaultListableBeanFactory().setAutowireCandidateResolver(new ContextAnnotationAutowireCandidateResolver ()); context.registerBean(AutowiredAnnotationBeanPostProcessor.class);
启动main()方法,查看控制台,我们发现@Autowired、@Value等注解已经生效:
1 2 [DEBUG] 17:49:43.017 [main] com.itheima.a04.Bean1 - @Autowired 生效: com.itheima.a04.Bean2@6bf0219d [DEBUG] 17:49:43.041 [main] com.itheima.a04.Bean1 - @Value 生效: C:\Path\jdk-14.0.1
CommonAnnotationBeanPostProcessor
CommonAnnotationBeanPostProcessor:主要用来解析@Resource、@PostConstruct、@PreDestroy等注解。
我们添加以下代码:
1 context.registerBean(CommonAnnotationBeanPostProcessor.class);
启动main()方法,查看控制台,发现@Resource、@PostConstruct、@PreDestroy等注解已经生效:
1 2 3 4 5 [DEBUG] 17:53:58.129 [main] com.itheima.a04.Bean1 - @Resource 生效: com.itheima.a04.Bean3@1356d4d4 [DEBUG] 17:53:58.192 [main] com.itheima.a04.Bean1 - @Autowired 生效: com.itheima.a04.Bean2@3541cb24 [DEBUG] 17:53:58.225 [main] com.itheima.a04.Bean1 - @Value 生效: C:\Path\jdk-14.0.1 [DEBUG] 17:53:58.231 [main] com.itheima.a04.Bean1 - @PostConstruct 生效 [DEBUG] 17:53:58.255 [main] com.itheima.a04.Bean1 - @PreDestroy 生效
ConfigurationPropertiesBindingPostProcessor
ConfigurationPropertiesBindingPostProcessor主要提供属性绑定的功能。
我们准备以下代码:
1 2 3 4 5 6 7 8 9 10 11 12 13 14 15 16 17 18 19 20 21 22 23 24 25 26 27 28 29 30 31 @ConfigurationProperties(prefix = "java") public class Bean4 { private String home; private String version; public String getHome () { return home; } public void setHome (String home) { this .home = home; } public String getVersion () { return version; } public void setVersion (String version) { this .version = version; } @Override public String toString () { return "Bean4{" + "home='" + home + '\'' + ", version='" + version + '\'' + '}' ; } }
在main方法中加入:
1 2 3 ConfigurationPropertiesBindingPostProcessor.register(context.getDefaultListableBeanFactory()); System.out.println(context.getBean(Bean4.class));
启动main()方法,查看控制台,发现属性已经绑定到类中。
1 2 3 Bean4{home='C:\Path\jdk-20' , version='20' }
依赖注解后处理器执行流程 本节主要对AutowiredAnnotationBeanPostProcessor的执行流程进行分析。
findAutowiringMetadata()方法主要用来获取需要进行依赖注入的元信息。
首先准备代码:
1 2 3 4 5 6 7 8 9 10 11 12 13 14 15 16 17 18 19 20 public class DigInAutowired { public static void main (String[] args) throws Throwable { DefaultListableBeanFactory beanFactory = new DefaultListableBeanFactory (); beanFactory.registerSingleton("bean2" , new Bean2 ()); beanFactory.registerSingleton("bean3" , new Bean3 ()); beanFactory.setAutowireCandidateResolver(new ContextAnnotationAutowireCandidateResolver ()); beanFactory.addEmbeddedValueResolver(new StandardEnvironment ()::resolvePlaceholders); AutowiredAnnotationBeanPostProcessor processor = new AutowiredAnnotationBeanPostProcessor (); processor.setBeanFactory(beanFactory); Bean1 bean1 = new Bean1 (); System.out.println(bean1); processor.postProcessProperties(null , bean1, "bean1" ); System.out.println(bean1); } }
启动main()方法,查看控制台:
1 2 3 4 Bean1{bean2=null, bean3=null, home='null'} [DEBUG] 18:17:08.121 [main] com.itheima.a04.Bean1 - @Autowired 生效: com.itheima.a04.Bean2@175c2241 [DEBUG] 18:17:08.135 [main] com.itheima.a04.Bean1 - @Value 生效: C:\Path\jdk-14.0.1 Bean1{bean2=com.itheima.a04.Bean2@175c2241, bean3=com.itheima.a04.Bean3@6025e1b6, home='C:\Path\jdk-14.0.1'}
我们发现,在processor.postProcessProperties(null, bean1, "bean1")方法执行之前,Bean1并没有进行依赖注入,而执行之后成功执行了依赖注入。说明postProcessProperties(null, bean1, "bean1")方法是执行依赖注入的核心方法。
进入postProcessProperties()方法:
1 2 3 4 5 6 7 8 9 10 11 12 13 14 public PropertyValues postProcessProperties (PropertyValues pvs, Object bean, String beanName) { InjectionMetadata metadata = this .findAutowiringMetadata(beanName, bean.getClass(), pvs); try { metadata.inject(bean, beanName, pvs); return pvs; } catch (BeanCreationException var6) { throw var6; } catch (Throwable var7) { throw new BeanCreationException (beanName, "Injection of autowired dependencies failed" , var7); } }
我们可以使用反射手动调用findAutowiringMetadata()方法:
1 2 3 4 5 6 7 8 9 10 11 12 13 14 15 16 17 18 19 20 21 22 23 24 25 26 27 28 29 public class DigInAutowired { public static void main (String[] args) throws Throwable { DefaultListableBeanFactory beanFactory = new DefaultListableBeanFactory (); beanFactory.registerSingleton("bean2" , new Bean2 ()); beanFactory.registerSingleton("bean3" , new Bean3 ()); beanFactory.setAutowireCandidateResolver(new ContextAnnotationAutowireCandidateResolver ()); beanFactory.addEmbeddedValueResolver(new StandardEnvironment ()::resolvePlaceholders); AutowiredAnnotationBeanPostProcessor processor = new AutowiredAnnotationBeanPostProcessor (); processor.setBeanFactory(beanFactory); Bean1 bean1 = new Bean1 (); Method findAutowiringMetadata = AutowiredAnnotationBeanPostProcessor.class.getDeclaredMethod("findAutowiringMetadata" , String.class, Class.class, PropertyValues.class); findAutowiringMetadata.setAccessible(true ); InjectionMetadata metadata = (InjectionMetadata) findAutowiringMetadata.invoke(processor, "bean1" , Bean1.class, null ); System.out.println(metadata); metadata.inject(bean1, "bean1" , null ); System.out.println(bean1); } }
启动main()方法,查看控制台:
1 2 3 4 org.springframework.beans.factory.annotation.InjectionMetadata@7f0eb4b4 [DEBUG] 18 :20 :14.969 [main] com.itheima.a04.Bean1 - @Value 生效: C:\Path\jdk-14.0 .1 [DEBUG] 18 :20 :14.976 [main] com.itheima.a04.Bean1 - @Autowired 生效: com.itheima.a04.Bean2@1165b38 Bean1{bean2=com.itheima.a04.Bean2@1165b38, bean3=com.itheima.a04.Bean3@4c12331b, home='C:\Path\jdk-14.0.1' }
我们发现同样成功进行了依赖注入。
inject() inject()方法主要用来执行依赖注入,一般有三种注入方式:
准备代码:
1 2 3 4 5 6 7 8 9 10 11 12 13 14 15 16 17 18 19 20 21 22 23 24 25 26 27 28 29 30 31 32 33 34 35 36 37 38 39 40 41 42 43 44 45 46 47 48 public class DigInAutowired { public static void main (String[] args) throws Throwable { DefaultListableBeanFactory beanFactory = new DefaultListableBeanFactory (); beanFactory.registerSingleton("bean2" , new Bean2 ()); beanFactory.registerSingleton("bean3" , new Bean3 ()); beanFactory.setAutowireCandidateResolver(new ContextAnnotationAutowireCandidateResolver ()); beanFactory.addEmbeddedValueResolver(new StandardEnvironment ()::resolvePlaceholders); AutowiredAnnotationBeanPostProcessor processor = new AutowiredAnnotationBeanPostProcessor (); processor.setBeanFactory(beanFactory); Bean1 bean1 = new Bean1 (); Method findAutowiringMetadata = AutowiredAnnotationBeanPostProcessor.class.getDeclaredMethod("findAutowiringMetadata" , String.class, Class.class, PropertyValues.class); findAutowiringMetadata.setAccessible(true ); InjectionMetadata metadata = (InjectionMetadata) findAutowiringMetadata.invoke(processor, "bean1" , Bean1.class, null ); System.out.println(metadata); Field bean3 = Bean1.class.getDeclaredField("bean3" ); DependencyDescriptor dd1 = new DependencyDescriptor (bean3, false ); Object o = beanFactory.doResolveDependency(dd1, null , null , null ); System.out.println(o); Method setBean2 = Bean1.class.getDeclaredMethod("setBean2" , Bean2.class); DependencyDescriptor dd2 = new DependencyDescriptor (new MethodParameter (setBean2, 0 ), true ); Object o1 = beanFactory.doResolveDependency(dd2, null , null , null ); System.out.println(o1); Method setHome = Bean1.class.getDeclaredMethod("setHome" , String.class); DependencyDescriptor dd3 = new DependencyDescriptor (new MethodParameter (setHome, 0 ), true ); Object o2 = beanFactory.doResolveDependency(dd3, null , null , null ); System.out.println(o2); } }
启动main()方法,查看控制台:
1 2 3 4 org.springframework.beans.factory.annotation.InjectionMetadata@7f0eb4b4 com.itheima.a04.Bean3@7b2bbc3 com.itheima.a04.Bean2@1aafa419 C:\Path\jdk-14.0.1
BeanFactory后处理器 常用后处理器 在com.itheima.a05.component包下创建类:
1 2 3 4 5 6 7 8 9 10 11 12 13 14 15 16 17 18 19 20 21 22 23 24 25 26 27 28 @Component public class Bean2 { private static final Logger log = LoggerFactory.getLogger(Bean2.class); public Bean2 () { log.debug("我被 Spring 管理啦" ); } } @Controller public class Bean3 { private static final Logger log = LoggerFactory.getLogger(Bean3.class); public Bean3 () { log.debug("我被 Spring 管理啦" ); } } public class Bean4 { private static final Logger log = LoggerFactory.getLogger(Bean4.class); public Bean4 () { log.debug("我被 Spring 管理啦" ); } }
在com.itheima.a05包下创建类:
1 2 3 4 5 6 7 8 9 10 11 12 13 14 15 16 17 18 19 20 21 22 23 24 25 26 27 28 29 30 31 32 33 34 public class Bean1 { private static final Logger log = LoggerFactory.getLogger(Bean1.class); public Bean1 () { log.debug("我被 Spring 管理啦" ); } } @Configuration @ComponentScan("com.itheima.a05.component") public class Config { @Bean public Bean1 bean1 () { return new Bean1 (); } @Bean public SqlSessionFactoryBean sqlSessionFactoryBean (DataSource dataSource) { SqlSessionFactoryBean sqlSessionFactoryBean = new SqlSessionFactoryBean (); sqlSessionFactoryBean.setDataSource(dataSource); return sqlSessionFactoryBean; } @Bean(initMethod = "init") public DruidDataSource dataSource () { DruidDataSource dataSource = new DruidDataSource (); dataSource.setUrl("jdbc:mysql://localhost:3306/test" ); dataSource.setUsername("root" ); dataSource.setPassword("root" ); return dataSource; } }
在com.itheima.a05包下创建启动类:
1 2 3 4 5 6 7 8 9 10 11 12 13 14 15 16 17 18 19 20 public class A05 { private static final Logger log = LoggerFactory.getLogger(A05.class); public static void main (String[] args) throws IOException { GenericApplicationContext context = new GenericApplicationContext (); context.registerBean("config" , Config.class); context.refresh(); for (String name : context.getBeanDefinitionNames()) { System.out.println(name); } context.close(); } }
启动main()方法,查看控制台:
发现只有我们手动注册的Config类在spring容器中,Config类上的注解@ComponentScan("com.itheima.a05.component")并没有生效。
ConfigurationClassPostProcesso
ConfigurationClassPostProcessor BeanFactory后处理器的作用是解析@ComponentScan、@Bean、@Import、@ImportResource等注解。
我们在代码中加入ConfigurationClassPostProcessor后处理器:
1 2 context.registerBean(ConfigurationClassPostProcessor.class);
启动main()方法,查看控制台:
1 2 3 4 5 6 7 8 [DEBUG] 18:49:37.889 [main] com.itheima.a05.component.Bean2 - 我被 Spring 管理啦 [DEBUG] 18:49:37.896 [main] com.itheima.a05.component.Bean3 - 我被 Spring 管理啦 [DEBUG] 18:49:37.910 [main] com.itheima.a05.Bean1 - 我被 Spring 管理啦 config org.springframework.context.annotation.ConfigurationClassPostProcessor bean2 bean3 bean1
我们发现@ComponentScan注解已经生效。
MapperScannerConfigurer
MapperScannerConfigurer BeanFactory后处理器的作用是扫描Mybatis的Mapper接口。
我们在com.itheima.a05.mapper包下创建代码:
1 2 3 4 5 6 7 @Mapper public interface Mapper1 {} @Mapper public interface Mapper2 {}
在启动类中添加代码:
1 2 3 context.registerBean(MapperScannerConfigurer.class, bd -> { bd.getPropertyValues().add("basePackage" , "com.itheima.a05.mapper" ); });
启动main()方法,查看控制台:
1 2 3 4 //... mapper1 mapper2 //...
我们发现mapper已被加入到spring中的容器中。
模拟注解实现 @ComponentScan 实现BeanDefinitionRegistryPostProcessor接口:
1 2 3 4 5 6 7 8 9 10 11 12 13 14 15 16 17 18 19 20 21 22 23 24 25 26 27 28 29 30 31 32 33 34 35 36 37 38 39 40 41 42 public class ComponentScanPostProcessor implements BeanDefinitionRegistryPostProcessor { @Override public void postProcessBeanFactory (ConfigurableListableBeanFactory configurableListableBeanFactory) throws BeansException { } @Override public void postProcessBeanDefinitionRegistry (BeanDefinitionRegistry beanFactory) throws BeansException { try { ComponentScan componentScan = AnnotationUtils.findAnnotation(Config.class, ComponentScan.class); if (componentScan != null ) { for (String p : componentScan.basePackages()) { System.out.println(p); String path = "classpath*:" + p.replace("." , "/" ) + "/**/*.class" ; System.out.println(path); CachingMetadataReaderFactory factory = new CachingMetadataReaderFactory (); Resource[] resources = new PathMatchingResourcePatternResolver ().getResources(path); AnnotationBeanNameGenerator generator = new AnnotationBeanNameGenerator (); for (Resource resource : resources) { MetadataReader reader = factory.getMetadataReader(resource); AnnotationMetadata annotationMetadata = reader.getAnnotationMetadata(); if (annotationMetadata.hasAnnotation(Component.class.getName()) || annotationMetadata.hasMetaAnnotation(Component.class.getName())) { AbstractBeanDefinition bd = BeanDefinitionBuilder .genericBeanDefinition(reader.getClassMetadata().getClassName()) .getBeanDefinition(); String name = generator.generateBeanName(bd, beanFactory); beanFactory.registerBeanDefinition(name, bd); } } } } } catch (IOException e) { e.printStackTrace(); } } }
主要步骤:
获取@ComponentScan注解
获取@ComponentScan注解上的值basePackages
转换扫描包为真实路径
解析路径获取resource
根据resource获取元信息
判断是否直接或间接拥有@Component注解
注册BeanDefinition
在main()方法中注册自己编写的ComponentScanPostProcessor类:
1 context.registerBean(ComponentScanPostProcessor.class);
运行main()方法,查看控制台,发现能够解析被@Component注解修饰的类:
@Bean 实现BeanDefinitionRegistryPostProcessor接口:
1 2 3 4 5 6 7 8 9 10 11 12 13 14 15 16 17 18 19 20 21 22 23 24 25 26 27 28 29 30 31 32 33 34 35 36 37 public class AtBeanPostProcessor implements BeanDefinitionRegistryPostProcessor { @Override public void postProcessBeanFactory (ConfigurableListableBeanFactory configurableListableBeanFactory) throws BeansException { } @Override public void postProcessBeanDefinitionRegistry (BeanDefinitionRegistry beanFactory) throws BeansException { try { CachingMetadataReaderFactory factory = new CachingMetadataReaderFactory (); MetadataReader reader = factory.getMetadataReader(new ClassPathResource ("com/itheima/a05/Config.class" )); Set<MethodMetadata> methods = reader.getAnnotationMetadata().getAnnotatedMethods(Bean.class.getName()); for (MethodMetadata method : methods) { System.out.println(method); String initMethod = method.getAnnotationAttributes(Bean.class.getName()).get("initMethod" ).toString(); BeanDefinitionBuilder builder = BeanDefinitionBuilder.genericBeanDefinition(); builder.setFactoryMethodOnBean(method.getMethodName(), "config" ); builder.setAutowireMode(AbstractBeanDefinition.AUTOWIRE_CONSTRUCTOR); if (initMethod.length() > 0 ) { builder.setInitMethodName(initMethod); } AbstractBeanDefinition bd = builder.getBeanDefinition(); beanFactory.registerBeanDefinition(method.getMethodName(), bd); } } catch (IOException e) { e.printStackTrace(); } } }
主要步骤:
根据类获取元信息
获取被@Bean注解标注的方法信息
创建BeanDefinitionBuilder
设置自动装配模式,用于依赖注入
注册Bean
还可以根据需要设置初始化方法
在main()方法中注册自己编写的AtBeanPostProcessor类:
1 context.registerBean(AtBeanPostProcessor.class);
运行main()方法,查看控制台,发现Config类中被@Bean注解修饰的方法已经生效:
1 2 3 4 5 //... bean1 sqlSessionFactoryBean dataSource //...
@Mapper 在Config类中添加Bean:
1 2 3 4 5 6 7 8 9 10 11 12 13 @Bean public MapperFactoryBean<Mapper1> mapper1 (SqlSessionFactory sqlSessionFactory) { MapperFactoryBean<Mapper1> factory = new MapperFactoryBean <>(Mapper1.class); factory.setSqlSessionFactory(sqlSessionFactory); return factory; } @Bean public MapperFactoryBean<Mapper2> mapper2 (SqlSessionFactory sqlSessionFactory) { MapperFactoryBean<Mapper2> factory = new MapperFactoryBean <>(Mapper2.class); factory.setSqlSessionFactory(sqlSessionFactory); return factory; }
实现BeanDefinitionRegistryPostProcessor接口:
1 2 3 4 5 6 7 8 9 10 11 12 13 14 15 16 17 18 19 20 21 22 23 24 25 26 27 28 29 30 31 32 33 34 35 36 37 38 39 40 public class MapperPostProcessor implements BeanDefinitionRegistryPostProcessor { @Override public void postProcessBeanDefinitionRegistry (BeanDefinitionRegistry beanFactory) throws BeansException { try { PathMatchingResourcePatternResolver resolver = new PathMatchingResourcePatternResolver (); Resource[] resources = resolver.getResources("classpath:com/itheima/a05/mapper/**/*.class" ); AnnotationBeanNameGenerator generator = new AnnotationBeanNameGenerator (); CachingMetadataReaderFactory factory = new CachingMetadataReaderFactory (); for (Resource resource : resources) { MetadataReader reader = factory.getMetadataReader(resource); ClassMetadata classMetadata = reader.getClassMetadata(); if (classMetadata.isInterface()) { AbstractBeanDefinition bd = BeanDefinitionBuilder.genericBeanDefinition(MapperFactoryBean.class) .addConstructorArgValue(classMetadata.getClassName()) .setAutowireMode(AbstractBeanDefinition.AUTOWIRE_BY_TYPE) .getBeanDefinition(); AbstractBeanDefinition bd2 = BeanDefinitionBuilder.genericBeanDefinition(classMetadata.getClassName()).getBeanDefinition(); String name = generator.generateBeanName(bd2, beanFactory); beanFactory.registerBeanDefinition(name, bd); } } } catch (IOException e) { e.printStackTrace(); } } @Override public void postProcessBeanFactory (ConfigurableListableBeanFactory beanFactory) throws BeansException { } }
主要步骤:
创建resource解析器
获取resource
获取类元信息
获取BeanDefinition
获取接口名作为Bean的名称
注册Bean
在main()方法中注册自己编写的MapperPostProcessor类:
1 context.registerBean(MapperPostProcessor.class);
运行main()方法,查看控制台,发现com/itheima/a05/mapper包中被@MapperScan注解修饰的方法已经生效:
1 2 3 4 //... mapper1 mapper2 //...
Aware接口 Aware与InitializingBean接口 Aware接口用于注入一些与容器相关信息, 例如
BeanNameAware注入bean的名字BeanFactoryAware注入BeanFactory 容器ApplicationContextAware注入ApplicationContext 容器EmbeddedValueResolverAware解析表达式,例如:${}
InitializingBean接口提供内置的初始化手段。
创建类MyBean并实现BeanNameAware、ApplicationContextAware、InitializingBean接口:
1 2 3 4 5 6 7 8 9 10 11 12 13 14 15 16 17 18 19 20 public class MyBean implements BeanNameAware , ApplicationContextAware, InitializingBean { private static final Logger log = LoggerFactory.getLogger(MyBean.class); @Override public void setBeanName (String name) { log.debug("当前bean " + this + " 名字叫:" + name); } @Override public void setApplicationContext (ApplicationContext applicationContext) throws BeansException { log.debug("当前bean " + this + " 容器是:" + applicationContext); } @Override public void afterPropertiesSet () throws Exception { log.debug("当前bean " + this + " 初始化" ); } }
编写启动类:
1 2 3 4 5 6 7 8 9 10 public class A06 { private static final Logger log = LoggerFactory.getLogger(A06.class); public static void main (String[] args) { GenericApplicationContext context = new GenericApplicationContext (); context.registerBean("myBean" , MyBean.class); context.refresh(); context.close(); } }
运行main()方法,查看控制台:
1 2 3 [DEBUG] 21:01:21.092 [main] com.itheima.a06.MyBean - 当前bean com.itheima.a06.MyBean@20deea7f 名字叫:myBean [DEBUG] 21:01:21.118 [main] com.itheima.a06.MyBean - 当前bean com.itheima.a06.MyBean@20deea7f 容器是:org.springframework.context.support.GenericApplicationContext@32464a14, started on Sun Mar 26 21:01:21 CST 2023 [DEBUG] 21:01:21.121 [main] com.itheima.a06.MyBean - 当前bean com.itheima.a06.MyBean@20deea7f 初始化
发现我们实现的方法都被调用。
Aware接口的功能@Autowired就能实现, 为啥还要用Aware接口呢?
@Autowired的解析需要用到bean后处理器, 属于扩展功能而Aware接口属于内置功能, 不加任何扩展, Spring就能识别
某些情况下, 扩展功能会失效, 而内置功能不会失效
这里做一个测试,在MyBean类中添加如下方法:
1 2 3 4 5 6 7 8 9 @Autowired public void aaa (ApplicationContext applicationContext) { log.debug("当前bean " + this + " 使用@Autowired 容器是:" + applicationContext); } @PostConstruct public void init () { log.debug("当前bean " + this + " 使用@PostConstruct 初始化" ); }
我们必须在启动类中添加相应的Bean后处理器,@Autowired、@PostConstruct注解才能生效:
1 2 context.registerBean(AutowiredAnnotationBeanPostProcessor.class); context.registerBean(CommonAnnotationBeanPostProcessor.class);
查看控制台:
1 2 3 4 5 [DEBUG] 21:07:23.998 [main] com.itheima.a06.MyBean - 当前bean com.itheima.a06.MyBean@d21a74c 使用@Autowired 容器是:org.springframework.context.support.GenericApplicationContext@32464a14, started on Sun Mar 26 21:07:23 CST 2023 [DEBUG] 21:07:24.004 [main] com.itheima.a06.MyBean - 当前bean com.itheima.a06.MyBean@d21a74c 名字叫:myBean [DEBUG] 21:07:24.004 [main] com.itheima.a06.MyBean - 当前bean com.itheima.a06.MyBean@d21a74c 容器是:org.springframework.context.support.GenericApplicationContext@32464a14, started on Sun Mar 26 21:07:23 CST 2023 [DEBUG] 21:07:24.007 [main] com.itheima.a06.MyBean - 当前bean com.itheima.a06.MyBean@d21a74c 使用@PostConstruct 初始化 [DEBUG] 21:07:24.008 [main] com.itheima.a06.MyBean - 当前bean com.itheima.a06.MyBean@d21a74c 初始化
注解失效分析 准备MyConfig1类,注意其中添加了一个beanFactory后处理器:
1 2 3 4 5 6 7 8 9 10 11 12 13 14 15 16 17 18 19 20 21 22 23 @Configuration public class MyConfig1 { private static final Logger log = LoggerFactory.getLogger(MyConfig1.class); @Autowired public void setApplicationContext (ApplicationContext applicationContext) { log.debug("注入 ApplicationContext" ); } @PostConstruct public void init () { log.debug("初始化" ); } @Bean public BeanFactoryPostProcessor processor1 () { return beanFactory -> { log.debug("执行 processor1" ); }; } }
编写启动类:
1 2 3 4 5 6 7 8 9 10 11 12 13 14 15 16 17 public class A06 { private static final Logger log = LoggerFactory.getLogger(A06.class); public static void main (String[] args) { GenericApplicationContext context = new GenericApplicationContext (); context.registerBean("myConfig1" , MyConfig1.class); context.registerBean(AutowiredAnnotationBeanPostProcessor.class); context.registerBean(CommonAnnotationBeanPostProcessor.class); context.registerBean(ConfigurationClassPostProcessor.class); context.refresh(); context.close(); } }
运行启动类,查看控制台:
1 [DEBUG] 21:20:02.446 [main] com.itheima.a06.MyConfig1 - 执行 processor1
发现@Autowired、@PostConstruct注解失效。
context.refresh()的执行顺序:
BeanFactory后处理器添加bean后处理器
初始化单例
Java配置类不包含BeanFactoryPostProcessor的情况:
Java配置类包含BeanFactoryPostProcessor的情况,因此要创建其中的BeanFactoryPostProcessor必须提前创建Java配置类,而此时的BeanPostProcessor还未准备好,导致@Autowired等注解失效
使用内置的InitializingBean接口和ApplicationContextAware则不会失效:
1 2 3 4 5 6 7 8 9 10 11 12 13 14 15 16 17 18 19 20 21 22 @Configuration public class MyConfig2 implements InitializingBean , ApplicationContextAware { private static final Logger log = LoggerFactory.getLogger(MyConfig2.class); @Override public void afterPropertiesSet () throws Exception { log.debug("初始化" ); } @Override public void setApplicationContext (ApplicationContext applicationContext) throws BeansException { log.debug("注入 ApplicationContext" ); } @Bean public BeanFactoryPostProcessor processor2 () { return beanFactory -> { log.debug("执行 processor2" ); }; } }
运行启动类,控制台输出:
1 2 3 4 [DEBUG] 21:27:31.312 [main] com.itheima.a06.MyConfig2 - 注入 ApplicationContext [DEBUG] 21:27:31.318 [main] com.itheima.a06.MyConfig2 - 初始化 [INFO ] 21:27:31.321 [main] o.s.c.a.ConfigurationClassEnhancer - @Bean method MyConfig2.processor2 is non-static and returns an object assignable to Spring's BeanFactoryPostProcessor interface. This will result in a failure to process annotations such as @Autowired, @Resource and @PostConstruct within the method's declaring @Configuration class. Add the 'static' modifier to this method to avoid these container lifecycle issues; see @Bean javadoc for complete details. [DEBUG] 21:27:31.333 [main] com.itheima.a06.MyConfig2 - 执行 processor2
初始化与销毁 初始化方法 创建Bean1类,分别使用了三种初始化方法:
使用@PostConstruct注解初始化
实现接口InitializingBean的afterPropertiesSet()方法
使用@Bean(initMethod = "init3")注解的initMethod属性
1 2 3 4 5 6 7 8 9 10 11 12 13 14 15 16 17 public class Bean1 implements InitializingBean { private static final Logger log = LoggerFactory.getLogger(Bean1.class); @PostConstruct public void init1 () { log.debug("初始化1" ); } @Override public void afterPropertiesSet () throws Exception { log.debug("初始化2" ); } public void init3 () { log.debug("初始化3" ); } }
创建启动类:
1 2 3 4 5 6 7 8 9 10 11 12 13 @SpringBootApplication public class A07_1 { public static void main (String[] args) { ConfigurableApplicationContext context = SpringApplication.run(A07_1.class, args); context.close(); } @Bean(initMethod = "init3") public Bean1 bean1 () { return new Bean1 (); } }
运行启动类,查看控制台:
1 2 3 [DEBUG] 21:34:09.944 [main] com.itheima.a07.Bean1 - 初始化1 [DEBUG] 21:34:09.944 [main] com.itheima.a07.Bean1 - 初始化2 [DEBUG] 21:34:09.944 [main] com.itheima.a07.Bean1 - 初始化3
初始化方法顺序:
@PostConstruct注解初始化接口InitializingBean的afterPropertiesSet()方法初始化
@Bean(initMethod = "init3")注解的initMethod属性初始化
销毁方法 创建Bean2类,分别使用了三种销毁方法:
使用@PreDestroy注解销毁
实现接口DisposableBean的destroy()方法销毁
使用@Bean(destroyMethod = "destroy3")注解的destroyMethod属性销毁
1 2 3 4 5 6 7 8 9 10 11 12 13 14 15 16 17 public class Bean2 implements DisposableBean { private static final Logger log = LoggerFactory.getLogger(Bean2.class); @PreDestroy public void destroy1 () { log.debug("销毁1" ); } @Override public void destroy () throws Exception { log.debug("销毁2" ); } public void destroy3 () { log.debug("销毁3" ); } }
编写启动类:
1 2 3 4 5 6 7 8 9 10 11 12 13 @SpringBootApplication public class A07_1 { public static void main (String[] args) { ConfigurableApplicationContext context = SpringApplication.run(A07_1.class, args); context.close(); } @Bean(destroyMethod = "destroy3") public Bean2 bean2 () { return new Bean2 (); } }
运行启动类,查看控制台:
1 2 3 [DEBUG] 21:34:10.565 [main] com.itheima.a07.Bean2 - 销毁1 [DEBUG] 21:34:10.566 [main] com.itheima.a07.Bean2 - 销毁2 [DEBUG] 21:34:10.566 [main] com.itheima.a07.Bean2 - 销毁3
销毁方法执行顺序:
@PreDestroy注解销毁接口DisposableBean的destroy()方法销毁
@Bean(destroyMethod = "destroy3")注解的destroyMethod属性销毁
Scope Scope的类型与销毁 scope的类型有以下五种:
singleton:这是Spring默认的scope,表示Spring容器只创建唯一个bean的实例,所有该对象的引用都共享这个实例,并且Spring在创建第一次后,会在Spring的IoC容器中缓存起来,之后不再创建。这就是设计模式中的单例模式的形式。并且对该bean的所有后续请求和引用都将返回该缓存中的对象实例。一般情况下,无状态的bean使用该scope。prototype:代表线程每次调用或请求这个bean都会创建一个新的实例,一般情况下,有状态的bean使用该scope。request:每次http请求将会有各自的bean实例,类似于prototype,也就是说每个request作用域内的请求只创建一个实例。session:在一个http session中,一个bean定义对应一个bean实例,也就是说每个session作用域内的请求只创建一个实例。application:全局web应用级别,也是在web环境中使用的,一个web应用程序对应一个bean实例,通常情况下和singleton效果类似的,不过也有不一样的地方,singleton是每个spring容器中只有一个bean实例,一般我们的程序只有一个spring容器,但是,一个应用程序中可以创建多个spring容器,不同的容器中可以存在同名的bean,但是scope=aplication的时候,不管应用中有多少个spring容器,这个应用中同名的bean只有一个
准备三个不同作用域的Bean:
1 2 3 4 5 6 7 8 9 10 11 12 13 14 15 16 17 18 19 20 21 22 23 24 25 26 27 28 29 30 31 32 33 @Scope("application") @Component public class BeanForApplication { private static final Logger log = LoggerFactory.getLogger(BeanForApplication.class); @PreDestroy public void destroy () { log.debug("destroy" ); } } @Scope("request") @Component public class BeanForRequest { private static final Logger log = LoggerFactory.getLogger(BeanForRequest.class); @PreDestroy public void destroy () { log.debug("destroy" ); } } @Scope("session") @Component public class BeanForSession { private static final Logger log = LoggerFactory.getLogger(BeanForSession.class); @PreDestroy public void destroy () { log.debug("destroy" ); } }
编写Controller:
1 2 3 4 5 6 7 8 9 10 11 12 13 14 15 16 17 18 19 20 21 22 23 24 25 26 27 @RestController public class MyController { @Lazy @Autowired private BeanForRequest beanForRequest; @Lazy @Autowired private BeanForSession beanForSession; @Lazy @Autowired private BeanForApplication beanForApplication; @GetMapping(value = "/test", produces = "text/html") public String test (HttpServletRequest request, HttpSession session) { ServletContext sc = request.getServletContext(); String sb = "<ul>" + "<li>" + "request scope:" + beanForRequest + "</li>" + "<li>" + "session scope:" + beanForSession + "</li>" + "<li>" + "application scope:" + beanForApplication + "</li>" + "</ul>" ; return sb; } }
编写启动类:
1 2 3 4 5 6 7 8 9 10 11 12 13 14 15 16 @SpringBootApplication public class A08 { public static void main (String[] args) { SpringApplication.run(A08.class, args); } }
运行启动类,访问http://localhost:8080/test,浏览器出现:
1 2 3 request scope:com.itheima.a08.BeanForRequest@14742c57 session scope:com.itheima.a08.BeanForSession@2f6cff45 application scope:com.itheima.a08.BeanForApplication@3b82843b
每当我们刷新一次页面BeanForRequest的地址就会变化,说明request作用范围在一次请求中。当session会话过期,我们刷新页面BeanForSession的地址也会变化,说明session作用范围在一次会话中。当我们停止启动类,BeanForApplication会被销毁,说明application作用范围与容器生命周期一样长。
Scope失效解决方法 Scope失效情况演示
准备如下类:
1 2 3 4 5 6 7 8 9 10 11 12 13 14 15 16 17 18 19 20 21 22 23 24 25 26 27 28 29 30 31 32 33 34 35 36 @Component public class E { @Autowired private F1 f1; public F1 getF1 () { return f1; } } @Scope("prototype") @Component public class F1 {} @ComponentScan("com.itheima.a08.sub") public class A08_1 { private static final Logger log = LoggerFactory.getLogger(A08_1.class); public static void main (String[] args) { AnnotationConfigApplicationContext context = new AnnotationConfigApplicationContext (A08_1.class); E e = context.getBean(E.class); log.debug("{}" , e.getF1()); log.debug("{}" , e.getF1()); log.debug("{}" , e.getF1()); } }
运行启动类,查看控制台:
1 2 3 [DEBUG] 23 :17 :58.864 [main] com.itheima.a08.A08_1 - com.itheima.a08.sub.F1@30bce90b [DEBUG] 23 :17 :58.864 [main] com.itheima.a08.A08_1 - com.itheima.a08.sub.F1@30bce90b [DEBUG] 23 :17 :58.864 [main] com.itheima.a08.A08_1 - com.itheima.a08.sub.F1@30bce90b
我们发现E中的F1类地址始终为一个,说明多例失效了。
解决方式一 添加@Lazy注解:
1 2 3 4 5 6 7 8 9 10 11 12 @Component public class E { @Lazy @Autowired private F1 f1; public F1 getF1 () { return f1; } }
运行启动类,查看控制台:
1 2 3 [DEBUG] 23:21:02.385 [main] com.itheima.a08.A08_1 - com.itheima.a08.sub.F1@4196c360 [DEBUG] 23:21:02.409 [main] com.itheima.a08.A08_1 - com.itheima.a08.sub.F1@225129c [DEBUG] 23:21:02.410 [main] com.itheima.a08.A08_1 - com.itheima.a08.sub.F1@573906eb
我们发现E中的F1类地址每次都变化,说明多例生效了。
事实上使用@Lazy注解,spring会为我们创建一个代理类,打印F类实例:
1 log.debug("{}" , e.getF1().getClass());
查看输出:
1 [DEBUG] 23:21:02.378 [main] com.itheima.a08.A08_1 - class com.itheima.a08.sub.F1$$EnhancerBySpringCGLIB$$21b324fd
发现是一个使用了cglib代理的类。
解决方式二 设置proxyMode=ScopedProxyMode.TARGET_CLASS,例如:
1 2 3 4 @Scope(value = "prototype", proxyMode = ScopedProxyMode.TARGET_CLASS) @Component public class F1 {}
运行启动类,查看控制台:
1 2 3 [DEBUG] 23:26:28.666 [main] com.itheima.a08.A08_1 - com.itheima.a08.sub.F1@7c214cc0 [DEBUG] 23:26:28.696 [main] com.itheima.a08.A08_1 - com.itheima.a08.sub.F1@609db546 [DEBUG] 23:26:28.696 [main] com.itheima.a08.A08_1 - com.itheima.a08.sub.F1@56c4278e
spring同样为我们创建了代理类:
1 [DEBUG] 23:26:28.658 [main] com.itheima.a08.A08_1 - class com.itheima.a08.sub.F1$$EnhancerBySpringCGLIB$$21b324fd
解决方式三 使用ObjectFactory工厂,例如:
1 2 3 4 5 6 7 8 9 10 11 @Component public class E { @Autowired private ObjectFactory<F3> f1; public F3 getF1 () { return f1.getObject(); } }
运行启动类,查看控制台:
1 2 3 4 [DEBUG] 23:30:58.390 [main] com.itheima.a08.A08_1 - class com.itheima.a08.sub.F1 [DEBUG] 23:30:58.390 [main] com.itheima.a08.A08_1 - com.itheima.a08.sub.F1@59cba5a [DEBUG] 23:30:58.390 [main] com.itheima.a08.A08_1 - com.itheima.a08.sub.F1@6f19ac19 [DEBUG] 23:30:58.390 [main] com.itheima.a08.A08_1 - com.itheima.a08.sub.F1@71329995
我们发现这种方式没有给我们创建代理。
解决方式四 使用ApplicationContext,例如:
1 2 3 4 5 6 7 8 9 @Component public class E { @Autowired private ApplicationContext context; public F4 getF1 () { return context.getBean(F1.class); } }
运行启动类,查看控制台:
1 2 3 4 [DEBUG] 23:34:15.926 [main] com.itheima.a08.A08_1 - class com.itheima.a08.sub.F1 [DEBUG] 23:34:15.926 [main] com.itheima.a08.A08_1 - com.itheima.a08.sub.F1@768fc0f2 [DEBUG] 23:34:15.926 [main] com.itheima.a08.A08_1 - com.itheima.a08.sub.F1@5454d35e [DEBUG] 23:34:15.926 [main] com.itheima.a08.A08_1 - com.itheima.a08.sub.F1@20c0a64d
我们发现这种方式没有给我们创建代理。
以上解决方式实际上都是延迟了多例对象的创建,使其在运行时创建,而不是在一开始就初始化完成。