DispatcherServlet及其重要组件 DispatcherServlet初始化 我们使用可支持内嵌web服务器的容器实现AnnotationConfigServletWebServerApplicationContext,这个容器不仅支持内嵌web服务器,也支持注解配置。
演示代码:
1
2
3
4
5
6
7
8
9
10
11
12
13
14
15
16
17
18
19
20
21
22
23
24
25
26
27
28
29
public class A20 { private static final Logger log = LoggerFactory.getLogger(A20.class); public static void main (String[] args) throws Exception { AnnotationConfigServletWebServerApplicationContext context = new AnnotationConfigServletWebServerApplicationContext (WebConfig.class); } } @Configuration @ComponentScan public class WebConfig { @Bean public TomcatServletWebServerFactory tomcatServletWebServerFactory () { return new TomcatServletWebServerFactory (); } @Bean public DispatcherServlet dispatcherServlet () { return new DispatcherServlet (); } @Bean public DispatcherServletRegistrationBean dispatcherServletRegistrationBean () { return new DispatcherServletRegistrationBean (dispatcherServlet, "/" ); } }
如果需要支持内嵌web容器的功能,配置类中有三项是必须配置的:
内嵌的web容器工厂,例如tomcat、jetty
DispatcherServlet,负责拦截请求注册器,注册DispatcherServlet,Spring MVC的入口
运行启动类,查看控制台:
1
2
3
4
5
6
7
8
9
10
11
12
13
[INFO ] 20:48:27.603 [main] o.s.b.w.e.tomcat.TomcatWebServer - Tomcat initialized with port(s): 8080 (http) 4月 02, 2023 8:48:27 下午 org.apache.coyote.AbstractProtocol init 信息: Initializing ProtocolHandler ["http-nio-8080"] 4月 02, 2023 8:48:27 下午 org.apache.catalina.core.StandardService startInternal 信息: Starting service [Tomcat] 4月 02, 2023 8:48:27 下午 org.apache.catalina.core.StandardEngine startInternal 信息: Starting Servlet engine: [Apache Tomcat/9.0.53] 4月 02, 2023 8:48:27 下午 org.apache.catalina.core.ApplicationContext log 信息: Initializing Spring embedded WebApplicationContext [INFO ] 20:48:27.805 [main] o.s.b.w.s.c.ServletWebServerApplicationContext - Root WebApplicationContext: initialization completed in 856 ms 4月 02, 2023 8:48:27 下午 org.apache.coyote.AbstractProtocol start 信息: Starting ProtocolHandler ["http-nio-8080"] [INFO ] 20:48:27.959 [main] o.s.b.w.e.tomcat.TomcatWebServer - Tomcat started on port(s): 8080 (http) with context path ''
我们发现tomcat容器和spring容器都已经初始化完毕。
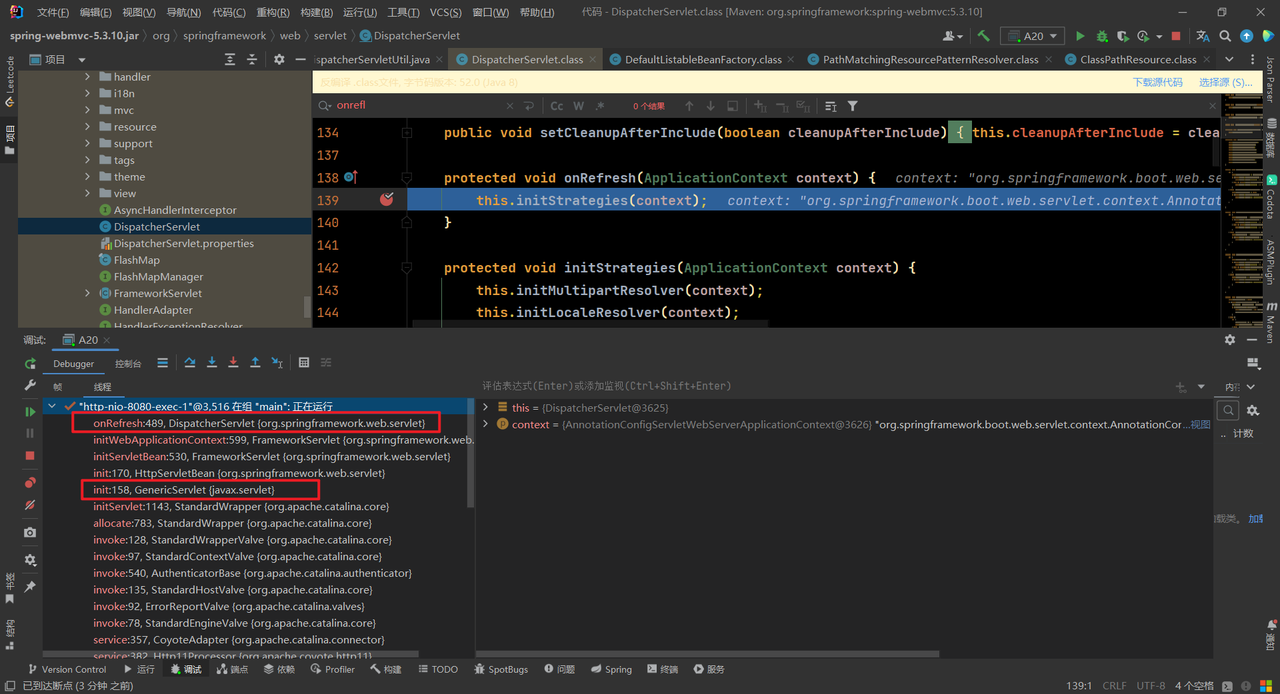
DispatcherServlet是由spring容器创建的,但是它的初始化是由tomcat来管理的,当用户首次访问tomcat服务器时,将会初始化DispatcherServlet。
清理一下控制台,访问tomcat服务器,查看打印日志:
1
2
3
4
5
6
7
8
9
10
11
12
13
14
15
16
17
18
[INFO ] 20:55:07.911 [http-nio-8080-exec-1] o.s.web.servlet.DispatcherServlet - Initializing Servlet 'dispatcherServlet' [TRACE] 20:55:07.912 [http-nio-8080-exec-1] o.s.web.servlet.DispatcherServlet - No MultipartResolver 'multipartResolver' declared [TRACE] 20:55:07.916 [http-nio-8080-exec-1] o.s.web.servlet.DispatcherServlet - No LocaleResolver 'localeResolver': using default [AcceptHeaderLocaleResolver] [TRACE] 20:55:07.917 [http-nio-8080-exec-1] o.s.web.servlet.DispatcherServlet - No ThemeResolver 'themeResolver': using default [FixedThemeResolver] [TRACE] 20:55:08.243 [http-nio-8080-exec-1] o.s.web.servlet.DispatcherServlet - No HandlerMappings declared for servlet 'dispatcherServlet': using default strategies from DispatcherServlet.properties [TRACE] 20:55:08.303 [http-nio-8080-exec-1] o.s.web.servlet.DispatcherServlet - No HandlerAdapters declared for servlet 'dispatcherServlet': using default strategies from DispatcherServlet.properties [TRACE] 20:55:08.312 [http-nio-8080-exec-1] o.s.web.servlet.DispatcherServlet - No HandlerExceptionResolvers declared in servlet 'dispatcherServlet': using default strategies from DispatcherServlet.properties [TRACE] 20:55:08.314 [http-nio-8080-exec-1] o.s.web.servlet.DispatcherServlet - No RequestToViewNameTranslator 'viewNameTranslator': using default [DefaultRequestToViewNameTranslator] [TRACE] 20:55:08.326 [http-nio-8080-exec-1] o.s.web.servlet.DispatcherServlet - No ViewResolvers declared for servlet 'dispatcherServlet': using default strategies from DispatcherServlet.properties [TRACE] 20:55:08.328 [http-nio-8080-exec-1] o.s.web.servlet.DispatcherServlet - No FlashMapManager 'flashMapManager': using default [SessionFlashMapManager] [DEBUG] 20:55:08.329 [http-nio-8080-exec-1] o.s.web.servlet.DispatcherServlet - enableLoggingRequestDetails='false': request parameters and headers will be masked to prevent unsafe logging of potentially sensitive data [INFO ] 20:55:08.329 [http-nio-8080-exec-1] o.s.web.servlet.DispatcherServlet - Completed initialization in 418 ms [TRACE] 20:55:08.339 [http-nio-8080-exec-1] o.s.web.servlet.DispatcherServlet - GET "/", parameters={}, headers={masked} in DispatcherServlet 'dispatcherServlet' [WARN ] 20:55:08.344 [http-nio-8080-exec-1] o.s.web.servlet.PageNotFound - No mapping for GET / [DEBUG] 20:55:08.346 [http-nio-8080-exec-1] o.s.web.servlet.DispatcherServlet - Completed 404 NOT_FOUND, headers={} [TRACE] 20:55:08.771 [http-nio-8080-exec-2] o.s.web.servlet.DispatcherServlet - GET "/favicon.ico", parameters={}, headers={masked} in DispatcherServlet 'dispatcherServlet' [WARN ] 20:55:08.772 [http-nio-8080-exec-2] o.s.web.servlet.PageNotFound - No mapping for GET /favicon.ico [DEBUG] 20:55:08.772 [http-nio-8080-exec-2] o.s.web.servlet.DispatcherServlet - Completed 404 NOT_FOUND, headers={}
我们发现,第一行正在初始化DispatcherServlet,第2~10行是初始化组件,第12行表示已经完成了DispatcherServlet的初始化。
我们可以将断点打在DispatcherServlet中的onRefresh()方法上,启动服务器,发现一开始并没有停在断点处,当我们tomcat服务器:
查看调用链,我们发现DispatcherServlet的onRefresh()方法是在执行Servlet的init()方法时调用的,因此DispatcherServlet走的是Servlet的初始化流程。
目前是在首次访问tomcat服务器时,DispatcherServlet才会去初始化,我们可以通过DispatcherServletRegistrationBean的setLoadOnStartup()方法去更改。setLoadOnStartup()方法的默认值为-1,即首次访问tomcat服务器时才初始化DispatcherServlet,如果值大于0,则启动时就会初始化DispatcherServlet。如果有多个Servlet,此值代表初始化的优先级,值越小优先级越高。
修改setLoadOnStartup()方法的值:
1
2
3
4
5
6
@Bean public DispatcherServletRegistrationBean dispatcherServletRegistrationBean (DispatcherServlet dispatcherServlet) { DispatcherServletRegistrationBean registrationBean = new DispatcherServletRegistrationBean (dispatcherServlet, "/" ); registrationBean.setLoadOnStartup(1 ); return registrationBean; }
重新运行启动类,查看控制台:
1
2
3
4
5
6
7
8
9
10
11
12
13
14
15
16
17
18
19
20
21
22
23
24
25
26
27
[INFO ] 21:09:59.471 [main] o.s.b.w.e.tomcat.TomcatWebServer - Tomcat initialized with port(s): 8080 (http) 4月 02, 2023 9:09:59 下午 org.apache.coyote.AbstractProtocol init 信息: Initializing ProtocolHandler ["http-nio-8080"] 4月 02, 2023 9:09:59 下午 org.apache.catalina.core.StandardService startInternal 信息: Starting service [Tomcat] 4月 02, 2023 9:09:59 下午 org.apache.catalina.core.StandardEngine startInternal 信息: Starting Servlet engine: [Apache Tomcat/9.0.53] 4月 02, 2023 9:09:59 下午 org.apache.catalina.core.ApplicationContext log 信息: Initializing Spring embedded WebApplicationContext [INFO ] 21:09:59.686 [main] o.s.b.w.s.c.ServletWebServerApplicationContext - Root WebApplicationContext: initialization completed in 888 ms 4月 02, 2023 9:09:59 下午 org.apache.coyote.AbstractProtocol start 信息: Starting ProtocolHandler ["http-nio-8080"] 4月 02, 2023 9:09:59 下午 org.apache.catalina.core.ApplicationContext log 信息: Initializing Spring DispatcherServlet 'dispatcherServlet' [INFO ] 21:09:59.838 [main] o.s.web.servlet.DispatcherServlet - Initializing Servlet 'dispatcherServlet' [TRACE] 21:09:59.838 [main] o.s.web.servlet.DispatcherServlet - No MultipartResolver 'multipartResolver' declared [TRACE] 21:09:59.841 [main] o.s.web.servlet.DispatcherServlet - No LocaleResolver 'localeResolver': using default [AcceptHeaderLocaleResolver] [TRACE] 21:09:59.843 [main] o.s.web.servlet.DispatcherServlet - No ThemeResolver 'themeResolver': using default [FixedThemeResolver] [TRACE] 21:10:00.337 [main] o.s.web.servlet.DispatcherServlet - No HandlerMappings declared for servlet 'dispatcherServlet': using default strategies from DispatcherServlet.properties [TRACE] 21:10:00.393 [main] o.s.web.servlet.DispatcherServlet - No HandlerAdapters declared for servlet 'dispatcherServlet': using default strategies from DispatcherServlet.properties [TRACE] 21:10:00.402 [main] o.s.web.servlet.DispatcherServlet - No HandlerExceptionResolvers declared in servlet 'dispatcherServlet': using default strategies from DispatcherServlet.properties [TRACE] 21:10:00.403 [main] o.s.web.servlet.DispatcherServlet - No RequestToViewNameTranslator 'viewNameTranslator': using default [DefaultRequestToViewNameTranslator] [TRACE] 21:10:00.410 [main] o.s.web.servlet.DispatcherServlet - No ViewResolvers declared for servlet 'dispatcherServlet': using default strategies from DispatcherServlet.properties [TRACE] 21:10:00.412 [main] o.s.web.servlet.DispatcherServlet - No FlashMapManager 'flashMapManager': using default [SessionFlashMapManager] [DEBUG] 21:10:00.412 [main] o.s.web.servlet.DispatcherServlet - enableLoggingRequestDetails='false': request parameters and headers will be masked to prevent unsafe logging of potentially sensitive data [INFO ] 21:10:00.412 [main] o.s.web.servlet.DispatcherServlet - Completed initialization in 574 ms [INFO ] 21:10:00.414 [main] o.s.b.w.e.tomcat.TomcatWebServer - Tomcat started on port(s): 8080 (http) with context path ''
我们发现容器启动时,DispatcherServlet就已经初始化完毕。
在实际情况下,一般将配置放在配置文件中,而不是写入代码,因此我们将配置抽取成配置文件。我们可以使用@PropertySource注解来读取类路径下的配置文件:
1 @PropertySource("classpath:application.properties")
@EnableConfigurationProperties注解提供将配置进行批量绑定的功能:
1 @EnableConfigurationProperties({WebMvcProperties.class, ServerProperties.class})
例如WebMvcProperties.class可以绑定以spring.mvc的配置项,查看WebMvcProperties.class源码:
1
2
3
4
5
6
@ConfigurationProperties( prefix = "spring.mvc" ) public class WebMvcProperties { }
绑定的对象会作为Bean注入到容器中,我们直接使用即可,更改后的WebConfig类如下:
1
2
3
4
5
6
7
8
9
10
11
12
13
14
15
16
17
18
19
20
21
22
23
24
25
26
27
28
@Configuration @ComponentScan @PropertySource("classpath:application.properties") @EnableConfigurationProperties({WebMvcProperties.class, ServerProperties.class}) public class WebConfig { @Bean public TomcatServletWebServerFactory tomcatServletWebServerFactory (ServerProperties serverProperties) { return new TomcatServletWebServerFactory (serverProperties.getPort()); } @Bean public DispatcherServlet dispatcherServlet () { return new DispatcherServlet (); } @Bean public DispatcherServletRegistrationBean dispatcherServletRegistrationBean ( DispatcherServlet dispatcherServlet, WebMvcProperties webMvcProperties) { DispatcherServletRegistrationBean registrationBean = new DispatcherServletRegistrationBean (dispatcherServlet, "/" ); registrationBean.setLoadOnStartup(webMvcProperties.getServlet().getLoadOnStartup()); return registrationBean; } }
重新运行启动类,查看控制台:
1
2
3
4
5
6
7
8
9
10
11
12
13
14
15
16
17
18
19
20
21
22
23
24
25
26
27
[INFO ] 21:21:23.218 [main] o.s.b.w.e.tomcat.TomcatWebServer - Tomcat initialized with port(s): 8080 (http) 4月 02, 2023 9:21:23 下午 org.apache.coyote.AbstractProtocol init 信息: Initializing ProtocolHandler ["http-nio-8080"] 4月 02, 2023 9:21:23 下午 org.apache.catalina.core.StandardService startInternal 信息: Starting service [Tomcat] 4月 02, 2023 9:21:23 下午 org.apache.catalina.core.StandardEngine startInternal 信息: Starting Servlet engine: [Apache Tomcat/9.0.53] 4月 02, 2023 9:21:23 下午 org.apache.catalina.core.ApplicationContext log 信息: Initializing Spring embedded WebApplicationContext [INFO ] 21:21:23.412 [main] o.s.b.w.s.c.ServletWebServerApplicationContext - Root WebApplicationContext: initialization completed in 1279 ms 4月 02, 2023 9:21:23 下午 org.apache.coyote.AbstractProtocol start 信息: Starting ProtocolHandler ["http-nio-8080"] 4月 02, 2023 9:21:23 下午 org.apache.catalina.core.ApplicationContext log 信息: Initializing Spring DispatcherServlet 'dispatcherServlet' [INFO ] 21:21:23.552 [main] o.s.web.servlet.DispatcherServlet - Initializing Servlet 'dispatcherServlet' [TRACE] 21:21:23.553 [main] o.s.web.servlet.DispatcherServlet - No MultipartResolver 'multipartResolver' declared [TRACE] 21:21:23.556 [main] o.s.web.servlet.DispatcherServlet - No LocaleResolver 'localeResolver': using default [AcceptHeaderLocaleResolver] [TRACE] 21:21:23.558 [main] o.s.web.servlet.DispatcherServlet - No ThemeResolver 'themeResolver': using default [FixedThemeResolver] [TRACE] 21:21:23.894 [main] o.s.web.servlet.DispatcherServlet - No HandlerMappings declared for servlet 'dispatcherServlet': using default strategies from DispatcherServlet.properties [TRACE] 21:21:23.944 [main] o.s.web.servlet.DispatcherServlet - No HandlerAdapters declared for servlet 'dispatcherServlet': using default strategies from DispatcherServlet.properties [TRACE] 21:21:23.955 [main] o.s.web.servlet.DispatcherServlet - No HandlerExceptionResolvers declared in servlet 'dispatcherServlet': using default strategies from DispatcherServlet.properties [TRACE] 21:21:23.957 [main] o.s.web.servlet.DispatcherServlet - No RequestToViewNameTranslator 'viewNameTranslator': using default [DefaultRequestToViewNameTranslator] [TRACE] 21:21:23.965 [main] o.s.web.servlet.DispatcherServlet - No ViewResolvers declared for servlet 'dispatcherServlet': using default strategies from DispatcherServlet.properties [TRACE] 21:21:23.968 [main] o.s.web.servlet.DispatcherServlet - No FlashMapManager 'flashMapManager': using default [SessionFlashMapManager] [DEBUG] 21:21:23.968 [main] o.s.web.servlet.DispatcherServlet - enableLoggingRequestDetails='false': request parameters and headers will be masked to prevent unsafe logging of potentially sensitive data [INFO ] 21:21:23.968 [main] o.s.web.servlet.DispatcherServlet - Completed initialization in 416 ms [INFO ] 21:21:23.969 [main] o.s.b.w.e.tomcat.TomcatWebServer - Tomcat started on port(s): 8080 (http) with context path ''
发现我们的配置文件已经生效。
DispatcherServlet初始化过程 DispatcherServlet初始化过程主要在onRefresh()方法中:
1
2
3
protected void onRefresh (ApplicationContext context) { this .initStrategies(context); }
进入initStrategies()方法:
1 2 3 4 5 6 7 8 9 10 11 12 13 14 15 16 17 protected void initStrategies (ApplicationContext context) { this .initMultipartResolver(context); this .initLocaleResolver(context); this .initThemeResolver(context); this .initHandlerMappings(context); this .initHandlerAdapters(context); this .initHandlerExceptionResolvers(context); this .initRequestToViewNameTranslator(context); this .initViewResolvers(context); this .initFlashMapManager(context); }
RequestMappingHandlerMapping
RequestMappingHandlerMapping的主要作用是建立请求路径与控制器的映射关系,它的主要工作流程如下:
扫描启动类下所有带有@Controller注解的类
解析类中带有@GetMapping、@PostMapping等注解的方法并建立请求路径与方法的映射。
由于RequestMappingHandlerMapping是由tomcat服务器管理的,并没有加入spring容器中,为了方便演示,我们添加自己创建的RequestMappingHandlerMapping,在WebConfig类中添加Bean:
1
2
3
4
@Bean public RequestMappingHandlerMapping requestMappingHandlerMapping () { return new RequestMappingHandlerMapping (); }
添加Controller1类:
1
2
3
4
5
6
7
8
9
10
11
12
13
14
15
16
17
18
19
20
21
22
23
24
25
26
27
28
29
30
31
32
33
34
35
36
37
38
39
40
41
42
43
44
45
46
47
48
49
50
51
52
53
54
55
56
57
58
59
60
61
62
@Controller public class Controller1 { private static final Logger log = LoggerFactory.getLogger(Controller1.class); @GetMapping("/test1") public ModelAndView test1 () throws Exception { log.debug("test1()" ); return null ; } @PostMapping("/test2") public ModelAndView test2 (@RequestParam("name") String name) { log.debug("test2({})" , name); return null ; } @PutMapping("/test3") public ModelAndView test3 (@Token String token) { log.debug("test3({})" , token); return null ; } @RequestMapping("/test4") @Yml public User test4 () { log.debug("test4" ); return new User ("张三" , 18 ); } public static class User { private String name; private int age; public User (String name, int age) { this .name = name; this .age = age; } public String getName () { return name; } public int getAge () { return age; } public void setName (String name) { this .name = name; } public void setAge (int age) { this .age = age; } } public static void main (String[] args) { String str = new Yaml ().dump(new User ("张三" , 18 )); System.out.println(str); } }
在启动类中获取RequestMappingHandlerMapping实例,并打印映射:
1 2 3 4 5 6 7 8 RequestMappingHandlerMapping handlerMapping = context.getBean(RequestMappingHandlerMapping.class);Map<RequestMappingInfo, HandlerMethod> handlerMethods = handlerMapping.getHandlerMethods(); handlerMethods.forEach((k, v) -> { System.out.println(k + "=" + v); });
运行启动类,查看控制台:
1
2
3
4
{GET [/test1]}=com.itheima.a20.Controller1#test1() {PUT [/test3]}=com.itheima.a20.Controller1#test3(String) { [/test4]}=com.itheima.a20.Controller1#test4() {POST [/test2]}=com.itheima.a20.Controller1#test2(String)
发现所有的映射都已经被打印出来。
我们可以模拟一个请求,并打印其信息:
1 2 3 HandlerExecutionChain chain = handlerMapping.getHandler(new MockHttpServletRequest ("GET" , "/test4" ));System.out.println(chain);
控制台输出:
1 HandlerExecutionChain with [com.itheima.a20.Controller1#test4()] and 0 interceptors
我们可以发现最终执行地方法逻辑为com.itheima.a20.Controller1#test4(),并且拦截器数量为0。
RequestMappingHandlerAdapter
RequestMappingHandlerAdapter的主要作用是调用控制器的方法。
由于RequestMappingHandlerAdapter是由tomcat服务器管理的,并没有加入spring容器中,为了方便演示,我们添加自己创建的RequestMappingHandlerAdapter,在WebConfig类中添加Bean:
1
2
3
4
@Bean public RequestMappingHandlerAdapter requestMappingHandlerAdapter () { return new RequestMappingHandlerAdapter (); }
由于RequestMappingHandlerAdapter中的重要方法invokeHandlerMethod()被protected关键字修饰,不能调用,因此我们创建一个子类去更改它的访问修饰符:
1
2
3
4
5
6
public class MyRequestMappingHandlerAdapter extends RequestMappingHandlerAdapter { @Override public ModelAndView invokeHandlerMethod (HttpServletRequest request, HttpServletResponse response, HandlerMethod handlerMethod) throws Exception { return super .invokeHandlerMethod(request, response, handlerMethod); } }
修改WebConfig类中RequestMappingHandlerAdapter类型的Bean注入:
1
2
3
4
@Bean public MyRequestMappingHandlerAdapter requestMappingHandlerAdapter () { return new MyRequestMappingHandlerAdapter (); }
在启动类中添加测试代码:
1
2
3
4
5
6
7
8
9
10
MockHttpServletRequest request = new MockHttpServletRequest ("POST" , "/test2" );request.setParameter("name" , "张三" ); MockHttpServletResponse response = new MockHttpServletResponse ();HandlerExecutionChain chain = handlerMapping.getHandler(request);System.out.println(chain); System.out.println(">>>>>>>>>>>>>>>>>>>>>" ); MyRequestMappingHandlerAdapter handlerAdapter = context.getBean(MyRequestMappingHandlerAdapter.class);handlerAdapter.invokeHandlerMethod(request, response, (HandlerMethod) chain.getHandler());
运行启动类,查看控制台:
1
2
3
HandlerExecutionChain with [com.itheima.a20.Controller1#test2(String)] and 0 interceptors >>>>>>>>>>>>>>>>>>>>> [DEBUG] 22 :07 :38.394 [main] com.itheima.a20.Controller1 - test2(张三)
我们发现RequestMappingHandlerAdapter正常调用了方法,并且成功解析了参数,说明@RequestParam成功被解析了,实际上@RequestParam注解的解析是由RequestMappingHandlerAdapter中的其他组件来实现的。
实际上RequestMappingHandlerAdapter中有很多的参数解析器,解析@RequestParam、@RequestBody等注解,我们可以打印一下:
1
2
3
for (HandlerMethodArgumentResolver resolver : handlerAdapter.getArgumentResolvers()) { System.out.println(resolver); }
运行启动类,查看控制台:
1
2
3
4
5
6
7
8
9
10
11
12
13
14
15
16
17
18
19
20
21
22
23
24
25
26
27
org.springframework.web.method.annotation.RequestParamMethodArgumentResolver@58516c91 org.springframework.web.method.annotation.RequestParamMapMethodArgumentResolver@7c129ef6 org.springframework.web.servlet.mvc.method.annotation.PathVariableMethodArgumentResolver@42d73c61 org.springframework.web.servlet.mvc.method.annotation.PathVariableMapMethodArgumentResolver@5a8cbffe org.springframework.web.servlet.mvc.method.annotation.MatrixVariableMethodArgumentResolver@96a75da org.springframework.web.servlet.mvc.method.annotation.MatrixVariableMapMethodArgumentResolver@61e7bf2f org.springframework.web.servlet.mvc.method.annotation.ServletModelAttributeMethodProcessor@1a28b346 org.springframework.web.servlet.mvc.method.annotation.RequestResponseBodyMethodProcessor@25e49cb2 org.springframework.web.servlet.mvc.method.annotation.RequestPartMethodArgumentResolver@7f7af971 org.springframework.web.method.annotation.RequestHeaderMethodArgumentResolver@23382f76 org.springframework.web.method.annotation.RequestHeaderMapMethodArgumentResolver@7c551ad4 org.springframework.web.servlet.mvc.method.annotation.ServletCookieValueMethodArgumentResolver@7d5508e0 org.springframework.web.method.annotation.ExpressionValueMethodArgumentResolver@554cd74a org.springframework.web.servlet.mvc.method.annotation.SessionAttributeMethodArgumentResolver@37ed010a org.springframework.web.servlet.mvc.method.annotation.RequestAttributeMethodArgumentResolver@633a2e99 org.springframework.web.servlet.mvc.method.annotation.ServletRequestMethodArgumentResolver@367d2816 org.springframework.web.servlet.mvc.method.annotation.ServletResponseMethodArgumentResolver@5b84f14 org.springframework.web.servlet.mvc.method.annotation.HttpEntityMethodProcessor@5a82ebf8 org.springframework.web.servlet.mvc.method.annotation.RedirectAttributesMethodArgumentResolver@68fe48d7 org.springframework.web.method.annotation.ModelMethodProcessor@379ce046 org.springframework.web.method.annotation.MapMethodProcessor@701bc94e org.springframework.web.method.annotation.ErrorsMethodArgumentResolver@3d8b319e org.springframework.web.method.annotation.SessionStatusMethodArgumentResolver@27a97e08 org.springframework.web.servlet.mvc.method.annotation.UriComponentsBuilderMethodArgumentResolver@77e7246b org.springframework.web.servlet.mvc.method.annotation.PrincipalMethodArgumentResolver@5918c260 org.springframework.web.method.annotation.RequestParamMethodArgumentResolver@3d7b1f1c org.springframework.web.servlet.mvc.method.annotation.ServletModelAttributeMethodProcessor@51ce6f85
我们可以发现有很多的参数解析器,其中就有解析@RequestParam注解的RequestParamMethodArgumentResolver。
除了参数解析器,还有返回值处理器,用来解析不同类型的返回值,比如字符串、对象、ModelAndView…最终返回值会被统一转换为ModelAndView。我们可以打印一下返回值处理器:
1
2
3
for (HandlerMethodReturnValueHandler handler : handlerAdapter.getReturnValueHandlers()) { System.out.println(handler); }
运行启动类,查看控制台:
1
2
3
4
5
6
7
8
9
10
11
12
13
14
15
org.springframework.web.servlet.mvc.method.annotation.ModelAndViewMethodReturnValueHandler@1f44ddab org.springframework.web.method.annotation.ModelMethodProcessor@5017e1 org.springframework.web.servlet.mvc.method.annotation.ViewMethodReturnValueHandler@65b66b08 org.springframework.web.servlet.mvc.method.annotation.ResponseBodyEmitterReturnValueHandler@4726927c org.springframework.web.servlet.mvc.method.annotation.StreamingResponseBodyReturnValueHandler@7eb6b6b6 org.springframework.web.servlet.mvc.method.annotation.HttpEntityMethodProcessor@7ed9499e org.springframework.web.servlet.mvc.method.annotation.HttpHeadersReturnValueHandler@28e19366 org.springframework.web.servlet.mvc.method.annotation.CallableMethodReturnValueHandler@5b275174 org.springframework.web.servlet.mvc.method.annotation.DeferredResultMethodReturnValueHandler@10ef5fa0 org.springframework.web.servlet.mvc.method.annotation.AsyncTaskMethodReturnValueHandler@244e619a org.springframework.web.servlet.mvc.method.annotation.ServletModelAttributeMethodProcessor@10acd6 org.springframework.web.servlet.mvc.method.annotation.RequestResponseBodyMethodProcessor@61dde151 org.springframework.web.servlet.mvc.method.annotation.ViewNameMethodReturnValueHandler@b25b095 org.springframework.web.method.annotation.MapMethodProcessor@5cb042da org.springframework.web.servlet.mvc.method.annotation.ServletModelAttributeMethodProcessor@59c33386
自定义参数解析器
在Controller中定义方法:
1
2
3
4
5
@PutMapping("/test3") public ModelAndView test3 (@Token String token) { log.debug("test3({})" , token); return null ; }
@Token是我们自定义的注解:
1
2
3
4
@Target(ElementType.PARAMETER) @Retention(RetentionPolicy.RUNTIME) public @interface Token {}
实现自定义的TokenArgumentResolver,需要实现HandlerMethodArgumentResolver接口:
1
2
3
4
5
6
7
8
9
10
11
12
13
14
15
16
17
18
19
20
public class TokenArgumentResolver implements HandlerMethodArgumentResolver { @Override public boolean supportsParameter (MethodParameter parameter) { Token token = parameter.getParameterAnnotation(Token.class); return token != null ; } @Override public Object resolveArgument (MethodParameter parameter, ModelAndViewContainer mavContainer, NativeWebRequest webRequest, WebDataBinderFactory binderFactory) throws Exception { return webRequest.getHeader("token" ); } }
接下来需要将TokenArgumentResolver加入到RequestMappingHandlerAdapter中:
1
2
3
4
5
6
7
@Bean public MyRequestMappingHandlerAdapter requestMappingHandlerAdapter () { TokenArgumentResolver tokenArgumentResolver = new TokenArgumentResolver (); MyRequestMappingHandlerAdapter handlerAdapter = new MyRequestMappingHandlerAdapter (); handlerAdapter.setCustomArgumentResolvers(List.of(tokenArgumentResolver)); return handlerAdapter; }
模拟请求,进行测试:
1
2
3
4
5
6
MockHttpServletRequest request = new MockHttpServletRequest ("PUT" , "/test3" );request.setParameter("name" , "张三" ); request.addHeader("token" , "某个令牌" ); MockHttpServletResponse response = new MockHttpServletResponse ();HandlerExecutionChain chain = handlerMapping.getHandler(request);System.out.println(chain);
运行启动类,查看控制台输出:
1 [DEBUG] 11:03:10.307 [main] com.itheima.a20.Controller1 - test3(某个令牌)
发现能正常解析我们的@Token注解。
自定义返回值处理器
返回值处理器可以解析不同类型的返回值,比如字符串、对象、ModelAndView…除此之外还可以解析方法的注解,比如解析@ResponseBody。
在Controller中定义方法:
1
2
3
4
5
6
@RequestMapping("/test4") @Yml public User test4 () { log.debug("test4" ); return new User ("张三" , 18 ); }
@Yml是我们自定义的注解:
1
2
3
4
@Target(ElementType.METHOD) @Retention(RetentionPolicy.RUNTIME) public @interface Yml {}
@Yml注解将返回值转换为Yml格式,我们可以使用org.yaml.snakeyaml.Yaml工具类进行转换:
1
2
3
4
5
6
7
8
9
10
11
12
13
14
15
16
17
18
19
20
21
22
23
24
25
26
27
28
29
30
public static class User { private String name; private int age; public User (String name, int age) { this .name = name; this .age = age; } public String getName () { return name; } public int getAge () { return age; } public void setName (String name) { this .name = name; } public void setAge (int age) { this .age = age; } } public static void main (String[] args) { String str = new Yaml ().dump(new User ("张三" , 18 )); System.out.println(str); }
控制台输出:
1 !!com.itheima.a20.Controller1$User {age: 18, name: 张三}
实现自定义的YmlReturnValueHandler,需要实现HandlerMethodReturnValueHandler接口:
1
2
3
4
5
6
7
8
9
10
11
12
13
14
15
16
17
18
19
20
21
22
23
24
25
26
27
28
29
public class YmlReturnValueHandler implements HandlerMethodReturnValueHandler { @Override public boolean supportsReturnType (MethodParameter returnType) { Yml yml = returnType.getMethodAnnotation(Yml.class); return yml != null ; } @Override public void handleReturnValue (Object returnValue, MethodParameter returnType, ModelAndViewContainer mavContainer, NativeWebRequest webRequest) throws Exception { String str = new Yaml ().dump(returnValue); HttpServletResponse response = webRequest.getNativeResponse(HttpServletResponse.class); response.setContentType("text/plain;charset=utf-8" ); response.getWriter().print(str); mavContainer.setRequestHandled(true ); } }
接下来需要将YmlReturnValueHandler加入到RequestMappingHandlerAdapter中:
1
2
3
4
5
6
7
8
9
@Bean public MyRequestMappingHandlerAdapter requestMappingHandlerAdapter () { TokenArgumentResolver tokenArgumentResolver = new TokenArgumentResolver (); YmlReturnValueHandler ymlReturnValueHandler = new YmlReturnValueHandler (); MyRequestMappingHandlerAdapter handlerAdapter = new MyRequestMappingHandlerAdapter (); handlerAdapter.setCustomArgumentResolvers(List.of(tokenArgumentResolver)); handlerAdapter.setCustomReturnValueHandlers(List.of(ymlReturnValueHandler)); return handlerAdapter; }
模拟请求,进行测试:
1
2
3
4
5
6
7
8
9
MockHttpServletRequest request = new MockHttpServletRequest ("GET" , "/test4" );MockHttpServletResponse response = new MockHttpServletResponse ();HandlerExecutionChain chain = handlerMapping.getHandler(request);MyRequestMappingHandlerAdapter handlerAdapter = context.getBean(MyRequestMappingHandlerAdapter.class);handlerAdapter.invokeHandlerMethod(request, response, (HandlerMethod) chain.getHandler()); byte [] content = response.getContentAsByteArray();System.out.println(new String (content, StandardCharsets.UTF_8));
运行启动类,查看控制台输出:
1 !!com.itheima.a20.Controller1$User {age: 18, name: 张三}
发现能正常解析我们的@Yml注解。
参数解析器 RequestMappingHandlerAdapter自带的参数解析器:
1
2
3
4
5
6
7
8
9
10
11
12
13
14
15
16
17
18
19
20
21
22
23
24
25
26
27
org.springframework.web.method.annotation.RequestParamMethodArgumentResolver@abbc908 org.springframework.web.method.annotation.RequestParamMapMethodArgumentResolver@44afefd5 org.springframework.web.servlet.mvc.method.annotation.PathVariableMethodArgumentResolver@9a7a808 org.springframework.web.servlet.mvc.method.annotation.PathVariableMapMethodArgumentResolver@72209d93 org.springframework.web.servlet.mvc.method.annotation.MatrixVariableMethodArgumentResolver@2687f956 org.springframework.web.servlet.mvc.method.annotation.MatrixVariableMapMethodArgumentResolver@1ded7b14 org.springframework.web.servlet.mvc.method.annotation.ServletModelAttributeMethodProcessor@29be7749 org.springframework.web.servlet.mvc.method.annotation.RequestResponseBodyMethodProcessor@5f84abe8 org.springframework.web.servlet.mvc.method.annotation.RequestPartMethodArgumentResolver@4650a407 org.springframework.web.method.annotation.RequestHeaderMethodArgumentResolver@30135202 org.springframework.web.method.annotation.RequestHeaderMapMethodArgumentResolver@6a4d7f76 org.springframework.web.servlet.mvc.method.annotation.ServletCookieValueMethodArgumentResolver@10ec523c org.springframework.web.method.annotation.ExpressionValueMethodArgumentResolver@53dfacba org.springframework.web.servlet.mvc.method.annotation.SessionAttributeMethodArgumentResolver@79767781 org.springframework.web.servlet.mvc.method.annotation.RequestAttributeMethodArgumentResolver@78411116 org.springframework.web.servlet.mvc.method.annotation.ServletRequestMethodArgumentResolver@aced190 org.springframework.web.servlet.mvc.method.annotation.ServletResponseMethodArgumentResolver@245a060f org.springframework.web.servlet.mvc.method.annotation.HttpEntityMethodProcessor@6edaa77a org.springframework.web.servlet.mvc.method.annotation.RedirectAttributesMethodArgumentResolver@1e63d216 org.springframework.web.method.annotation.ModelMethodProcessor@62ddd21b org.springframework.web.method.annotation.MapMethodProcessor@16c3ca31 org.springframework.web.method.annotation.ErrorsMethodArgumentResolver@2d195ee4 org.springframework.web.method.annotation.SessionStatusMethodArgumentResolver@2d6aca33 org.springframework.web.servlet.mvc.method.annotation.UriComponentsBuilderMethodArgumentResolver@21ab988f org.springframework.web.servlet.mvc.method.annotation.PrincipalMethodArgumentResolver@29314cc9 org.springframework.web.method.annotation.RequestParamMethodArgumentResolver@4e38d975 org.springframework.web.servlet.mvc.method.annotation.ServletModelAttributeMethodProcessor@35f8a9d3
准备测试代码:
1
2
3
4
5
6
7
8
9
10
11
12
13
14
15
16
17
18
19
20
21
22
23
24
25
26
27
28
29
30
31
32
33
34
35
36
37
38
39
40
41
42
43
44
45
46
47
48
49
50
51
52
53
54
55
56
57
58
59
60
61
62
63
64
65
66
67
68
69
70
71
72
73
74
75
76
77
78
79
80
81
82
83
84
85
86
87
88
89
90
91
92
93
94
95
96
97
98
public class A21 { public static void main (String[] args) throws Exception { AnnotationConfigApplicationContext context = new AnnotationConfigApplicationContext (WebConfig.class); DefaultListableBeanFactory beanFactory = context.getDefaultListableBeanFactory(); HttpServletRequest request = mockRequest(); HandlerMethod handlerMethod = new HandlerMethod (new Controller (), Controller.class.getMethod("test" , String.class, String.class, int .class, String.class, MultipartFile.class, int .class, String.class, String.class, String.class, HttpServletRequest.class, User.class, User.class, User.class)); ServletRequestDataBinderFactory factory = new ServletRequestDataBinderFactory (null , null ); ModelAndViewContainer container = new ModelAndViewContainer (); for (MethodParameter parameter : handlerMethod.getMethodParameters()) { String annotation = Arrays.stream(parameter.getParameterAnnotations()).map(a -> a.annotationType().getSimpleName()).collect(Collectors.joining()); String str = annotation.equals("" ) ? "" : "@" + annotation + " " ; parameter.initParameterNameDiscovery(new DefaultParameterNameDiscoverer ()); System.out.println("[" + parameter.getParameterIndex() + "] " + str + parameter.getParameterType().getSimpleName() + " " + parameter.getParameterName()); } } private static HttpServletRequest mockRequest () { MockHttpServletRequest request = new MockHttpServletRequest (); request.setParameter("name1" , "zhangsan" ); request.setParameter("name2" , "lisi" ); request.addPart(new MockPart ("file" , "abc" , "hello" .getBytes(StandardCharsets.UTF_8))); Map<String, String> map = new AntPathMatcher ().extractUriTemplateVariables("/test/{id}" , "/test/123" ); request.setAttribute(HandlerMapping.URI_TEMPLATE_VARIABLES_ATTRIBUTE, map); request.setContentType("application/json" ); request.setCookies(new Cookie ("token" , "123456" )); request.setParameter("name" , "张三" ); request.setParameter("age" , "18" ); request.setContent(""" { "name":"李四", "age":20 } """ .getBytes(StandardCharsets.UTF_8)); return new StandardServletMultipartResolver ().resolveMultipart(request); } static class Controller { public void test ( @RequestParam("name1") String name1, // name1=张三 String name2, // name2=李四 @RequestParam("age") int age, // age=18 @RequestParam(name = "home", defaultValue = "${JAVA_HOME}") String home1, // spring 获取数据 @RequestParam("file") MultipartFile file, // 上传文件 @PathVariable("id") int id, // /test/124 /test/{id} @RequestHeader("Content-Type") String header, @CookieValue("token") String token, @Value("${JAVA_HOME}") String home2, // spring 获取数据 ${} #{} HttpServletRequest request, // request, response, session ... @ModelAttribute("abc") User user1, // name=zhang&age=18 User user2, // name=zhang&age=18 @RequestBody User user3 // json ) { } } static class User { private String name; private int age; public String getName () { return name; } public void setName (String name) { this .name = name; } public int getAge () { return age; } public void setAge (int age) { this .age = age; } @Override public String toString () { return "User{" + "name='" + name + '\'' + ", age=" + age + '}' ; } } }
运行启动类,查看控制台:
1
2
3
4
5
6
7
8
9
10
11
12
13
[0] @RequestParam String name1 [1] String name2 [2] @RequestParam int age [3] @RequestParam String home1 [4] @RequestParam MultipartFile file [5] @PathVariable int id [6] @RequestHeader String header [7] @CookieValue String token [8] @Value String home2 [9] HttpServletRequest request [10] @ModelAttribute User user1 [11] User user2 [12] @RequestBody User user3
我们已经能够拿到Controller中HandlerMethod的属性,例如注解、参数类型、参数名称等
RequestParamMethodArgumentResolver
我们添加一个RequestParamMethodArgumentResolver来解析@RequestParam注解:
1 2 RequestParamMethodArgumentResolver resolver = new RequestParamMethodArgumentResolver (null , false );
调用它的方法解析数据:
1
2
3
4
5
6
7
if (resolver.supportsParameter(parameter)) { Object v = resolver.resolveArgument(parameter, container, new ServletWebRequest (request), null ); System.out.println("[" + parameter.getParameterIndex() + "] " + str + parameter.getParameterType().getSimpleName() + " " + parameter.getParameterName() + "->" + v); } else { System.out.println("[" + parameter.getParameterIndex() + "] " + str + parameter.getParameterType().getSimpleName() + " " + parameter.getParameterName()); }
运行启动类,查看控制台:
1
2
3
4
5
6
7
8
9
10
11
12
13
[0] @RequestParam String name1->zhangsan [1] String name2 [2] @RequestParam int age->18 [3] @RequestParam String home1->${JAVA_HOME} [4] @RequestParam MultipartFile file->org.springframework.web.multipart.support.StandardMultipartHttpServletRequest$StandardMultipartFile@50313382 [5] @PathVariable int id [6] @RequestHeader String header [7] @CookieValue String token [8] @Value String home2 [9] HttpServletRequest request [10] @ModelAttribute User user1 [11] User user2 [12] @RequestBody User user3
发现只要标注了@RequestParam注解的参数都已经被解析成功。
我们将解析出来的值的类型打印出来:
1 System.out.println(v.getClass());
运行启动类,查看控制台:
1
2
3
4
5
6
7
8
9
10
11
12
13
14
15
16
17
class java.lang.String [0] @RequestParam String name1->zhangsan [1] String name2 class java.lang.String [2] @RequestParam int age->18 class java.lang.String [3] @RequestParam String home1->${JAVA_HOME} class org.springframework.web.multipart.support.StandardMultipartHttpServletRequest$StandardMultipartFile [4] @RequestParam MultipartFile file->org.springframework.web.multipart.support.StandardMultipartHttpServletRequest$StandardMultipartFile@50313382 [5] @PathVariable int id [6] @RequestHeader String header [7] @CookieValue String token [8] @Value String home2 [9] HttpServletRequest request [10] @ModelAttribute User user1 [11] User user2 [12] @RequestBody User user3
发现age参数没有进行类型转换,我们期望的是数值型,但最终还是字符串类型。
我们需要准备一个类型转换工厂:
1 ServletRequestDataBinderFactory factory = new ServletRequestDataBinderFactory (null , null );
在调用resolveArgument()方法时传入此工厂:
1 Object v = resolver.resolveArgument(parameter, container, new ServletWebRequest (request), factory);
运行启动类,查看控制台:
1
2
3
4
5
6
7
8
9
10
11
12
13
14
15
16
17
class java.lang.String [0] @RequestParam String name1->zhangsan [1] String name2 class java.lang.Integer [2] @RequestParam int age->18 class java.lang.String [3] @RequestParam String home1->${JAVA_HOME} class org.springframework.web.multipart.support.StandardMultipartHttpServletRequest$StandardMultipartFile [4] @RequestParam MultipartFile file->org.springframework.web.multipart.support.StandardMultipartHttpServletRequest$StandardMultipartFile@6c372fe6 [5] @PathVariable int id [6] @RequestHeader String header [7] @CookieValue String token [8] @Value String home2 [9] HttpServletRequest request [10] @ModelAttribute User user1 [11] User user2 [12] @RequestBody User user3
发现age参数已经帮我们进行了类型转换。
再次观察输出结果,发现在request中我们没有传入home1参数,因此原样输出了${JAVA_HOME},但这并不是我们想要的结果,我们需要的是${JAVA_HOME}被解析后的结果。说明表达式并没有被解析,我们可以使用BeanFactory容器提供的表达式解析器去解析。
获取beanFactory,在创建参数解析器的时候传入BeanFactory:
1
2
DefaultListableBeanFactory beanFactory = context.getDefaultListableBeanFactory();RequestParamMethodArgumentResolver resolver = new RequestParamMethodArgumentResolver (beanFactory, false );
运行启动类,查看控制台:
1
2
3
4
5
6
7
8
9
10
11
12
13
14
15
16
17
class java.lang.String [0] @RequestParam String name1->zhangsan [1] String name2 class java.lang.Integer [2] @RequestParam int age->18 class java.lang.String [3] @RequestParam String home1->C:\Path\jdk-14.0.1 class org.springframework.web.multipart.support.StandardMultipartHttpServletRequest$StandardMultipartFile [4] @RequestParam MultipartFile file->org.springframework.web.multipart.support.StandardMultipartHttpServletRequest$StandardMultipartFile@19e7a160 [5] @PathVariable int id [6] @RequestHeader String header [7] @CookieValue String token [8] @Value String home2 [9] HttpServletRequest request [10] @ModelAttribute User user1 [11] User user2 [12] @RequestBody User user3
发现${}表达式成功被解析。
我们将new RequestParamMethodArgumentResolver()第二个参数设置为true:
1 2 RequestParamMethodArgumentResolver resolver = new RequestParamMethodArgumentResolver (null , true );
运行启动类,查看控制台:
1
2
3
4
5
6
7
8
9
10
11
12
13
14
class java.lang.String [0] @RequestParam String name1->zhangsan class java.lang.String [1] String name2->lisi class java.lang.Integer [2] @RequestParam int age->18 class java.lang.String [3] @RequestParam String home1->C:\Path\jdk-14.0.1 class org.springframework.web.multipart.support.StandardMultipartHttpServletRequest$StandardMultipartFile [4] @RequestParam MultipartFile file->org.springframework.web.multipart.support.StandardMultipartHttpServletRequest$StandardMultipartFile@4e31276e Exception in thread "main" java.lang.IllegalStateException: Optional int parameter 'id' is present but cannot be translated into a null value due to being declared as a primitive type. Consider declaring it as object wrapper for the corresponding primitive type. at org.springframework.web.method.annotation.AbstractNamedValueMethodArgumentResolver.handleNullValue(AbstractNamedValueMethodArgumentResolver.java:263) at org.springframework.web.method.annotation.AbstractNamedValueMethodArgumentResolver.resolveArgument(AbstractNamedValueMethodArgumentResolver.java:116) at com.spring.test._21_.A21.main(A21.java:87)
发现name2这种没有带@RequestParam注解的参数也被成功解析了。
但是解析到带有@PathVariable注解的参数id却出错了,这是因为只要没有带@RequestParam注解的参数例如@PathVariable、@RequestHeader、@CookieValue等注解RequestParamMethodArgumentResolver都会尝试去解析,因此会解析失败。针对这种情况,其实我们只需要把其他类型的解析器都添加上,每个解析器都会去尝试解析,只要有一个解析器解析成功就以此值为准。
Spring中提供了HandlerMethodArgumentResolverComposite类,它使用了组合模式。我们只需要将解析器添加进去,直接调用HandlerMethodArgumentResolverComposite的supportsParameter()方法和resolveArgument()方法即可,不需要一个一个去调用判断,体现了组合模式的优势。
HandlerMethodArgumentResolverComposite使用示例:
1
2
3
4
5
6
7
8
9
10
11
12
13
HandlerMethodArgumentResolverComposite composite = new HandlerMethodArgumentResolverComposite ();composite.addResolvers( new RequestParamMethodArgumentResolver (beanFactory, false ) ); if (composite.supportsParameter(parameter)) { Object v = composite.resolveArgument(parameter, container, new ServletWebRequest (request), factory); System.out.println(v.getClass()); System.out.println("[" + parameter.getParameterIndex() + "] " + str + parameter.getParameterType().getSimpleName() + " " + parameter.getParameterName() + "->" + v); } else { System.out.println("[" + parameter.getParameterIndex() + "] " + str + parameter.getParameterType().getSimpleName() + " " + parameter.getParameterName()); }
PathVariableMethodArgumentResolver
PathVariableMethodArgumentResolver解析器实际上是从request去取HandlerMapping.URI_TEMPLATE_VARIABLES_ATTRIBUTE键对应的map值,然后从这个map中去取值,这里我们没有HandlerMapping去解析映射,因此我们手动模拟:
1
2
Map<String, String> map = new AntPathMatcher ().extractUriTemplateVariables("/test/{id}" , "/test/123" ); request.setAttribute(HandlerMapping.URI_TEMPLATE_VARIABLES_ATTRIBUTE, map);
map的内容实际为:
我们添加PathVariableMethodArgumentResolver解析器:
1
2
3
4
composite.addResolvers( new PathVariableMethodArgumentResolver () );
运行启动类,查看控制台:
1 [5] @PathVariable int id->123
发现id参数已经成功被解析。
RequestHeaderMethodArgumentResolver
RequestHeaderMethodArgumentResolver解析器主要解析请求头中的内容,我们添加此解析器:
1
2
3
4
composite.addResolvers( new RequestHeaderMethodArgumentResolver (beanFactory) );
运行启动类,查看控制台:
1 [6] @RequestHeader String header->application/json
发现header参数已经成功被解析。
ServletCookieValueMethodArgumentResolver
ServletCookieValueMethodArgumentResolver解析器是从cookie中获取数据,我们添加此解析器:
1
2
3
4
composite.addResolvers( new ServletCookieValueMethodArgumentResolver (beanFactory) );
运行启动类,查看控制台:
1 [7] @CookieValue String token->123456
发现token参数已经成功被解析。
ExpressionValueMethodArgumentResolver
ExpressionValueMethodArgumentResolver解析器从BeanFactory中获取数据,并且支持EL表达式,我们添加此解析器:
1
2
3
4
composite.addResolvers( new ExpressionValueMethodArgumentResolver (beanFactory) );
运行启动类,查看控制台:
1 [8] @Value String home2->C:\Path\jdk-14.0.1
发现home2参数已经成功被解析。
ServletRequestMethodArgumentResolver
ServletRequestMethodArgumentResolver解析器是根据类型解析数据,会将web容器中的类型注入,我们添加此解析器:
1
2
3
4
composite.addResolvers( new ServletRequestMethodArgumentResolver () );
运行启动类,查看控制台:
1 HttpServletRequest request->org.springframework.web.multipart.support.StandardMultipartHttpServletRequest@6c0d7c83
发现request参数已经成功被解析。
除了解析HttpServletRequest类型之外,它还支持很多类型,我们可以查看它的supportsParameter()方法:
1
2
3
4
public boolean supportsParameter (MethodParameter parameter) { Class<?> paramType = parameter.getParameterType(); return WebRequest.class.isAssignableFrom(paramType) || ServletRequest.class.isAssignableFrom(paramType) || MultipartRequest.class.isAssignableFrom(paramType) || HttpSession.class.isAssignableFrom(paramType) || pushBuilder != null && pushBuilder.isAssignableFrom(paramType) || Principal.class.isAssignableFrom(paramType) && !parameter.hasParameterAnnotations() || InputStream.class.isAssignableFrom(paramType) || Reader.class.isAssignableFrom(paramType) || HttpMethod.class == paramType || Locale.class == paramType || TimeZone.class == paramType || ZoneId.class == paramType; }
可以发现一些常用的类型,例如ServletRequest、HttpSession等
ServletModelAttributeMethodProcessor
ServletModelAttributeMethodProcessor解析器可以解析请求参数并封装为Model,最终会存到ModelAndViewContainer中,我们添加此解析器:
1
2
3
4
5
composite.addResolvers( new ServletModelAttributeMethodProcessor (false ) );
运行启动类,查看控制台:
1 [10] @ModelAttribute User user1->User{name='zhangsan', age=18}
发现请求参数已经成功被封装为User对象。
我们可以再加一个ServletModelAttributeMethodProcessor参数为true的解析器,用来解析不带@ModelAttribute注解的参数:
1
2
3
4
5
composite.addResolvers( new ServletModelAttributeMethodProcessor (true ) );
运行启动类,查看控制台:
1 [11] User user2->User{name='zhangsan', age=18}
发现不带@ModelAttribute注解的参数也已经成功被封装为User对象。
除了封装将请求参数封装为Model,还会存到ModelAndViewContainer中,我们打印ModelAndViewContainer:
1 System.out.println("model:" + container.getModel());
运行启动类,查看控制台:
1
2
3
4
5
[10] @ModelAttribute User user1->User{name='zhangsan', age=18} model:{abc=User{name='zhangsan', age=18}, org.springframework.validation.BindingResult.abc=org.springframework.validation.BeanPropertyBindingResult: 0 errors} class com.spring.test._21_.A21$User [11] User user2->User{name='zhangsan', age=18} model:{abc=User{name='zhangsan', age=18}, org.springframework.validation.BindingResult.abc=org.springframework.validation.BeanPropertyBindingResult: 0 errors, user=User{name='zhangsan', age=18}, org.springframework.validation.BindingResult.user=org.springframework.validation.BeanPropertyBindingResult: 0 errors}
[10]是带有@ModelAttribute注解的参数,[11]是不带有@ModelAttribute注解的参数,发现都会将解析后的数据存到ModelAndViewContainer中。
RequestResponseBodyMethodProcessor
RequestResponseBodyMethodProcessor解析器会将请求体中的数据绑定到对象上,我们添加此解析器:
1
2
3
4
5
6
composite.addResolvers( new ServletModelAttributeMethodProcessor (false ), new RequestResponseBodyMethodProcessor (List.of(new MappingJackson2HttpMessageConverter ())), new ServletModelAttributeMethodProcessor (true ), );
注意RequestResponseBodyMethodProcessor解析器不能放在ServletModelAttributeMethodProcessor(true)之后,否则解析的时候会优先使用ServletModelAttributeMethodProcessor(true)解析器(从请求参数中取值),就不会使用RequestResponseBodyMethodProcessor解析器。
运行启动类,查看控制台:
1 [12] @RequestBody User user3->User{name='lisi', age=20}
发现带@RequestBody注解的参数已经成功被封装为User对象。
参数名解析 参数名称原理 在通过HandlerMethod的getMethodParameters()方法获取MethodParameter之后,我们直接通过
MethodParameter的getParameterName()方法获取参数名是获取不到的。我们必须通过MethodParameter的initParameterNameDiscovery()方法添加一个参数解析器才能获取到参数,说明参数的获取并不是我们想象的那么简单。
为了避免idea为我们编译类,我们在show模块下创建a22目录,并在a22目录下创建com.itheima.a22包,在此包下创建测试类。
我们创建一个测试类:
1
2
3
4
5
6
7
public class Bean2 { public Bean2 () { } public void foo (String name, int age) { } }
使用javac命令手动编译此类:
使用idea查看反编译后的代码:
1
2
3
4
5
6
7
public class Bean2 { public Bean2 () { } public void foo (String var1, int var2) { } }
发现我们的参数名被丢弃了,变成了var1、var2。说明在不加任何编译参数的情况下,是不会保留代码参数名的。
使用javap命令反编译代码:
1
2
3
4
5
6
7
8
9
10
11
12
13
14
15
16
17
18
19
20
21
22
23
24
25
26
27
28
29
30
31
32
33
34
35
36
37
38
39
40
41
42
43
44
45
46
47
48
49
50
51
52
53
54
55
56
javap -c -v .\Bean2.class Classfile /F:/Java/黑马全套java教程/第2阶段企业级开发—基础框架/7、spring高级45讲/代码/代码/show/a22/com/itheima/a22/Bean2.class Last modified 2023年4月4日; size 317 bytes SHA-256 checksum 178e5acc8063e10d20b3da678a5d96fa1b8329c21794834b5304135963070a9a Compiled from "Bean2.java" public class com.itheima.a22.Bean2 minor version: 0 major version: 58 flags: (0x0021) ACC_PUBLIC, ACC_SUPER this_class: #7 // com/itheima/a22/Bean2 super_class: #2 // java/lang/Object interfaces: 0, fields: 0, methods: 2, attributes: 1 Constant pool: # 1 = Methodref # 2 = Class # 3 = NameAndType # 4 = Utf8 java/lang/Object # 5 = Utf8 <init> # 6 = Utf8 ()V # 7 = Class # 8 = Utf8 com/itheima/a22/Bean2 # 9 = Utf8 Code # 10 = Utf8 LineNumberTable # 11 = Utf8 foo # 12 = Utf8 (Ljava/lang/String;I)V # 13 = Utf8 MethodParameters # 14 = Utf8 name # 15 = Utf8 age # 16 = Utf8 SourceFile # 17 = Utf8 Bean2.java { public com.itheima.a22.Bean2(); descriptor: ()V flags: (0x0001) ACC_PUBLIC Code: stack=1, locals=1, args_size=1 0: aload_0 1: invokespecial #1 // Method java/lang/Object."<init>":()V 4: return LineNumberTable: line 3: 0 public void foo(java.lang.String, int); descriptor: (Ljava/lang/String;I)V flags: (0x0001) ACC_PUBLIC Code: stack=0, locals=3, args_size=3 0: return LineNumberTable: line 6: 0 MethodParameters: Name Flags name age } SourceFile: "Bean2.java"
发现并没有保存参数名称信息。
有两种方式可以解决这个问题:
编译命令添加-parameters参数
1 javac -parameters .\Bean2.java
然后再使用idea查看反编译后的代码:
1
2
3
4
5
6
7
public class Bean2 { public Bean2 () { } public void foo (String name, int age) { } }
发现保留了参数名称。
使用javap命令反编译代码:
1
2
3
4
5
6
7
8
9
10
11
12
13
14
15
16
17
18
19
20
21
22
23
24
25
26
27
28
29
30
31
32
33
34
35
36
37
38
39
40
41
42
43
44
45
46
47
48
49
50
51
52
53
54
55
56
javap -c -v .\Bean2.class Classfile /F:/Java/黑马全套java教程/第2阶段企业级开发—基础框架/7、spring高级45讲/代码/代码/show/a22/com/itheima/a22/Bean2.class Last modified 2023年4月4日; size 317 bytes SHA-256 checksum 178e5acc8063e10d20b3da678a5d96fa1b8329c21794834b5304135963070a9a Compiled from "Bean2.java" public class com.itheima.a22.Bean2 minor version: 0 major version: 58 flags: (0x0021) ACC_PUBLIC, ACC_SUPER this_class: #7 // com/itheima/a22/Bean2 super_class: #2 // java/lang/Object interfaces: 0, fields: 0, methods: 2, attributes: 1 Constant pool: # 1 = Methodref # 2 = Class # 3 = NameAndType # 4 = Utf8 java/lang/Object # 5 = Utf8 <init> # 6 = Utf8 ()V # 7 = Class # 8 = Utf8 com/itheima/a22/Bean2 # 9 = Utf8 Code # 10 = Utf8 LineNumberTable # 11 = Utf8 foo # 12 = Utf8 (Ljava/lang/String;I)V # 13 = Utf8 MethodParameters # 14 = Utf8 name # 15 = Utf8 age # 16 = Utf8 SourceFile # 17 = Utf8 Bean2.java { public com.itheima.a22.Bean2(); descriptor: ()V flags: (0x0001) ACC_PUBLIC Code: stack=1, locals=1, args_size=1 0: aload_0 1: invokespecial #1 // Method java/lang/Object."<init>":()V 4: return LineNumberTable: line 3: 0 public void foo(java.lang.String, int); descriptor: (Ljava/lang/String;I)V flags: (0x0001) ACC_PUBLIC Code: stack=0, locals=3, args_size=3 0: return LineNumberTable: line 6: 0 MethodParameters: Name Flags name age } SourceFile: "Bean2.java"
发现比没有添加任何参数的编译命令多了MethodParameters值,其中记录了参数名称。
编译命令添加-g选项
然后再使用idea查看反编译后的代码:
1
2
3
4
5
6
7
public class Bean2 { public Bean2 () { } public void foo (String name, int age) { } }
发现也保留了参数名称。
使用javap命令反编译代码:
1
2
3
4
5
6
7
8
9
10
11
12
13
14
15
16
17
18
19
20
21
22
23
24
25
26
27
28
29
30
31
32
33
34
35
36
37
38
39
40
41
42
43
44
45
46
47
48
49
50
51
52
53
54
55
56
57
58
59
60
61
62
63
64
javap -c -v .\Bean2.class Classfile /F:/Java/黑马全套java教程/第2阶段企业级开发—基础框架/7、spring高级45讲/代码/代码/show/a22/com/itheima/a22/Bean2.class Last modified 2023年4月4日; size 418 bytes SHA-256 checksum 7ca753d2e057ff492011420a6e1ec419c0025fbedff47832ddb179560b1b42cd Compiled from "Bean2.java" public class com.itheima.a22.Bean2 minor version: 0 major version: 58 flags: (0x0021) ACC_PUBLIC, ACC_SUPER this_class: #7 // com/itheima/a22/Bean2 super_class: #2 // java/lang/Object interfaces: 0, fields: 0, methods: 2, attributes: 1 Constant pool: # 1 = Methodref # 2 = Class # 3 = NameAndType # 4 = Utf8 java/lang/Object # 5 = Utf8 <init> # 6 = Utf8 ()V # 7 = Class # 8 = Utf8 com/itheima/a22/Bean2 # 9 = Utf8 Code # 10 = Utf8 LineNumberTable # 11 = Utf8 LocalVariableTable # 12 = Utf8 this # 13 = Utf8 Lcom/itheima/a22/Bean2; # 14 = Utf8 foo # 15 = Utf8 (Ljava/lang/String;I)V # 16 = Utf8 name # 17 = Utf8 Ljava/lang/String; # 18 = Utf8 age # 19 = Utf8 I # 20 = Utf8 SourceFile # 21 = Utf8 Bean2.java { public com.itheima.a22.Bean2(); descriptor: ()V flags: (0x0001) ACC_PUBLIC Code: stack=1, locals=1, args_size=1 0: aload_0 1: invokespecial #1 // Method java/lang/Object."<init>":()V 4: return LineNumberTable: line 3: 0 LocalVariableTable: Start Length Slot Name Signature 0 5 0 this Lcom/itheima/a22/Bean2; public void foo(java.lang.String, int); descriptor: (Ljava/lang/String;I)V flags: (0x0001) ACC_PUBLIC Code: stack=0, locals=3, args_size=3 0: return LineNumberTable: line 6: 0 LocalVariableTable: Start Length Slot Name Signature 0 1 0 this Lcom/itheima/a22/Bean2; 0 1 1 name Ljava/lang/String; 0 1 2 age I } SourceFile: "Bean2.java"
发现比没有添加任何参数的编译命令多了LocalVariableTable值,其中记录了参数名称。
使用-parameters与使用-g选项的区别:
使用-parameters生成的MethodParameters可以通过反射获取
使用-g生成的LocalVariableTable不能通过反射获取,但能通过ASM方式获取
Spring对这两种方式都支持
获取参数名称 首先我们需要将a22/com/itheima/a22加入模块依赖:
打开项目结构
点击模块,选择show模块
点击依赖,点击+号,选择JAR或目录
选择a22/com/itheima/a22,点击应用
编写测试代码,分别通过反射和ASM的方式获取参数名:
1
2
3
4
5
6
7
8
9
10
11
12
13
14
15
16
public class A22 { public static void main (String[] args) throws NoSuchMethodException, ClassNotFoundException { Method foo = Bean2.class.getMethod("foo" , String.class, int .class); for (Parameter parameter : foo.getParameters()) { System.out.println(parameter.getName()); } System.out.println("-----------" ); LocalVariableTableParameterNameDiscoverer discoverer = new LocalVariableTableParameterNameDiscoverer (); String[] parameterNames = discoverer.getParameterNames(foo); System.out.println(Arrays.toString(parameterNames)); } }
测试不带任何参数编译类文件:
运行启动类,查看控制台:
1
2
3
4
arg0 arg1 ----------- null
发现通过反射获取的参数名为编译后的默认名称,而通过LocalVariableTable变量表的方式获取不到任何信息。
测试带-parameters参数编译类文件:
1 javac -parameters .\Bean2.java
运行启动类,查看控制台:
1
2
3
4
name age ----------- null
发现通过反射能成功获取参数名称,而通过LocalVariableTable变量表的方式获取不到任何信息。
测试带-g选项编译类文件:
运行启动类,查看控制台:
1
2
3
4
arg0 arg1 ----------- [name, age]
发现通过反射获取的参数名为编译后的默认名称,而通过LocalVariableTable变量表的方式能正常获取参数名称。
Spring中其实将以上两种参数解析的方式统一了,ParameterNameDiscoverer接口有一个实现DefaultParameterNameDiscoverer:
1
2
3
4
5
6
7
8
9
10
11
12
public class DefaultParameterNameDiscoverer extends PrioritizedParameterNameDiscoverer { public DefaultParameterNameDiscoverer () { if (KotlinDetector.isKotlinReflectPresent() && !NativeDetector.inNativeImage()) { this .addDiscoverer(new KotlinReflectionParameterNameDiscoverer ()); } this .addDiscoverer(new StandardReflectionParameterNameDiscoverer ()); this .addDiscoverer(new LocalVariableTableParameterNameDiscoverer ()); } }
通过本地变量表的方式获取参数名称有一个局限性,它只能获取普通类的方法上的参数,而不能获取接口的方法上的参数名称。
我们创建一个接口:
1
2
3
public interface Bean1 { public void foo (String name, int age) ; }
使用javac -g .\Bean1.java命令编译,然后使用javap -c -v .\Bean1.class命令反编译:
1
2
3
4
5
6
7
8
9
10
11
12
13
14
15
16
17
18
19
Classfile /F:/Java/黑马全套java教程/第2阶段企业级开发—基础框架/7、spring高级45讲/代码/代码/show/a22/com/itheima/a22/Bean1.class Last modified 2023年4月4日; size 146 bytes SHA-256 checksum 916828ed8e8f37b1a074cb49b21e55a5b35ffd2ecad4926d0608828fc3d1bc5d Compiled from "Bean1.java" public interface com.itheima.a22.Bean1 minor version: 0 major version: 58 flags: (0x0601) ACC_PUBLIC, ACC_INTERFACE, ACC_ABSTRACT this_class: #1 // com/itheima/a22/Bean1 super_class: #3 // java/lang/Object #6 = Utf8 (Ljava/lang/String;I)V #7 = Utf8 SourceFile #8 = Utf8 Bean1.java { public abstract void foo(java.lang.String, int); descriptor: (Ljava/lang/String;I)V flags: (0x0401) ACC_PUBLIC, ACC_ABSTRACT } SourceFile: "Bean1.java"
发现反编译后的代码没有LocalVariableTable信息。
而通过javac -parameters .\Bean2.java这种方式对于普通类和接口都有效,我们可以测试一下,使用javac -parameters .\Bean1.java命令编译,然后使用javap -c -v .\Bean1.class命令反编译:
1
2
3
4
5
6
7
8
9
10
11
12
13
14
15
16
17
18
19
20
21
22
23
24
25
26
27
28
29
30
31
32
33
Classfile /F:/Java/黑马全套java教程/第2阶段企业级开发—基础框架/7、spring高级45讲/代码/代码/show/a22/com/itheima/a22/Bean1.class Last modified 2023年4月4日; size 193 bytes SHA-256 checksum 4c2d4e73c785737a30dd1c6986385adced085c4e191a26181f84d6fd253a8c7b Compiled from "Bean1.java" public interface com.itheima.a22.Bean1 minor version: 0 major version: 58 flags: (0x0601) ACC_PUBLIC, ACC_INTERFACE, ACC_ABSTRACT this_class: #1 // com/itheima/a22/Bean1 super_class: #3 // java/lang/Object interfaces: 0, fields: 0, methods: 1, attributes: 1 Constant pool: #1 = Class #2 // com/itheima/a22/Bean1 #2 = Utf8 com/itheima/a22/Bean1 #3 = Class #4 // java/lang/Object #4 = Utf8 java/lang/Object #5 = Utf8 foo #6 = Utf8 (Ljava/lang/String;I)V #7 = Utf8 MethodParameters #8 = Utf8 name #9 = Utf8 age #10 = Utf8 SourceFile #11 = Utf8 Bean1.java { public abstract void foo(java.lang.String, int); descriptor: (Ljava/lang/String;I)V flags: (0x0401) ACC_PUBLIC, ACC_ABSTRACT MethodParameters: Name Flags name age } SourceFile: "Bean1.java"
发现也有MethodParameters信息。
对象绑定与类型转换 底层类型转换接口
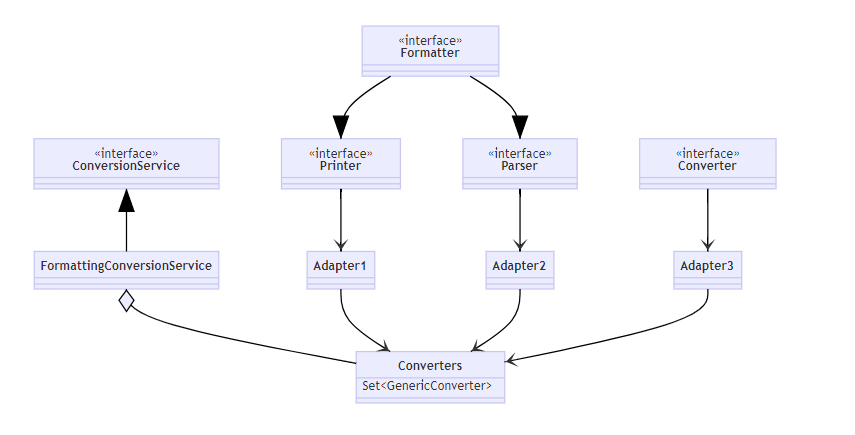
底层第一套转换接口与实现:
Printer把其它类型转为StringParser把String转为其它类型Formatter综合Printer与Parser功能Converter把类型S转为类型TPrinter、Parser、Converter 经过适配转换成GenericConverter放入Converters集合FormattingConversionService利用其它们实现转换
第一套转换接口与实现是由Spring提供的
底层第二套转换接口与实现:
PropertyEditor把String与其它类型相互转换PropertyEditorRegistry可以注册多个PropertyEditor对象与第一套接口直接可以通过FormatterPropertyEditorAdapter来进行适配
第二套转换接口与实现是由JDK提供的
为什么要使用两套转换接口呢,这里可能是Spring的历史遗留问题,最早的时候Spring使用的是由JDK提供的类型转换接口,后来可能觉得JDK提供的功能不够全面,自己实现了一套类型转换接口。而为了保证版本向前兼容,因此保留了JDK提供的类型转换接口的实现。
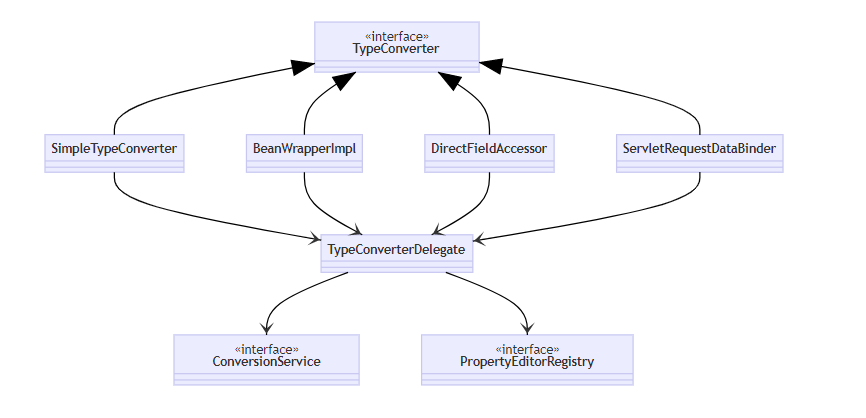
高级类型转换接口
它们都实现了TypeConverter这个高层转换接口,在转换时,会用到TypeConverterDelegate委派ConversionService与PropertyEditorRegistry真正执行转换(Facade门面模式)
首先看是否有自定义转换器, @InitBinder添加的即属于这种 (用了适配器模式把Formatter转为需要的 PropertyEditor)
再看有没有ConversionService转换
再利用默认的PropertyEditor转换
最后有一些特殊处理
SimpleTypeConverter仅做类型转换BeanWrapperImpl为bean的属性赋值,当需要时做类型转换,走PropertyDirectFieldAccessor为bean的属性赋值,当需要时做类型转换,走FieldServletRequestDataBinder为bean的属性执行绑定,当需要时做类型转换,根据directFieldAccess选择走Property还是Field,具备校验与获取校验结果功能
类型转换与数据绑定示例 SimpleTypeConverter SimpleTypeConverter仅有类型转换的功能:
1
2
3
4
5
6
7
8
9
public class TestSimpleConverter { public static void main (String[] args) { SimpleTypeConverter typeConverter = new SimpleTypeConverter (); Integer number = typeConverter.convertIfNecessary("13" , int .class); Date date = typeConverter.convertIfNecessary("1999/03/04" , Date.class); System.out.println(number); System.out.println(date); } }
运行启动类,控制台输出:
1
2
13 Thu Mar 04 00:00:00 CST 1999
BeanWrapperImpl BeanWrapperImpl为bean的属性赋值,当需要时做类型转换,走Property:
1
2
3
4
5
6
7
8
9
10
11
12
13
14
15
16
17
18
19
20
21
22
23
24
25
26
27
28
29
30
31
32
33
34
35
36
37
38
39
40
41
42
43
44
45
46
47
48
49
public class TestBeanWrapper { public static void main (String[] args) { MyBean target = new MyBean (); BeanWrapperImpl wrapper = new BeanWrapperImpl (target); wrapper.setPropertyValue("a" , "10" ); wrapper.setPropertyValue("b" , "hello" ); wrapper.setPropertyValue("c" , "1999/03/04" ); System.out.println(target); } static class MyBean { private int a; private String b; private Date c; public int getA () { return a; } public void setA (int a) { this .a = a; } public String getB () { return b; } public void setB (String b) { this .b = b; } public Date getC () { return c; } public void setC (Date c) { this .c = c; } @Override public String toString () { return "MyBean{" + "a=" + a + ", b='" + b + '\'' + ", c=" + c + '}' ; } } }
运行启动类,控制台输出:
1 MyBean{a=10, b='hello', c=Thu Mar 04 00:00:00 CST 1999}
DirectFieldAccessor DirectFieldAccessor为bean的属性赋值,当需要时做类型转换,走Field:
1
2
3
4
5
6
7
8
9
10
11
12
13
14
15
16
17
18
19
20
21
22
23
24
25
public class TestFieldAccessor { public static void main (String[] args) { MyBean target = new MyBean (); DirectFieldAccessor accessor = new DirectFieldAccessor (target); accessor.setPropertyValue("a" , "10" ); accessor.setPropertyValue("b" , "hello" ); accessor.setPropertyValue("c" , "1999/03/04" ); System.out.println(target); } static class MyBean { private int a; private String b; private Date c; @Override public String toString () { return "MyBean{" + "a=" + a + ", b='" + b + '\'' + ", c=" + c + '}' ; } } }
运行启动类,控制台输出:
1 MyBean{a=10, b='hello', c=Thu Mar 04 00:00:00 CST 1999}
DataBinder DataBinder执行数据绑定,DataBinder有两个方法
initBeanPropertyAccess()使用property的方式绑定数据initDirectFieldAccess()使用field的方式绑定数据
我们查看源代码:
1
2
3
4
5
6
7
8
public void initBeanPropertyAccess () { Assert.state(this .bindingResult == null , "DataBinder is already initialized - call initBeanPropertyAccess before other configuration methods" ); this .directFieldAccess = false ; } public void initDirectFieldAccess () { Assert.state(this .bindingResult == null , "DataBinder is already initialized - call initDirectFieldAccess before other configuration methods" ); this .directFieldAccess = true ; }
发现就是将directFieldAccess修改为不同的值。
1
2
3
4
5
6
7
8
9
10
11
12
13
14
15
16
17
18
19
20
21
22
23
24
25
26
27
28
29
public class TestDataBinder { public static void main (String[] args) { MyBean target = new MyBean (); DataBinder dataBinder = new DataBinder (target); dataBinder.initDirectFieldAccess(); MutablePropertyValues pvs = new MutablePropertyValues (); pvs.add("a" , "10" ); pvs.add("b" , "hello" ); pvs.add("c" , "1999/03/04" ); dataBinder.bind(pvs); System.out.println(target); } static class MyBean { private int a; private String b; private Date c; @Override public String toString () { return "MyBean{" + "a=" + a + ", b='" + b + '\'' + ", c=" + c + '}' ; } } }
运行启动类,控制台输出:
1 MyBean{a=10, b='hello', c=Thu Mar 04 00:00:00 CST 1999}
以上是普通环境中DataBinder的数据绑定,在WEB环境中也有相对应的实现,我们需要将DataBinder的实现替换为ServletRequestDataBinder,同时将MutablePropertyValues的实现替换为ServletRequestParameterPropertyValues:
1
2
3
4
5
6
7
8
9
10
11
12
13
14
15
16
17
18
19
20
21
22
23
24
25
26
27
28
29
30
31
32
33
34
35
36
37
38
39
40
41
42
43
44
45
46
47
48
49
50
51
52
53
54
55
public class TestServletDataBinder { public static void main (String[] args) { MyBean target = new MyBean (); ServletRequestDataBinder dataBinder = new ServletRequestDataBinder (target); MockHttpServletRequest request = new MockHttpServletRequest (); request.setParameter("a" , "10" ); request.setParameter("b" , "hello" ); request.setParameter("c" , "1999/03/04" ); dataBinder.bind(new ServletRequestParameterPropertyValues (request)); System.out.println(target); } static class MyBean { private int a; private String b; private Date c; public int getA () { return a; } public void setA (int a) { this .a = a; } public String getB () { return b; } public void setB (String b) { this .b = b; } public Date getC () { return c; } public void setC (Date c) { this .c = c; } @Override public String toString () { return "MyBean{" + "a=" + a + ", b='" + b + '\'' + ", c=" + c + '}' ; } } }
运行启动类,控制台输出:
1 MyBean{a=10, b='hello', c=Thu Mar 04 00:00:00 CST 1999}
实际上参数解析器ModelAttributeMethodProcessor使用的类型转换就是ServletRequestDataBinder。
数据绑定工厂 试想一种场景,如果传入的参数是自定义的格式,那么DataBinder还能正常工作吗?先看下面一个例子:
1
2
3
4
5
6
7
8
9
10
11
12
13
14
15
16
17
18
19
20
21
22
23
24
25
26
27
28
29
30
31
32
33
34
35
36
37
38
39
40
41
42
43
44
45
46
47
48
49
50
51
52
53
54
55
56
57
58
59
public class TestServletDataBinderFactory { public static void main (String[] args) throws Exception { MockHttpServletRequest request = new MockHttpServletRequest (); request.setParameter("birthday" , "1999|01|02" ); request.setParameter("address.name" , "西安" ); User target = new User (); ServletRequestDataBinder dataBinder = new ServletRequestDataBinder (target); dataBinder.bind(new ServletRequestParameterPropertyValues (request)); System.out.println(target); } public static class User { private Date birthday; private Address address; public Address getAddress () { return address; } public void setAddress (Address address) { this .address = address; } public Date getBirthday () { return birthday; } public void setBirthday (Date birthday) { this .birthday = birthday; } @Override public String toString () { return "User{" + "birthday=" + birthday + ", address=" + address + '}' ; } } public static class Address { private String name; public String getName () { return name; } public void setName (String name) { this .name = name; } @Override public String toString () { return "Address{" + "name='" + name + '\'' + '}' ; } } }
运行启动类,查看控制台:
1 User{birthday=null, address=Address{name='西安'}}
发现我们自定义的日期格式,DataBinder是不能识别的,这时候就需要用到类型转换工厂。有两种方式可以实现自定义格式绑定:
使用底层第一套类型转换,用@InitBinder转换,即PropertyEditorRegistry+PropertyEditor
使用底层第二套类型转换,用ConversionService转换, 即ConversionService+Formatter
使用默认的ConversionService进行转换
用@InitBinder转换:
1 2 3 4 5 6 7 8 9 10 11 12 13 14 15 16 17 18 19 20 21 22 23 24 25 26 27 28 29 30 31 32 33 34 35 36 37 38 39 40 41 42 43 44 45 46 47 48 49 50 51 52 53 54 55 56 57 58 59 60 61 62 63 64 65 66 67 68 69 70 71 72 73 74 75 76 77 78 79 80 81 82 83 84 85 86 87 88 89 90 91 92 93 94 95 96 97 98 99 100 101 102 103 104 public class MyDateFormatter implements Formatter <Date> { private static final Logger log = LoggerFactory.getLogger(MyDateFormatter.class); private final String desc; public MyDateFormatter (String desc) { this .desc = desc; } @Override public String print (Date date, Locale locale) { SimpleDateFormat sdf = new SimpleDateFormat ("yyyy|MM|dd" ); return sdf.format(date); } @Override public Date parse (String text, Locale locale) throws ParseException { log.debug(">>>>>> 进入了: {}" , desc); SimpleDateFormat sdf = new SimpleDateFormat ("yyyy|MM|dd" ); return sdf.parse(text); } } static class MyController { @InitBinder public void aaa (WebDataBinder dataBinder) { dataBinder.addCustomFormatter(new MyDateFormatter ("用 @InitBinder 方式扩展的" )); } } public class TestServletDataBinderFactory { public static void main (String[] args) throws Exception { MockHttpServletRequest request = new MockHttpServletRequest (); request.setParameter("birthday" , "1999|01|02" ); request.setParameter("address.name" , "西安" ); User target = new User (); InvocableHandlerMethod method = new InvocableHandlerMethod (new MyController (), MyController.class.getMethod("aaa" , WebDataBinder.class)); ServletRequestDataBinderFactory factory = new ServletRequestDataBinderFactory (List.of(method), null ); WebDataBinder dataBinder = factory.createBinder(new ServletWebRequest (request), target, "user" ); dataBinder.bind(new ServletRequestParameterPropertyValues (request)); System.out.println(target); } public static class User { private Date birthday; private Address address; public Address getAddress () { return address; } public void setAddress (Address address) { this .address = address; } public Date getBirthday () { return birthday; } public void setBirthday (Date birthday) { this .birthday = birthday; } @Override public String toString () { return "User{" + "birthday=" + birthday + ", address=" + address + '}' ; } } public static class Address { private String name; public String getName () { return name; } public void setName (String name) { this .name = name; } @Override public String toString () { return "Address{" + "name='" + name + '\'' + '}' ; } } }
使用@InitBinder转换的步骤:
标注了@InitBinder注解的方法向WebDataBinder中添加了自定义的转换器
在创建ServletRequestDataBinderFactory时,添加了InvocableHandlerMethod
在通过factory.createBinder()获取WebDataBinder时会回调标注了@InitBinder注解的方法,并添加自定义的转换器
我们查看WebDataBinder的addCustomFormatter()方法:
1
2
3
4
public void addCustomFormatter (Formatter<?> formatter) { FormatterPropertyEditorAdapter adapter = new FormatterPropertyEditorAdapter (formatter); this .getPropertyEditorRegistry().registerCustomEditor(adapter.getFieldType(), adapter); }
发现实际调用的是PropertyEditorRegistry的registerCustomEditor()方法注册转换器,本质上是利用PropertyEditorRegistry+PropertyEditor的方式进行数据绑定。
运行启动类,查看控制台:
1
2
[DEBUG] 12:55:41.361 [main] com.itheima.a23.MyDateFormatter - >>>>>> 进入了: 用 @InitBinder 方式扩展的 User{birthday=Sat Jan 02 00:00:00 CST 1999, address=Address{name='西安'}}
发现数据成功被绑定。
用ConversionService转换:
1
2
3
4
5
6
7
8
9
10
11
12
13
14
15
16
17
18
19
20
21
22
23
24
25
26
27
28
29
30
31
32
33
34
35
36
37
38
39
40
41
42
43
44
45
46
47
48
49
50
51
52
53
54
55
56
57
58
59
60
61
62
63
64
65
public class TestServletDataBinderFactory { public static void main (String[] args) throws Exception { MockHttpServletRequest request = new MockHttpServletRequest (); request.setParameter("birthday" , "1999|01|02" ); request.setParameter("address.name" , "西安" ); User target = new User (); FormattingConversionService service = new FormattingConversionService (); service.addFormatter(new MyDateFormatter ("用 ConversionService 方式扩展转换功能" )); ConfigurableWebBindingInitializer initializer = new ConfigurableWebBindingInitializer (); initializer.setConversionService(service); ServletRequestDataBinderFactory factory = new ServletRequestDataBinderFactory (null , initializer); WebDataBinder dataBinder = factory.createBinder(new ServletWebRequest (request), target, "user" ); dataBinder.bind(new ServletRequestParameterPropertyValues (request)); System.out.println(target); } public static class User { private Date birthday; private Address address; public Address getAddress () { return address; } public void setAddress (Address address) { this .address = address; } public Date getBirthday () { return birthday; } public void setBirthday (Date birthday) { this .birthday = birthday; } @Override public String toString () { return "User{" + "birthday=" + birthday + ", address=" + address + '}' ; } } public static class Address { private String name; public String getName () { return name; } public void setName (String name) { this .name = name; } @Override public String toString () { return "Address{" + "name='" + name + '\'' + '}' ; } } }
运行启动类,查看控制台:
1
2
[DEBUG] 13:07:36.277 [main] com.itheima.a23.MyDateFormatter - >>>>>> 进入了: 用 ConversionService 方式扩展转换功能 User{birthday=Sat Jan 02 00:00:00 CST 1999, address=Address{name='西安'}}
如果同时使用以上两种方式,那么会优先调用哪一种方式进行转换呢?
1
2
3
4
5
6
7
8
9
10
11
12
13
14
15
16
17
18
19
20
21
22
23
24
25
26
27
28
29
30
31
32
33
34
35
36
37
38
39
40
41
42
43
44
45
46
47
48
49
50
51
52
53
54
55
56
57
58
59
60
61
62
63
64
65
66
67
68
69
70
71
72
73
74
public class TestServletDataBinderFactory { public static void main (String[] args) throws Exception { MockHttpServletRequest request = new MockHttpServletRequest (); request.setParameter("birthday" , "1999|01|02" ); request.setParameter("address.name" , "西安" ); User target = new User (); InvocableHandlerMethod method = new InvocableHandlerMethod (new MyController (), MyController.class.getMethod("aaa" , WebDataBinder.class)); FormattingConversionService service = new FormattingConversionService (); service.addFormatter(new MyDateFormatter ("用 ConversionService 方式扩展转换功能" )); ConfigurableWebBindingInitializer initializer = new ConfigurableWebBindingInitializer (); initializer.setConversionService(service); ServletRequestDataBinderFactory factory = new ServletRequestDataBinderFactory (List.of(method), initializer); WebDataBinder dataBinder = factory.createBinder(new ServletWebRequest (request), target, "user" ); dataBinder.bind(new ServletRequestParameterPropertyValues (request)); System.out.println(target); } static class MyController { @InitBinder public void aaa (WebDataBinder dataBinder) { dataBinder.addCustomFormatter(new MyDateFormatter ("用 @InitBinder 方式扩展的" )); } } public static class User { private Date birthday; private Address address; public Address getAddress () { return address; } public void setAddress (Address address) { this .address = address; } public Date getBirthday () { return birthday; } public void setBirthday (Date birthday) { this .birthday = birthday; } @Override public String toString () { return "User{" + "birthday=" + birthday + ", address=" + address + '}' ; } } public static class Address { private String name; public String getName () { return name; } public void setName (String name) { this .name = name; } @Override public String toString () { return "Address{" + "name='" + name + '\'' + '}' ; } } }
运行启动类,查看控制台:
1
2
[DEBUG] 13:09:55.594 [main] com.itheima.a23.MyDateFormatter - >>>>>> 进入了: 用 @InitBinder 方式扩展的 User{birthday=Sat Jan 02 00:00:00 CST 1999, address=Address{name='西安'}}
发现优先使用的是@InitBinder的方式进行转换的,这也符合高级类型转换接口的转换规则:
首先看是否有自定义转换器, @InitBinder添加的即属于这种 (用了适配器模式把Formatter转为需要的 PropertyEditor)
再看有没有ConversionService转换
再利用默认的PropertyEditor转换
最后有一些特殊处理
使用默认的ConversionService进行转换:
默认的ConversionService转换需要配合注解@DateTimeFormat使用:
1
2
3
4
5
6
7
8
9
10
11
12
13
14
15
16
17
18
19
20
21
22
23
24
25
26
27
28
29
30
31
32
33
34
35
36
37
38
39
40
41
42
43
44
45
46
47
48
49
50
51
52
53
54
55
56
57
58
59
60
61
62
63
64
65
66
public class TestServletDataBinderFactory { public static void main (String[] args) throws Exception { MockHttpServletRequest request = new MockHttpServletRequest (); request.setParameter("birthday" , "1999|01|02" ); request.setParameter("address.name" , "西安" ); User target = new User (); DefaultFormattingConversionService service = new DefaultFormattingConversionService (); ConfigurableWebBindingInitializer initializer = new ConfigurableWebBindingInitializer (); initializer.setConversionService(service); ServletRequestDataBinderFactory factory = new ServletRequestDataBinderFactory (null , initializer); WebDataBinder dataBinder = factory.createBinder(new ServletWebRequest (request), target, "user" ); dataBinder.bind(new ServletRequestParameterPropertyValues (request)); System.out.println(target); } public static class User { @DateTimeFormat(pattern = "yyyy|MM|dd") private Date birthday; private Address address; public Address getAddress () { return address; } public void setAddress (Address address) { this .address = address; } public Date getBirthday () { return birthday; } public void setBirthday (Date birthday) { this .birthday = birthday; } @Override public String toString () { return "User{" + "birthday=" + birthday + ", address=" + address + '}' ; } } public static class Address { private String name; public String getName () { return name; } public void setName (String name) { this .name = name; } @Override public String toString () { return "Address{" + "name='" + name + '\'' + '}' ; } } }
运行启动类,查看控制台:
1 User{birthday=Sat Jan 02 00:00:00 CST 1999, address=Address{name='西安'}}
获取泛型参数 获取泛型参数有两种方法:
使用jdk的原始api
使用spring提供的工具类
创建示例代码:
1
2
3
4
5
6
7
8
9
10
11
12
13
14
15
16
17
18
19
20
class BaseDao <T> { T findOne () { return null ; } } class EmployeeDao extends BaseDao {} class Student {} class StudentDao extends BaseDao <Student> {} class Teacher {} class TeacherDao extends BaseDao <Teacher> {}
使用jdk的原始api:
1
2
3
4
5
6
7
8
9
10
11
12
public class TestGenericType { public static void main (String[] args) { Type type = TeacherDao.class.getGenericSuperclass(); System.out.println(type); if (type instanceof ParameterizedType parameterizedType) { System.out.println(parameterizedType.getActualTypeArguments()[0 ]); } } }
运行启动类,查看控制台:
1
2
com.itheima.a23.sub.BaseDao<com.itheima.a23.sub.Teacher> class com.itheima.a23.sub.Teacher
使用spring提供的工具类
1
2
3
4
5
6
7
8
public class TestGenericType { public static void main (String[] args) { Class<?> t = GenericTypeResolver.resolveTypeArgument(TeacherDao.class, BaseDao.class); System.out.println(t); } }
运行启动类,查看控制台:
1 class com.itheima.a23.sub.Teacher
如果有多个泛型参数的话,可以使用GenericTypeResolver的resolveTypeArgument()方法
@InitBinder注解 @ControllerAdvice可以为控制器提供增强功能,它能提供以下三种功能增强:
@ExceptionHandler:加在方法上,统一异常处理@ModelAttribute:加载方法上,方法的返回值将作为模型数据补充到控制器的执行过程中@InitBinder:自定义类型转换器
这里主要介绍@InitBinder注解,@InitBinder注解可以在两个地方使用:
加在@ControllerAdvice注解修饰的类中的方法上,对所有Controller都生效。
加在@Controller注解修饰的类中的方法上,只对当前Controller生效。
初始化流程大致为先解析@InitBinder注解,再执行对应的Handler方法,查看RequestMappingHandlerAdapter源码:
1 2 3 4 private final Map<Class<?>, Set<Method>> initBinderCache = new ConcurrentHashMap (64 );private final Map<ControllerAdviceBean, Set<Method>> initBinderAdviceCache = new LinkedHashMap ();
准备代码示例:
1 2 3 4 5 6 7 8 9 10 11 12 13 14 15 16 17 18 19 20 21 22 23 24 25 26 27 28 29 30 31 32 33 34 35 36 37 38 39 40 41 42 43 44 45 46 47 48 49 50 51 52 53 54 55 56 57 58 59 60 61 62 63 64 65 66 67 68 69 70 71 72 73 74 75 76 77 78 79 80 81 82 83 84 85 86 87 88 89 90 91 92 93 94 95 96 97 @Configuration public class WebConfig { @ControllerAdvice static class MyControllerAdvice { @InitBinder public void binder3 (WebDataBinder webDataBinder) { webDataBinder.addCustomFormatter(new MyDateFormatter ("binder3 转换器" )); } } @Controller static class Controller1 { @InitBinder public void binder1 (WebDataBinder webDataBinder) { webDataBinder.addCustomFormatter(new MyDateFormatter ("binder1 转换器" )); } public void foo () { } } @Controller static class Controller2 { @InitBinder public void binder21 (WebDataBinder webDataBinder) { webDataBinder.addCustomFormatter(new MyDateFormatter ("binder21 转换器" )); } @InitBinder public void binder22 (WebDataBinder webDataBinder) { webDataBinder.addCustomFormatter(new MyDateFormatter ("binder22 转换器" )); } public void bar () { } } } public class A24 { private static final Logger log = LoggerFactory.getLogger(A24.class); public static void main (String[] args) throws Exception { AnnotationConfigApplicationContext context = new AnnotationConfigApplicationContext (WebConfig.class); RequestMappingHandlerAdapter handlerAdapter = new RequestMappingHandlerAdapter (); handlerAdapter.setApplicationContext(context); handlerAdapter.afterPropertiesSet(); log.debug("1. 刚开始..." ); showBindMethods(handlerAdapter); Method getDataBinderFactory = RequestMappingHandlerAdapter.class.getDeclaredMethod("getDataBinderFactory" , HandlerMethod.class); getDataBinderFactory.setAccessible(true ); log.debug("2. 模拟调用 Controller1 的 foo 方法时 ..." ); getDataBinderFactory.invoke(handlerAdapter, new HandlerMethod (new WebConfig .Controller1(), WebConfig.Controller1.class.getMethod("foo" ))); showBindMethods(handlerAdapter); log.debug("3. 模拟调用 Controller2 的 bar 方法时 ..." ); getDataBinderFactory.invoke(handlerAdapter, new HandlerMethod (new WebConfig .Controller2(), WebConfig.Controller2.class.getMethod("bar" ))); showBindMethods(handlerAdapter); context.close(); } @SuppressWarnings("all") private static void showBindMethods (RequestMappingHandlerAdapter handlerAdapter) throws NoSuchFieldException, IllegalAccessException { Field initBinderAdviceCache = RequestMappingHandlerAdapter.class.getDeclaredField("initBinderAdviceCache" ); initBinderAdviceCache.setAccessible(true ); Map<ControllerAdviceBean, Set<Method>> globalMap = (Map<ControllerAdviceBean, Set<Method>>) initBinderAdviceCache.get(handlerAdapter); log.debug("全局的 @InitBinder 方法 {}" , globalMap.values().stream() .flatMap(ms -> ms.stream().map(m -> m.getName())) .collect(Collectors.toList()) ); Field initBinderCache = RequestMappingHandlerAdapter.class.getDeclaredField("initBinderCache" ); initBinderCache.setAccessible(true ); Map<Class<?>, Set<Method>> controllerMap = (Map<Class<?>, Set<Method>>) initBinderCache.get(handlerAdapter); log.debug("控制器的 @InitBinder 方法 {}" , controllerMap.entrySet().stream() .flatMap(e -> e.getValue().stream().map(v -> e.getKey().getSimpleName() + "." + v.getName())) .collect(Collectors.toList()) ); } }
运行启动类,查看控制台:
1
2
3
4
5
6
7
8
9
[DEBUG] 16:20:11.370 [main] com.itheima.a24.A24 - 1. 刚开始... [DEBUG] 16:20:11.376 [main] com.itheima.a24.A24 - 全局的 @InitBinder 方法 [binder3] [DEBUG] 16:20:11.378 [main] com.itheima.a24.A24 - 控制器的 @InitBinder 方法 [] [DEBUG] 16:20:11.379 [main] com.itheima.a24.A24 - 2. 模拟调用 Controller1 的 foo 方法时 ... [DEBUG] 16:20:11.384 [main] com.itheima.a24.A24 - 全局的 @InitBinder 方法 [binder3] [DEBUG] 16:20:11.387 [main] com.itheima.a24.A24 - 控制器的 @InitBinder 方法 [Controller1.binder1] [DEBUG] 16:20:11.387 [main] com.itheima.a24.A24 - 3. 模拟调用 Controller2 的 bar 方法时 ... [DEBUG] 16:20:11.388 [main] com.itheima.a24.A24 - 全局的 @InitBinder 方法 [binder3] [DEBUG] 16:20:11.388 [main] com.itheima.a24.A24 - 控制器的 @InitBinder 方法 [Controller1.binder1, Controller2.binder22, Controller2.binder21]
观察输出,我们发现:
@ControllerAdvice中@InitBinder标注的方法,由RequestMappingHandlerAdapter在初始化 时解析并记录@Controller中@InitBinder标注的方法,由RequestMappingHandlerAdapter会在控制器方法首次执行时 解析并记录
控制器方法执行流程
HandlerMethod需要:
bean即是哪个Controllermethod即是Controller中的哪个方法
ServletInvocableHandlerMethod需要:
WebDataBinderFactory负责对象绑定、类型转换ParameterNameDiscoverer负责参数名解析HandlerMethodArgumentResolverComposite负责解析参数HandlerMethodReturnValueHandlerComposite负责处理返回值
控制器方法执行流程如下图所示:
准备代码示例:
1 2 3 4 5 6 7 8 9 10 11 12 13 14 15 16 17 18 19 20 21 22 23 24 25 26 27 28 29 30 31 32 33 34 35 36 37 38 39 40 41 42 43 44 45 46 47 48 49 50 51 52 53 54 55 56 57 58 59 60 61 62 63 64 65 66 67 68 69 70 71 72 73 74 75 76 77 78 @Configuration public class WebConfig { @Controller static class Controller1 { @ResponseStatus(HttpStatus.OK) public ModelAndView foo (User user) { System.out.println("foo" ); return null ; } } static class User { private String name; public void setName (String name) { this .name = name; } public String getName () { return name; } @Override public String toString () { return "User{" + "name='" + name + '\'' + '}' ; } } } public class A25 { public static void main (String[] args) throws Exception { AnnotationConfigApplicationContext context = new AnnotationConfigApplicationContext (WebConfig.class); MockHttpServletRequest request = new MockHttpServletRequest (); request.setParameter("name" , "张三" ); ServletInvocableHandlerMethod handlerMethod = new ServletInvocableHandlerMethod ( new Controller1 (), Controller1.class.getMethod("foo" , User.class)); ServletRequestDataBinderFactory factory = new ServletRequestDataBinderFactory (null , null ); handlerMethod.setDataBinderFactory(factory); handlerMethod.setParameterNameDiscoverer(new DefaultParameterNameDiscoverer ()); handlerMethod.setHandlerMethodArgumentResolvers(getArgumentResolvers(context)); ModelAndViewContainer container = new ModelAndViewContainer (); handlerMethod.invokeAndHandle(new ServletWebRequest (request), container); System.out.println(container.getModel()); context.close(); } public static HandlerMethodArgumentResolverComposite getArgumentResolvers (AnnotationConfigApplicationContext context) { HandlerMethodArgumentResolverComposite composite = new HandlerMethodArgumentResolverComposite (); composite.addResolvers( new RequestParamMethodArgumentResolver (context.getDefaultListableBeanFactory(), false ), new PathVariableMethodArgumentResolver (), new RequestHeaderMethodArgumentResolver (context.getDefaultListableBeanFactory()), new ServletCookieValueMethodArgumentResolver (context.getDefaultListableBeanFactory()), new ExpressionValueMethodArgumentResolver (context.getDefaultListableBeanFactory()), new ServletRequestMethodArgumentResolver (), new ServletModelAttributeMethodProcessor (false ), new RequestResponseBodyMethodProcessor (List.of(new MappingJackson2HttpMessageConverter ())), new ServletModelAttributeMethodProcessor (true ), new RequestParamMethodArgumentResolver (context.getDefaultListableBeanFactory(), true ) ); return composite; } }
运行启动类,查看控制台:
1
2
foo {user=User{name='张三'}, org.springframework.validation.BindingResult.user=org.springframework.validation.BeanPropertyBindingResult: 0 errors}
发现调用了目标方法,并且将@ModelAttribute注解解析的数据放入了Model中。
@ModelAttribute注解 @ModelAttribute注解可以在三个地方使用:
添加到Controller中的方法参数列表上:
1
2
3
4
5
6
7
8
@Controller static class Controller1 { @ResponseStatus(HttpStatus.OK) public ModelAndView foo (@ModelAttribute("u") User user) { System.out.println("foo" ); return null ; } }
这种方式由参数解析器ServletModelAttributeMethodProcessor解析。
添加到ControllerAdvice中的方法上,对于全局都有效:
1 2 3 4 5 6 7 @ControllerAdvice static class MyControllerAdvice { @ModelAttribute("a") public String aa () { return "aa" ; } }
这种方式由RequestMappingHandlerAdapter来解析。
添加到Controller中的方法上,对于当前Controller有效:
1 2 3 4 5 6 7 @Controller static class Controller1 { @ModelAttribute("b") public String aa () { return "bb" ; } }
这种方式由RequestMappingHandlerAdapter来解析。
以上几种方式的功能一样,都是解析数据并添加到ModelAndViewContainer中。
准备代码示例:
1 2 3 4 5 6 7 8 9 10 11 12 13 14 15 16 17 18 19 20 21 22 23 24 25 26 27 28 29 30 31 32 33 34 35 36 37 38 39 40 41 42 43 44 45 46 47 48 49 50 51 52 53 54 55 56 57 58 59 60 61 62 63 64 65 66 67 68 69 70 71 72 73 74 75 76 77 78 79 80 81 82 83 84 85 86 87 88 89 90 91 92 93 94 95 96 97 98 99 100 101 102 @Configuration public class WebConfig { @ControllerAdvice static class MyControllerAdvice { @ModelAttribute("a") public String aa () { return "aa" ; } } @Controller static class Controller1 { @ModelAttribute("b") public String aa () { return "bb" ; } @ResponseStatus(HttpStatus.OK) public ModelAndView foo (@ModelAttribute("u") User user) { System.out.println("foo" ); return null ; } } static class User { private String name; public void setName (String name) { this .name = name; } public String getName () { return name; } @Override public String toString () { return "User{" + "name='" + name + '\'' + '}' ; } } } public class A26 { public static void main (String[] args) throws Exception { AnnotationConfigApplicationContext context = new AnnotationConfigApplicationContext (WebConfig.class); RequestMappingHandlerAdapter adapter = new RequestMappingHandlerAdapter (); adapter.setApplicationContext(context); adapter.afterPropertiesSet(); MockHttpServletRequest request = new MockHttpServletRequest (); request.setParameter("name" , "张三" ); ServletInvocableHandlerMethod handlerMethod = new ServletInvocableHandlerMethod ( new Controller1 (), Controller1.class.getMethod("foo" , User.class)); ServletRequestDataBinderFactory factory = new ServletRequestDataBinderFactory (null , null ); handlerMethod.setDataBinderFactory(factory); handlerMethod.setParameterNameDiscoverer(new DefaultParameterNameDiscoverer ()); handlerMethod.setHandlerMethodArgumentResolvers(getArgumentResolvers(context)); ModelAndViewContainer container = new ModelAndViewContainer (); Method getModelFactory = RequestMappingHandlerAdapter.class.getDeclaredMethod("getModelFactory" , HandlerMethod.class, WebDataBinderFactory.class); getModelFactory.setAccessible(true ); ModelFactory modelFactory = (ModelFactory) getModelFactory.invoke(adapter, handlerMethod, factory); modelFactory.initModel(new ServletWebRequest (request), container, handlerMethod); handlerMethod.invokeAndHandle(new ServletWebRequest (request), container); System.out.println(container.getModel()); context.close(); } public static HandlerMethodArgumentResolverComposite getArgumentResolvers (AnnotationConfigApplicationContext context) { HandlerMethodArgumentResolverComposite composite = new HandlerMethodArgumentResolverComposite (); composite.addResolvers( new RequestParamMethodArgumentResolver (context.getDefaultListableBeanFactory(), false ), new PathVariableMethodArgumentResolver (), new RequestHeaderMethodArgumentResolver (context.getDefaultListableBeanFactory()), new ServletCookieValueMethodArgumentResolver (context.getDefaultListableBeanFactory()), new ExpressionValueMethodArgumentResolver (context.getDefaultListableBeanFactory()), new ServletRequestMethodArgumentResolver (), new ServletModelAttributeMethodProcessor (false ), new RequestResponseBodyMethodProcessor (List.of(new MappingJackson2HttpMessageConverter ())), new ServletModelAttributeMethodProcessor (true ), new RequestParamMethodArgumentResolver (context.getDefaultListableBeanFactory(), true ) ); return composite; } }
运行启动类,查看控制台:
1 2 foo {a=aa, b=bb, u=User{name='张三'}, org.springframework.validation.BindingResult.u=org.springframework.validation.BeanPropertyBindingResult: 0 errors}
所有的@ModelAttribute注解都已经被解析。
返回值处理器 RequestMappingHandlerAdapter自带的返回值处理器:
1 2 3 4 5 6 7 8 9 10 11 12 13 14 15 org.springframework.web.servlet.mvc.method.annotation.ModelAndViewMethodReturnValueHandler@1f44ddab org.springframework.web.method.annotation.ModelMethodProcessor@5017e1 org.springframework.web.servlet.mvc.method.annotation.ViewMethodReturnValueHandler@65b66b08 org.springframework.web.servlet.mvc.method.annotation.ResponseBodyEmitterReturnValueHandler@4726927c org.springframework.web.servlet.mvc.method.annotation.StreamingResponseBodyReturnValueHandler@7eb6b6b6 org.springframework.web.servlet.mvc.method.annotation.HttpEntityMethodProcessor@7ed9499e org.springframework.web.servlet.mvc.method.annotation.HttpHeadersReturnValueHandler@28e19366 org.springframework.web.servlet.mvc.method.annotation.CallableMethodReturnValueHandler@5b275174 org.springframework.web.servlet.mvc.method.annotation.DeferredResultMethodReturnValueHandler@10ef5fa0 org.springframework.web.servlet.mvc.method.annotation.AsyncTaskMethodReturnValueHandler@244e619a org.springframework.web.servlet.mvc.method.annotation.ServletModelAttributeMethodProcessor@10acd6 org.springframework.web.servlet.mvc.method.annotation.RequestResponseBodyMethodProcessor@61dde151 org.springframework.web.servlet.mvc.method.annotation.ViewNameMethodReturnValueHandler@b25b095 org.springframework.web.method.annotation.MapMethodProcessor@5cb042da org.springframework.web.servlet.mvc.method.annotation.ServletModelAttributeMethodProcessor@59c33386
准备测试代码:
1 2 3 4 5 6 7 8 9 10 11 12 13 14 15 16 17 18 19 20 21 22 23 24 25 26 27 28 29 30 31 32 33 34 35 36 37 38 39 40 41 42 43 44 45 46 47 48 49 50 51 52 53 54 55 56 57 58 59 60 61 62 63 64 65 66 67 68 69 70 71 72 73 74 75 76 77 78 79 80 81 82 83 84 85 86 87 88 89 90 91 92 93 94 95 96 97 98 99 100 101 102 103 104 105 106 107 108 109 110 111 112 113 114 115 116 117 118 119 120 121 122 123 124 125 126 127 128 129 130 131 132 133 134 135 136 137 138 139 140 141 142 143 144 145 146 147 148 149 150 151 152 153 154 155 156 @Configuration public class WebConfig { @Bean public FreeMarkerConfigurer freeMarkerConfigurer () { FreeMarkerConfigurer configurer = new FreeMarkerConfigurer (); configurer.setDefaultEncoding("utf-8" ); configurer.setTemplateLoaderPath("classpath:templates" ); return configurer; } @Bean public FreeMarkerViewResolver viewResolver (FreeMarkerConfigurer configurer) { FreeMarkerViewResolver resolver = new FreeMarkerViewResolver () { @Override protected AbstractUrlBasedView instantiateView () { FreeMarkerView view = new FreeMarkerView () { @Override protected boolean isContextRequired () { return false ; } }; view.setConfiguration(configurer.getConfiguration()); return view; } }; resolver.setContentType("text/html;charset=utf-8" ); resolver.setPrefix("/" ); resolver.setSuffix(".ftl" ); resolver.setExposeSpringMacroHelpers(false ); return resolver; } } public class A27 { private static final Logger log = LoggerFactory.getLogger(A27.class); public static void main (String[] args) throws Exception { AnnotationConfigApplicationContext context = new AnnotationConfigApplicationContext (WebConfig.class); testXxx(context); } public static HandlerMethodReturnValueHandlerComposite getReturnValueHandler () { HandlerMethodReturnValueHandlerComposite composite = new HandlerMethodReturnValueHandlerComposite (); composite.addHandler(new ModelAndViewMethodReturnValueHandler ()); composite.addHandler(new ViewNameMethodReturnValueHandler ()); composite.addHandler(new ServletModelAttributeMethodProcessor (false )); composite.addHandler(new HttpEntityMethodProcessor (List.of(new MappingJackson2HttpMessageConverter ()))); composite.addHandler(new HttpHeadersReturnValueHandler ()); composite.addHandler(new RequestResponseBodyMethodProcessor (List.of(new MappingJackson2HttpMessageConverter ()))); composite.addHandler(new ServletModelAttributeMethodProcessor (true )); return composite; } @SuppressWarnings("all") private static void renderView (AnnotationConfigApplicationContext context, ModelAndViewContainer container, ServletWebRequest webRequest) throws Exception { log.debug(">>>>>> 渲染视图" ); FreeMarkerViewResolver resolver = context.getBean(FreeMarkerViewResolver.class); String viewName = container.getViewName() != null ? container.getViewName() : new DefaultRequestToViewNameTranslator ().getViewName(webRequest.getRequest()); log.debug("没有获取到视图名, 采用默认视图名: {}" , viewName); View view = resolver.resolveViewName(viewName, Locale.getDefault()); view.render(container.getModel(), webRequest.getRequest(), webRequest.getResponse()); System.out.println(new String (((MockHttpServletResponse) webRequest.getResponse()).getContentAsByteArray(), StandardCharsets.UTF_8)); } static class Controller { private static final Logger log = LoggerFactory.getLogger(Controller.class); public ModelAndView test1 () { log.debug("test1()" ); ModelAndView mav = new ModelAndView ("view1" ); mav.addObject("name" , "张三" ); return mav; } public String test2 () { log.debug("test2()" ); return "view2" ; } @ModelAttribute public User test3 () { log.debug("test3()" ); return new User ("李四" , 20 ); } public User test4 () { log.debug("test4()" ); return new User ("王五" , 30 ); } public HttpEntity<User> test5 () { log.debug("test5()" ); return new HttpEntity <>(new User ("赵六" , 40 )); } public HttpHeaders test6 () { log.debug("test6()" ); HttpHeaders headers = new HttpHeaders (); headers.add("Content-Type" , "text/html" ); return headers; } @ResponseBody public User test7 () { log.debug("test7()" ); return new User ("钱七" , 50 ); } } public static class User { private String name; private int age; public User (String name, int age) { this .name = name; this .age = age; } public String getName () { return name; } public void setName (String name) { this .name = name; } public int getAge () { return age; } public void setAge (int age) { this .age = age; } @Override public String toString () { return "User{" + "name='" + name + '\'' + ", age=" + age + '}' ; } } }
templates代码:
1 2 3 4 5 6 7 8 9 10 11 12 13 14 15 16 17 18 19 20 21 22 23 24 25 26 27 28 29 30 31 32 33 34 35 36 37 38 39 40 41 42 43 44 45 46 47 48 <!doctype html > <html lang ="zh" > <head > <meta charset ="UTF-8" > <title > test3</title > </head > <body > <h1 > Hello! ${user.name} ${user.age}</h1 > </body > </html > <!doctype html > <html lang ="zh" > <head > <meta charset ="UTF-8" > <title > test4</title > </head > <body > <h1 > Hello! ${user.name} ${user.age}</h1 > </body > </html > <!doctype html > <html lang ="zh" > <head > <meta charset ="UTF-8" > <title > view1</title > </head > <body > <h1 > Hello! ${name}</h1 > </body > </html > <!doctype html > <html lang ="zh" > <head > <meta charset ="UTF-8" > <title > view2</title > </head > <body > <h1 > Hello!</h1 > </body > </html >
ModelAndViewMethodReturnValueHandler
ModelAndViewMethodReturnValueHandler解析模型和视图,跳转到视图并且根据模型数据渲染视图。
添加测试方法:
1 2 3 4 5 6 7 8 9 10 11 12 13 14 15 16 17 18 19 20 21 22 private static void test1 (AnnotationConfigApplicationContext context) throws Exception { Method method = Controller.class.getMethod("test1" ); Controller controller = new Controller (); Object returnValue = method.invoke(controller); HandlerMethod methodHandle = new HandlerMethod (controller, method); ModelAndViewContainer container = new ModelAndViewContainer (); HandlerMethodReturnValueHandlerComposite composite = getReturnValueHandler(); ServletWebRequest webRequest = new ServletWebRequest (new MockHttpServletRequest (), new MockHttpServletResponse ()); if (composite.supportsReturnType(methodHandle.getReturnType())) { composite.handleReturnValue(returnValue, methodHandle.getReturnType(), container, webRequest); System.out.println(container.getModel()); System.out.println(container.getViewName()); renderView(context, container, webRequest); } }
运行启动类,查看控制台:
1 2 3 4 5 6 7 8 9 10 11 12 13 14 15 16 17 [DEBUG] 21:01:41.269 [main] com.itheima.a27.A27$Controller - test1() {name=张三} view1 [DEBUG] 21:01:41.616 [main] com.itheima.a27.A27 - >>>>>> 渲染视图 [DEBUG] 21:01:41.617 [main] com.itheima.a27.A27 - 没有获取到视图名, 采用默认视图名: view1 [DEBUG] 21:01:41.667 [main] com.itheima.a27.WebConfig$1$1 - View name 'view1', model {name=张三} [DEBUG] 21:01:41.673 [main] com.itheima.a27.WebConfig$1$1 - Rendering [/view1.ftl] <!doctype html> <html lang="zh"> <head> <meta charset="UTF-8"> <title>view1</title> </head> <body> <h1>Hello! 张三</h1> </body> </html>
发现能成功解析返回值并渲染视图。
ViewNameMethodReturnValueHandler
ViewNameMethodReturnValueHandler解析视图,跳转到对应的视图。
添加测试方法:
1 2 3 4 5 6 7 8 9 10 11 12 13 14 15 16 17 18 19 20 21 22 private static void test2 (AnnotationConfigApplicationContext context) throws Exception { Method method = Controller.class.getMethod("test2" ); Controller controller = new Controller (); Object returnValue = method.invoke(controller); HandlerMethod methodHandle = new HandlerMethod (controller, method); ModelAndViewContainer container = new ModelAndViewContainer (); HandlerMethodReturnValueHandlerComposite composite = getReturnValueHandler(); ServletWebRequest webRequest = new ServletWebRequest (new MockHttpServletRequest (), new MockHttpServletResponse ()); if (composite.supportsReturnType(methodHandle.getReturnType())) { composite.handleReturnValue(returnValue, methodHandle.getReturnType(), container, webRequest); System.out.println(container.getModel()); System.out.println(container.getViewName()); renderView(context, container, webRequest); } }
运行启动类,查看控制台:
1 2 3 4 5 6 7 8 9 10 11 12 13 14 15 16 17 [DEBUG] 21:07:58.480 [main] com.itheima.a27.A27$Controller - test2() {} view2 [DEBUG] 21:07:59.284 [main] com.itheima.a27.A27 - >>>>>> 渲染视图 [DEBUG] 21:07:59.286 [main] com.itheima.a27.A27 - 没有获取到视图名, 采用默认视图名: view2 [DEBUG] 21:07:59.438 [main] com.itheima.a27.WebConfig$1$1 - View name 'view2', model {} [DEBUG] 21:07:59.447 [main] com.itheima.a27.WebConfig$1$1 - Rendering [/view2.ftl] <!doctype html> <html lang="zh"> <head> <meta charset="UTF-8"> <title>view2</title> </head> <body> <h1>Hello!</h1> </body> </html>
发现成功跳转到view2视图。
ServletModelAttributeMethodProcessor
ServletModelAttributeMethodProcessor解析加在方法上的@ModelAttribute注解,跳转视图时按照方法上的@RequestMapping注解的值为准,这里没有@RequestMapping注解的解析环境,因此手动去添加视图。
添加测试方法:
1 2 3 4 5 6 7 8 9 10 11 12 13 14 15 16 17 18 19 20 21 22 23 24 25 26 private static void test3 (AnnotationConfigApplicationContext context) throws Exception { Method method = Controller.class.getMethod("test3" ); Controller controller = new Controller (); Object returnValue = method.invoke(controller); HandlerMethod methodHandle = new HandlerMethod (controller, method); ModelAndViewContainer container = new ModelAndViewContainer (); HandlerMethodReturnValueHandlerComposite composite = getReturnValueHandler(); MockHttpServletRequest request = new MockHttpServletRequest (); request.setRequestURI("/test3" ); UrlPathHelper.defaultInstance.resolveAndCacheLookupPath(request); ServletWebRequest webRequest = new ServletWebRequest (request, new MockHttpServletResponse ()); if (composite.supportsReturnType(methodHandle.getReturnType())) { composite.handleReturnValue(returnValue, methodHandle.getReturnType(), container, webRequest); System.out.println(container.getModel()); System.out.println(container.getViewName()); renderView(context, container, webRequest); } }
运行启动类,查看控制台:
1 2 3 4 5 6 7 8 9 10 11 12 13 14 15 16 17 [DEBUG] 21:13:27.532 [main] com.itheima.a27.A27$Controller - test3() {user=User{name='李四', age=20}} null [DEBUG] 21:13:27.799 [main] com.itheima.a27.A27 - >>>>>> 渲染视图 [DEBUG] 21:13:27.802 [main] com.itheima.a27.A27 - 没有获取到视图名, 采用默认视图名: test3 [DEBUG] 21:13:27.839 [main] com.itheima.a27.WebConfig$1$1 - View name 'test3', model {user=User{name='李四', age=20}} [DEBUG] 21:13:27.844 [main] com.itheima.a27.WebConfig$1$1 - Rendering [/test3.ftl] <!doctype html> <html lang="zh"> <head> <meta charset="UTF-8"> <title>test3</title> </head> <body> <h1>Hello! 李四 20</h1> </body> </html>
在创建ServletModelAttributeMethodProcessor对象时,可以传入一个布尔值,如果为true代表可以省略方法上的@ModelAttribute注解,如果为false代表不能省略@ModelAttribute注解。
HttpEntityMethodProcessor
HttpEntityMethodProcessor、HttpHeadersReturnValueHandler、RequestResponseBodyMethodProcessor都是只处理数据,不解析视图,在它们的handleReturnValue()方法中,都有以下操作:
1 2 mavContainer.setRequestHandled(true );
HttpEntityMethodProcessor处理器可以返回响应的所有内容,包括响应头、响应体、状态码等。
添加测试方法:
1 2 3 4 5 6 7 8 9 10 11 12 13 14 15 16 17 18 19 20 21 22 23 24 25 26 27 28 private static void test5 (AnnotationConfigApplicationContext context) throws Exception { Method method = Controller.class.getMethod("test5" ); Controller controller = new Controller (); Object returnValue = method.invoke(controller); HandlerMethod methodHandle = new HandlerMethod (controller, method); ModelAndViewContainer container = new ModelAndViewContainer (); HandlerMethodReturnValueHandlerComposite composite = getReturnValueHandler(); MockHttpServletRequest request = new MockHttpServletRequest (); MockHttpServletResponse response = new MockHttpServletResponse (); ServletWebRequest webRequest = new ServletWebRequest (request, response); if (composite.supportsReturnType(methodHandle.getReturnType())) { composite.handleReturnValue(returnValue, methodHandle.getReturnType(), container, webRequest); System.out.println(container.getModel()); System.out.println(container.getViewName()); if (!container.isRequestHandled()) { renderView(context, container, webRequest); } else { System.out.println(new String (response.getContentAsByteArray(), StandardCharsets.UTF_8)); } } }
运行启动类,查看控制台:
1 2 3 4 [DEBUG] 21:25:55.986 [main] com.itheima.a27.A27$Controller - test5() {} null {"name":"赵六","age":40}
发现模型与视图都为空,而返回值为json格式的数据。
HttpHeadersReturnValueHandler
HttpHeadersReturnValueHandler主要解析响应头和状态码。
添加测试方法:
1 2 3 4 5 6 7 8 9 10 11 12 13 14 15 16 17 18 19 20 21 22 23 24 25 26 27 28 29 30 31 private static void test6 (AnnotationConfigApplicationContext context) throws Exception { Method method = Controller.class.getMethod("test6" ); Controller controller = new Controller (); Object returnValue = method.invoke(controller); HandlerMethod methodHandle = new HandlerMethod (controller, method); ModelAndViewContainer container = new ModelAndViewContainer (); HandlerMethodReturnValueHandlerComposite composite = getReturnValueHandler(); MockHttpServletRequest request = new MockHttpServletRequest (); MockHttpServletResponse response = new MockHttpServletResponse (); ServletWebRequest webRequest = new ServletWebRequest (request, response); if (composite.supportsReturnType(methodHandle.getReturnType())) { composite.handleReturnValue(returnValue, methodHandle.getReturnType(), container, webRequest); System.out.println(container.getModel()); System.out.println(container.getViewName()); if (!container.isRequestHandled()) { renderView(context, container, webRequest); } else { for (String name : response.getHeaderNames()) { System.out.println(name + "=" + response.getHeader(name)); } System.out.println(new String (response.getContentAsByteArray(), StandardCharsets.UTF_8)); } } }
运行启动类,查看控制台:
1 2 3 4 [DEBUG] 21:28:51.932 [main] com.itheima.a27.A27$Controller - test6() {} null Content-Type=text/html
发现模型与视图都为空,而响应头中的内容以及被打印。
RequestResponseBodyMethodProcessor
1 RequestResponseBodyMethodProcessor`主要解析响应体内容,它会默认在响应头中给我们添加`Content-Type=application/json
添加测试方法:
1 2 3 4 5 6 7 8 9 10 11 12 13 14 15 16 17 18 19 20 21 22 23 24 25 26 27 28 29 30 31 private static void test7 (AnnotationConfigApplicationContext context) throws Exception { Method method = Controller.class.getMethod("test7" ); Controller controller = new Controller (); Object returnValue = method.invoke(controller); HandlerMethod methodHandle = new HandlerMethod (controller, method); ModelAndViewContainer container = new ModelAndViewContainer (); HandlerMethodReturnValueHandlerComposite composite = getReturnValueHandler(); MockHttpServletRequest request = new MockHttpServletRequest (); MockHttpServletResponse response = new MockHttpServletResponse (); ServletWebRequest webRequest = new ServletWebRequest (request, response); if (composite.supportsReturnType(methodHandle.getReturnType())) { composite.handleReturnValue(returnValue, methodHandle.getReturnType(), container, webRequest); System.out.println(container.getModel()); System.out.println(container.getViewName()); if (!container.isRequestHandled()) { renderView(context, container, webRequest); } else { for (String name : response.getHeaderNames()) { System.out.println(name + "=" + response.getHeader(name)); } System.out.println(new String (response.getContentAsByteArray(), StandardCharsets.UTF_8)); } } }
运行启动类,查看控制台:
1 2 3 4 5 [DEBUG] 21:30:50.557 [main] com.itheima.a27.A27$Controller - test7() {} null Content-Type=application/json {"name":"钱七","age":50}
MessageConverter 在学习HttpEntityMethodProcessor处理器和RequestResponseBodyMethodProcessor时,创建这两个处理器我们都会添加一个MappingJackson2HttpMessageConverter。MappingJackson2HttpMessageConverter的作用是将返回值转换为json格式。
测试MessageConverter的用法,准备实体类:
1 2 3 4 5 6 7 8 9 10 11 12 13 14 15 16 17 18 19 20 21 22 23 24 25 26 27 28 29 30 31 32 33 34 public static class User { private String name; private int age; @JsonCreator public User (@JsonProperty("name") String name, @JsonProperty("age") int age) { this .name = name; this .age = age; } public String getName () { return name; } public void setName (String name) { this .name = name; } public int getAge () { return age; } public void setAge (int age) { this .age = age; } @Override public String toString () { return "User{" + "name='" + name + '\'' + ", age=" + age + '}' ; } }
测试将对象转化为json格式:
1 2 3 4 5 6 7 8 public static void test1 () throws IOException { MockHttpOutputMessage message = new MockHttpOutputMessage (); MappingJackson2HttpMessageConverter converter = new MappingJackson2HttpMessageConverter (); if (converter.canWrite(User.class, MediaType.APPLICATION_JSON)) { converter.write(new User ("张三" , 18 ), MediaType.APPLICATION_JSON, message); System.out.println(message.getBodyAsString()); } }
运行启动类,查看控制台:
测试将对象转为xml格式:
1 2 3 4 5 6 7 8 private static void test2 () throws IOException { MockHttpOutputMessage message = new MockHttpOutputMessage (); MappingJackson2XmlHttpMessageConverter converter = new MappingJackson2XmlHttpMessageConverter (); if (converter.canWrite(User.class, MediaType.APPLICATION_XML)) { converter.write(new User ("李四" , 20 ), MediaType.APPLICATION_XML, message); System.out.println(message.getBodyAsString()); } }
运行启动类,查看控制台:
1 <User><name>李四</name><age>20</age></User>
测试将json格式数据转换为java对象:
1 2 3 4 5 6 7 8 9 10 11 12 13 private static void test3 () throws IOException { MockHttpInputMessage message = new MockHttpInputMessage (""" { "name":"李四", "age":20 } """ .getBytes(StandardCharsets.UTF_8)); MappingJackson2HttpMessageConverter converter = new MappingJackson2HttpMessageConverter (); if (converter.canRead(User.class, MediaType.APPLICATION_JSON)) { Object read = converter.read(User.class, message); System.out.println(read); } }
运行启动类,查看控制台:
如果添加了多个MessageConverter,会以那种优先呢?
添加方法:
1 2 3 4 @ResponseBody public User user () { return null ; }
添加测试方法:
1 2 3 4 5 6 7 8 9 10 11 12 13 14 15 16 17 private static void test4 () throws IOException, HttpMediaTypeNotAcceptableException, NoSuchMethodException { MockHttpServletRequest request = new MockHttpServletRequest (); MockHttpServletResponse response = new MockHttpServletResponse (); ServletWebRequest webRequest = new ServletWebRequest (request, response); RequestResponseBodyMethodProcessor processor = new RequestResponseBodyMethodProcessor ( List.of( new MappingJackson2HttpMessageConverter (), new MappingJackson2XmlHttpMessageConverter () )); processor.handleReturnValue( new User ("张三" , 18 ), new MethodParameter (A28.class.getMethod("user" ), -1 ), new ModelAndViewContainer (), webRequest ); System.out.println(new String (response.getContentAsByteArray(), StandardCharsets.UTF_8)); }
运行启动类,查看控制台:
在默认情况下,按照MessageConverter添加的次序进行解析。
如果将MappingJackson2XmlHttpMessageConverter放在前面:
1 2 3 4 RequestResponseBodyMethodProcessor processor = new RequestResponseBodyMethodProcessor ( List.of( new MappingJackson2XmlHttpMessageConverter (), new MappingJackson2HttpMessageConverter () ));
运行启动类,查看控制台:
1 <User><name>张三</name><age>18</age></User>
如果在请求头中添加可接受的格式,例如:
1 request.addHeader("Accept" , "application/xml" );
那么不论MessageConverter的次序如何,都会返回xml格式的数据。
如果在响应头中设置了ContentType格式,那么按照ContentType设置的格式返回,其优先级比请求头中的Accept高,例如:
1 response.setContentType("application/json" );
此时会以json格式的数据返回。
返回值处理器如何选择MediaType:
首先看@RequestMapping上有没有指定(这种情况由于没有环境没有进行测试)
其次看request的Accept头有没有指定
最后按MessageConverter的顺序, 谁能谁先转换
ResponseBodyAdvice 一般在编写controller时,我们都会统一将返回值封装成一个Result对象,包含状态码,消息,数据等。例如:
1 2 3 4 5 6 7 8 9 10 11 12 13 14 15 16 17 18 19 20 21 22 23 24 25 26 27 28 29 30 31 32 33 34 35 36 37 38 39 40 41 42 43 44 45 46 47 48 49 50 51 52 53 @JsonInclude(JsonInclude.Include.NON_NULL) public class Result { private int code; private String msg; private Object data; public int getCode () { return code; } public void setCode (int code) { this .code = code; } public String getMsg () { return msg; } public void setMsg (String msg) { this .msg = msg; } public Object getData () { return data; } public void setData (Object data) { this .data = data; } @JsonCreator private Result (@JsonProperty("code") int code, @JsonProperty("data") Object data) { this .code = code; this .data = data; } private Result (int code, String msg) { this .code = code; this .msg = msg; } public static Result ok () { return new Result (200 , null ); } public static Result ok (Object data) { return new Result (200 , data); } public static Result error (String msg) { return new Result (500 , "服务器内部错误:" + msg); } }
这种约定的返回方式非常常用,当然也有其他方式可以实现,将返回值封装为一个Result对象。我们可以使用@ControllerAdvice注解对响应体进行增强。
对返回值的增强需要实现ResponseBodyAdvice接口,其中有两个方法:
supports():判断是否需要增强返回值beforeBodyWrite():增强返回值的具体逻辑
编写配置类:
1 2 3 4 5 6 7 8 9 10 11 12 13 14 15 16 17 18 19 20 21 22 23 24 25 26 27 28 29 30 31 32 33 34 35 36 37 38 39 40 41 42 43 44 45 46 47 48 49 50 51 52 53 54 55 56 57 58 59 @Configuration public class WebConfig { @ControllerAdvice static class MyControllerAdvice implements ResponseBodyAdvice <Object> { public boolean supports (MethodParameter returnType, Class<? extends HttpMessageConverter<?>> converterType) { if (returnType.getMethodAnnotation(ResponseBody.class) != null || AnnotationUtils.findAnnotation(returnType.getContainingClass(), ResponseBody.class) != null ) { return true ; } return false ; } public Object beforeBodyWrite (Object body, MethodParameter returnType, MediaType selectedContentType, Class<? extends HttpMessageConverter<?>> selectedConverterType, ServerHttpRequest request, ServerHttpResponse response) { if (body instanceof Result) { return body; } return Result.ok(body); } } @RestController public static class MyController { public User user () { return new User ("王五" , 18 ); } } public static class User { private String name; private int age; public User (String name, int age) { this .name = name; this .age = age; } public String getName () { return name; } public void setName (String name) { this .name = name; } public int getAge () { return age; } public void setAge (int age) { this .age = age; } } }
编写启动类:
1 2 3 4 5 6 7 8 9 10 11 12 13 14 15 16 17 18 19 20 21 22 23 24 25 26 27 28 29 30 31 32 33 34 35 36 37 38 39 40 41 42 43 44 45 46 47 48 49 50 51 52 53 54 55 56 57 public class A29 { public static void main (String[] args) throws Exception { AnnotationConfigApplicationContext context = new AnnotationConfigApplicationContext (WebConfig.class); ServletInvocableHandlerMethod handlerMethod = new ServletInvocableHandlerMethod ( context.getBean(WebConfig.MyController.class), WebConfig.MyController.class.getMethod("user" ) ); handlerMethod.setDataBinderFactory(new ServletRequestDataBinderFactory (Collections.emptyList(), null )); handlerMethod.setParameterNameDiscoverer(new DefaultParameterNameDiscoverer ()); handlerMethod.setHandlerMethodArgumentResolvers(getArgumentResolvers(context)); handlerMethod.setHandlerMethodReturnValueHandlers(getReturnValueHandlers(context)); MockHttpServletRequest request = new MockHttpServletRequest (); MockHttpServletResponse response = new MockHttpServletResponse (); ModelAndViewContainer container = new ModelAndViewContainer (); handlerMethod.invokeAndHandle(new ServletWebRequest (request, response), container); System.out.println(new String (response.getContentAsByteArray(), StandardCharsets.UTF_8)); } public static HandlerMethodArgumentResolverComposite getArgumentResolvers (AnnotationConfigApplicationContext context) { HandlerMethodArgumentResolverComposite composite = new HandlerMethodArgumentResolverComposite (); composite.addResolvers( new RequestParamMethodArgumentResolver (context.getDefaultListableBeanFactory(), false ), new PathVariableMethodArgumentResolver (), new RequestHeaderMethodArgumentResolver (context.getDefaultListableBeanFactory()), new ServletCookieValueMethodArgumentResolver (context.getDefaultListableBeanFactory()), new ExpressionValueMethodArgumentResolver (context.getDefaultListableBeanFactory()), new ServletRequestMethodArgumentResolver (), new ServletModelAttributeMethodProcessor (false ), new RequestResponseBodyMethodProcessor (List.of(new MappingJackson2HttpMessageConverter ())), new ServletModelAttributeMethodProcessor (true ), new RequestParamMethodArgumentResolver (context.getDefaultListableBeanFactory(), true ) ); return composite; } public static HandlerMethodReturnValueHandlerComposite getReturnValueHandlers (AnnotationConfigApplicationContext context) { List<ControllerAdviceBean> annotatedBeans = ControllerAdviceBean.findAnnotatedBeans(context); List<Object> collect = annotatedBeans.stream().filter(b -> ResponseBodyAdvice.class.isAssignableFrom(b.getBeanType())) .collect(Collectors.toList()); HandlerMethodReturnValueHandlerComposite composite = new HandlerMethodReturnValueHandlerComposite (); composite.addHandler(new ModelAndViewMethodReturnValueHandler ()); composite.addHandler(new ViewNameMethodReturnValueHandler ()); composite.addHandler(new ServletModelAttributeMethodProcessor (false )); composite.addHandler(new HttpEntityMethodProcessor (List.of(new MappingJackson2HttpMessageConverter ()))); composite.addHandler(new HttpHeadersReturnValueHandler ()); composite.addHandler(new RequestResponseBodyMethodProcessor (List.of(new MappingJackson2HttpMessageConverter ()), collect)); composite.addHandler(new ServletModelAttributeMethodProcessor (true )); return composite; } }
运行启动类,查看控制台:
1 {"code":200,"data":{"name":"王五","age":18}}
发现返回值的格式已经被重新封装。
异常解析器 DispatcherServlet的核心流程在doDispatch()方法内:
1 2 3 4 5 6 7 8 9 10 11 12 13 14 15 16 17 18 19 20 21 22 23 24 25 26 27 28 29 30 31 32 33 34 35 36 37 38 39 40 41 42 43 44 45 46 47 48 49 50 51 52 53 54 55 56 57 58 59 60 61 62 63 64 65 protected void doDispatch (HttpServletRequest request, HttpServletResponse response) throws Exception { HttpServletRequest processedRequest = request; HandlerExecutionChain mappedHandler = null ; boolean multipartRequestParsed = false ; WebAsyncManager asyncManager = WebAsyncUtils.getAsyncManager(request); try { try { ModelAndView mv = null ; Exception dispatchException = null ; try { processedRequest = this .checkMultipart(request); multipartRequestParsed = processedRequest != request; mappedHandler = this .getHandler(processedRequest); if (mappedHandler == null ) { this .noHandlerFound(processedRequest, response); return ; } HandlerAdapter ha = this .getHandlerAdapter(mappedHandler.getHandler()); String method = request.getMethod(); boolean isGet = HttpMethod.GET.matches(method); if (isGet || HttpMethod.HEAD.matches(method)) { long lastModified = ha.getLastModified(request, mappedHandler.getHandler()); if ((new ServletWebRequest (request, response)).checkNotModified(lastModified) && isGet) { return ; } } if (!mappedHandler.applyPreHandle(processedRequest, response)) { return ; } mv = ha.handle(processedRequest, response, mappedHandler.getHandler()); if (asyncManager.isConcurrentHandlingStarted()) { return ; } this .applyDefaultViewName(processedRequest, mv); mappedHandler.applyPostHandle(processedRequest, response, mv); } catch (Exception var20) { dispatchException = var20; } catch (Throwable var21) { dispatchException = new NestedServletException ("Handler dispatch failed" , var21); } this .processDispatchResult(processedRequest, response, mappedHandler, mv, (Exception)dispatchException); } catch (Exception var22) { this .triggerAfterCompletion(processedRequest, response, mappedHandler, var22); } catch (Throwable var23) { this .triggerAfterCompletion(processedRequest, response, mappedHandler, new NestedServletException ("Handler processing failed" , var23)); } } finally { if (asyncManager.isConcurrentHandlingStarted()) { if (mappedHandler != null ) { mappedHandler.applyAfterConcurrentHandlingStarted(processedRequest, response); } } else if (multipartRequestParsed) { this .cleanupMultipart(processedRequest); } } }
在发生异常时,只是将异常记录在dispatchException变量内,并不直接抛出,最后在processDispatchResult()内进行处理。
我们查看processDispatchResult()方法:
1 2 3 4 5 6 7 8 9 10 11 12 13 14 15 16 17 18 19 20 21 22 23 24 25 26 27 28 29 private void processDispatchResult (HttpServletRequest request, HttpServletResponse response, @Nullable HandlerExecutionChain mappedHandler, @Nullable ModelAndView mv, @Nullable Exception exception) throws Exception { boolean errorView = false ; if (exception != null ) { if (exception instanceof ModelAndViewDefiningException) { this .logger.debug("ModelAndViewDefiningException encountered" , exception); mv = ((ModelAndViewDefiningException)exception).getModelAndView(); } else { Object handler = mappedHandler != null ? mappedHandler.getHandler() : null ; mv = this .processHandlerException(request, response, handler, exception); errorView = mv != null ; } } if (mv != null && !mv.wasCleared()) { this .render(mv, request, response); if (errorView) { WebUtils.clearErrorRequestAttributes(request); } } else if (this .logger.isTraceEnabled()) { this .logger.trace("No view rendering, null ModelAndView returned." ); } if (!WebAsyncUtils.getAsyncManager(request).isConcurrentHandlingStarted()) { if (mappedHandler != null ) { mappedHandler.triggerAfterCompletion(request, response, (Exception)null ); } } }
processDispatchResult()方法首先判断异常是否为空,如果不为空则处理异常,否则进行正常的视图渲染流程。
我们进入processHandlerException()方法:
1 2 3 4 5 6 7 8 9 10 11 12 13 14 15 16 17 18 19 20 21 22 23 24 25 26 27 28 29 30 31 32 33 34 35 36 37 38 39 40 41 @Nullable protected ModelAndView processHandlerException (HttpServletRequest request, HttpServletResponse response, @Nullable Object handler, Exception ex) throws Exception { request.removeAttribute(HandlerMapping.PRODUCIBLE_MEDIA_TYPES_ATTRIBUTE); ModelAndView exMv = null ; if (this .handlerExceptionResolvers != null ) { Iterator var6 = this .handlerExceptionResolvers.iterator(); while (var6.hasNext()) { HandlerExceptionResolver resolver = (HandlerExceptionResolver)var6.next(); exMv = resolver.resolveException(request, response, handler, ex); if (exMv != null ) { break ; } } } if (exMv != null ) { if (exMv.isEmpty()) { request.setAttribute(EXCEPTION_ATTRIBUTE, ex); return null ; } else { if (!exMv.hasView()) { String defaultViewName = this .getDefaultViewName(request); if (defaultViewName != null ) { exMv.setViewName(defaultViewName); } } if (this .logger.isTraceEnabled()) { this .logger.trace("Using resolved error view: " + exMv, ex); } else if (this .logger.isDebugEnabled()) { this .logger.debug("Using resolved error view: " + exMv); } WebUtils.exposeErrorRequestAttributes(request, ex, this .getServletName()); return exMv; } } else { throw ex; } }
processHandlerException()方法遍历handlerExceptionResolvers,查找合适的异常处理器进行处理。
1 2 @Nullable private List<HandlerExceptionResolver> handlerExceptionResolvers;
HandlerExceptionResolver接口有一个重要的实现——ExceptionHandlerExceptionResolver。这个解析器就是用来解析@ExceptionHandler注解的。
测试处理json返回值
编写示例代码:
1 2 3 4 5 6 7 8 9 10 11 12 13 14 15 16 17 18 19 20 21 22 23 24 25 26 public class A30 { public static void main (String[] args) throws NoSuchMethodException { ExceptionHandlerExceptionResolver resolver = new ExceptionHandlerExceptionResolver (); resolver.setMessageConverters(List.of(new MappingJackson2HttpMessageConverter ())); resolver.afterPropertiesSet(); MockHttpServletRequest request = new MockHttpServletRequest (); MockHttpServletResponse response = new MockHttpServletResponse (); HandlerMethod handlerMethod = new HandlerMethod (new Controller1 (), Controller1.class.getMethod("foo" )); Exception e = new ArithmeticException ("被零除" ); resolver.resolveException(request, response, handlerMethod, e); System.out.println(new String (response.getContentAsByteArray(), StandardCharsets.UTF_8)); } static class Controller1 { public void foo () { } @ExceptionHandler @ResponseBody public Map<String, Object> handle (ArithmeticException e) { return Map.of("error" , e.getMessage()); } } }
运行启动类,查看控制台:
发现能正确处理json格式的返回值。
测试处理ModelAndView返回值
编写示例代码:
1 2 3 4 5 6 7 8 9 10 11 12 13 14 15 16 17 18 19 20 21 22 23 24 25 26 public class A30 { public static void main (String[] args) throws NoSuchMethodException { ExceptionHandlerExceptionResolver resolver = new ExceptionHandlerExceptionResolver (); resolver.setMessageConverters(List.of(new MappingJackson2HttpMessageConverter ())); resolver.afterPropertiesSet(); MockHttpServletRequest request = new MockHttpServletRequest (); MockHttpServletResponse response = new MockHttpServletResponse (); HandlerMethod handlerMethod = new HandlerMethod (new Controller2 (), Controller2.class.getMethod("foo" )); Exception e = new ArithmeticException ("被零除" ); ModelAndView mav = resolver.resolveException(request, response, handlerMethod, e); System.out.println(mav.getModel()); System.out.println(mav.getViewName()); } static class Controller2 { public void foo () { } @ExceptionHandler public ModelAndView handle (ArithmeticException e) { return new ModelAndView ("test2" , Map.of("error" , e.getMessage())); } } }
运行启动类,查看控制台:
测试处理嵌套异常的情况
编写示例代码:
1 2 3 4 5 6 7 8 9 10 11 12 13 14 15 16 17 18 19 20 21 22 23 24 25 26 public class A30 { public static void main (String[] args) throws NoSuchMethodException { ExceptionHandlerExceptionResolver resolver = new ExceptionHandlerExceptionResolver (); resolver.setMessageConverters(List.of(new MappingJackson2HttpMessageConverter ())); resolver.afterPropertiesSet(); MockHttpServletRequest request = new MockHttpServletRequest (); MockHttpServletResponse response = new MockHttpServletResponse (); HandlerMethod handlerMethod = new HandlerMethod (new Controller3 (), Controller3.class.getMethod("foo" )); Exception e = new Exception ("e1" , new RuntimeException ("e2" , new IOException ("e3" ))); resolver.resolveException(request, response, handlerMethod, e); System.out.println(new String (response.getContentAsByteArray(), StandardCharsets.UTF_8)); } static class Controller3 { public void foo () { } @ExceptionHandler @ResponseBody public Map<String, Object> handle (IOException e3) { return Map.of("error" , e3.getMessage()); } } }
运行启动类,查看控制台:
发现这种嵌套异常的情况也能够正确匹配到异常处理器。
查看ExceptionHandlerExceptionResolver类中的doResolveHandlerMethodException()方法:
1 2 3 4 5 6 7 Throwable cause; for (Throwable exToExpose = exception; exToExpose != null ; exToExpose = cause != exToExpose ? cause : null ) { exceptions.add(exToExpose); cause = ((Throwable)exToExpose).getCause(); }
注意这段逻辑,首先拿到最外层异常,然后循环拿到起因异常,最后将所有异常都添加到exceptions中,因此它能够处理嵌套异常。
测试异常处理方法参数解析
编写示例代码:
1 2 3 4 5 6 7 8 9 10 11 12 13 14 15 16 17 18 19 20 21 22 23 24 public class A30 { public static void main (String[] args) throws NoSuchMethodException { ExceptionHandlerExceptionResolver resolver = new ExceptionHandlerExceptionResolver (); resolver.setMessageConverters(List.of(new MappingJackson2HttpMessageConverter ())); resolver.afterPropertiesSet(); MockHttpServletRequest request = new MockHttpServletRequest (); MockHttpServletResponse response = new MockHttpServletResponse (); HandlerMethod handlerMethod = new HandlerMethod (new Controller4 (), Controller4.class.getMethod("foo" )); Exception e = new Exception ("e1" ); resolver.resolveException(request, response, handlerMethod, e); System.out.println(new String (response.getContentAsByteArray(), StandardCharsets.UTF_8)); } static class Controller4 { public void foo () {} @ExceptionHandler @ResponseBody public Map<String, Object> handler (Exception e, HttpServletRequest request) { System.out.println(request); return Map.of("error" , e.getMessage()); } } }
运行启动类,查看控制台:
1 2 org.springframework.mock.web.MockHttpServletRequest@60db1c0e {"error":"e1"}
在抛出异常时,也能正确拿到request对象。
@ExceptionHandler注解 @ControllerAdvice注解配合@ExceptionHandler注解可以实现全局异常处理器,不需要每个Controller中都添加ExceptionHandler。
编写测试代码:
1 2 3 4 5 6 7 8 9 10 11 12 13 14 15 16 17 18 19 20 21 22 23 24 25 26 27 28 29 30 31 32 33 34 35 36 37 38 39 40 41 42 43 44 45 @Configuration public class WebConfig { @ControllerAdvice static class MyControllerAdvice { @ExceptionHandler @ResponseBody public Map<String, Object> handle (Exception e) { return Map.of("error" , e.getMessage()); } } @Bean public ExceptionHandlerExceptionResolver resolver () { ExceptionHandlerExceptionResolver resolver = new ExceptionHandlerExceptionResolver (); resolver.setMessageConverters(List.of(new MappingJackson2HttpMessageConverter ())); return resolver; } } public class A31 { public static void main (String[] args) throws NoSuchMethodException { MockHttpServletRequest request = new MockHttpServletRequest (); MockHttpServletResponse response = new MockHttpServletResponse (); AnnotationConfigApplicationContext context = new AnnotationConfigApplicationContext (WebConfig.class); ExceptionHandlerExceptionResolver resolver = context.getBean(ExceptionHandlerExceptionResolver.class); HandlerMethod handlerMethod = new HandlerMethod (new Controller5 (), Controller5.class.getMethod("foo" )); Exception e = new Exception ("e1" ); resolver.resolveException(request, response, handlerMethod, e); System.out.println(new String (response.getContentAsByteArray(), StandardCharsets.UTF_8)); } static class Controller5 { public void foo () { } } }
运行启动类,查看控制台:
我们发现在Controller5中没有添加ExceptionHandler,通过全局的ExceptionHandler也能处理异常。
异常处理流程:
优先在Controller中找ExceptionHandler
其次在全局处理器中找ExceptionHandler
查看ExceptionHandlerExceptionResolver中的afterPropertiesSet()方法:
1 2 3 4 5 6 7 8 9 10 11 12 13 14 public void afterPropertiesSet () { this .initExceptionHandlerAdviceCache(); List handlers; if (this .argumentResolvers == null ) { handlers = this .getDefaultArgumentResolvers(); this .argumentResolvers = (new HandlerMethodArgumentResolverComposite ()).addResolvers(handlers); } if (this .returnValueHandlers == null ) { handlers = this .getDefaultReturnValueHandlers(); this .returnValueHandlers = (new HandlerMethodReturnValueHandlerComposite ()).addHandlers(handlers); } }
initExceptionHandlerAdviceCache()即是处理@ControllerAdvice注解标注的配置,进入此方法:
1 2 3 4 5 6 7 8 9 10 11 12 13 14 15 16 17 18 19 20 21 22 23 24 25 26 27 28 29 30 31 32 33 34 private void initExceptionHandlerAdviceCache () { if (this .getApplicationContext() != null ) { List<ControllerAdviceBean> adviceBeans = ControllerAdviceBean.findAnnotatedBeans(this .getApplicationContext()); Iterator var2 = adviceBeans.iterator(); while (var2.hasNext()) { ControllerAdviceBean adviceBean = (ControllerAdviceBean)var2.next(); Class<?> beanType = adviceBean.getBeanType(); if (beanType == null ) { throw new IllegalStateException ("Unresolvable type for ControllerAdviceBean: " + adviceBean); } ExceptionHandlerMethodResolver resolver = new ExceptionHandlerMethodResolver (beanType); if (resolver.hasExceptionMappings()) { this .exceptionHandlerAdviceCache.put(adviceBean, resolver); } if (ResponseBodyAdvice.class.isAssignableFrom(beanType)) { this .responseBodyAdvice.add(adviceBean); } } if (this .logger.isDebugEnabled()) { int handlerSize = this .exceptionHandlerAdviceCache.size(); int adviceSize = this .responseBodyAdvice.size(); if (handlerSize == 0 && adviceSize == 0 ) { this .logger.debug("ControllerAdvice beans: none" ); } else { this .logger.debug("ControllerAdvice beans: " + handlerSize + " @ExceptionHandler, " + adviceSize + " ResponseBodyAdvice" ); } } } }
此方法中获取并添加了ControllerAdvice中的ExceptionHandler以及ResponseBody增强。
Tomcat异常处理 ControllerAdvice中的ExceptionHandler只能处理Controller中抛出的异常,如果是过滤器中抛出的异常,那么ControllerAdvice不能处理,因此需要更上一级的异常处理。
测试tomcat中默认的异常处理:
1 2 3 4 5 6 7 8 9 10 11 12 13 14 15 16 17 18 19 20 21 22 23 24 25 26 27 28 29 30 31 32 33 34 35 36 37 38 39 40 41 42 43 44 45 46 47 48 49 50 51 52 53 54 55 56 57 58 59 60 61 62 63 64 @Configuration public class WebConfig { @Bean public TomcatServletWebServerFactory servletWebServerFactory () { return new TomcatServletWebServerFactory (); } @Bean public DispatcherServlet dispatcherServlet () { return new DispatcherServlet (); } @Bean public DispatcherServletRegistrationBean servletRegistrationBean (DispatcherServlet dispatcherServlet) { DispatcherServletRegistrationBean registrationBean = new DispatcherServletRegistrationBean (dispatcherServlet, "/" ); registrationBean.setLoadOnStartup(1 ); return registrationBean; } @Bean public RequestMappingHandlerMapping requestMappingHandlerMapping () { return new RequestMappingHandlerMapping (); } @Bean public RequestMappingHandlerAdapter requestMappingHandlerAdapter () { RequestMappingHandlerAdapter handlerAdapter = new RequestMappingHandlerAdapter (); handlerAdapter.setMessageConverters(List.of(new MappingJackson2HttpMessageConverter ())); return handlerAdapter; } @Bean public ErrorPageRegistrarBeanPostProcessor errorPageRegistrarBeanPostProcessor () { return new ErrorPageRegistrarBeanPostProcessor (); } @Controller public static class MyController { @RequestMapping("test") public ModelAndView test () { int i = 1 / 0 ; return null ; } } } public class A32 { public static void main (String[] args) throws NoSuchFieldException, IllegalAccessException { AnnotationConfigServletWebServerApplicationContext context = new AnnotationConfigServletWebServerApplicationContext (WebConfig.class); RequestMappingHandlerMapping handlerMapping = context.getBean(RequestMappingHandlerMapping.class); handlerMapping.getHandlerMethods().forEach((RequestMappingInfo k, HandlerMethod v) -> { System.out.println("映射路径:" + k + "\t方法信息:" + v); }); } }
运行启动类,访问localhost:8080/test,浏览器上出现以下页面:
说明tomcat是有默认的异常的异常处理以及跳转逻辑的。
为了提高用户体验,一般来讲需要返回json格式的错误信息,因此我们需要自定义异常处理。
自定义异常处理:
修改Tomcat服务器默认错误转发地址,添加以下Bean:
1 2 3 4 @Bean public ErrorPageRegistrar errorPageRegistrar () { return webServerFactory -> webServerFactory.addErrorPages(new ErrorPage ("/error" )); }
添加ErrorPageRegistrarBeanPostProcessor,这个Bean将会回调webServerFactory的addErrorPages()方法,去真正执行修改错误页面的动作:
1 2 3 4 @Bean public ErrorPageRegistrarBeanPostProcessor errorPageRegistrarBeanPostProcessor () { return new ErrorPageRegistrarBeanPostProcessor (); }
添加Controller方法,返回json格式的数据:
1 2 3 4 5 6 @RequestMapping("/error") @ResponseBody public Map<String, Object> error (HttpServletRequest request) { Throwable e = (Throwable) request.getAttribute(RequestDispatcher.ERROR_EXCEPTION); return Map.of("error" , e.getMessage()); }
运行启动类,访问localhost:8080/test,浏览器上出现以下输出:
1 2 3 { "error": "Request processing failed; nested exception is java.lang.ArithmeticException: / by zero" }
成功将我们的错误信息以json格式返回。
除了通过tomcat提供的方式自定义异常处理,springboot中也提供了BasicErrorController支持我们自定义异常处理。
查看BasicErrorController源码:
1 2 3 4 @Controller @RequestMapping({"${server.error.path:${error.path:/error}}"}) public class BasicErrorController extends AbstractErrorController {}
发现这也是一个Controller,它的RequestMapping映射的路径寻找规则:
首先查找server.error.path值
其次查找error.path值
最后使用默认的/error路径
我们在容器中添加BasicErrorController:
1 2 3 4 5 @Bean public BasicErrorController basicErrorController () { return new BasicErrorController (new DefaultErrorAttributes (), new ErrorProperties ()); }
BasicErrorController异常处理考虑得更加全面,其中有两个RequestMapping:
1 2 3 4 5 6 7 8 9 10 11 12 13 14 15 16 17 18 19 20 21 @RequestMapping( produces = {"text/html"} ) public ModelAndView errorHtml (HttpServletRequest request, HttpServletResponse response) { HttpStatus status = this .getStatus(request); Map<String, Object> model = Collections.unmodifiableMap(this .getErrorAttributes(request, this .getErrorAttributeOptions(request, MediaType.TEXT_HTML))); response.setStatus(status.value()); ModelAndView modelAndView = this .resolveErrorView(request, response, status, model); return modelAndView != null ? modelAndView : new ModelAndView ("error" , model); } @RequestMapping public ResponseEntity<Map<String, Object>> error (HttpServletRequest request) { HttpStatus status = this .getStatus(request); if (status == HttpStatus.NO_CONTENT) { return new ResponseEntity (status); } else { Map<String, Object> body = this .getErrorAttributes(request, this .getErrorAttributeOptions(request, MediaType.ALL)); return new ResponseEntity (body, status); } }
根据前端想要的返回格式,一种是返回html格式,另一种是json格式。
运行启动类,使用postman进行测试:
1 2 3 4 5 6 { "timestamp" : 1680758526029 , "status" : 500 , "error" : "Internal Server Error" , "path" : "/test" }
返回的一串json格式的数据,其中的属性就是我们构造BasicErrorController时,传入的DefaultErrorAttributes。
查看DefaultErrorAttributes的getErrorAttributes()方法:
1 2 3 4 5 6 7 8 private Map<String, Object> getErrorAttributes (WebRequest webRequest, boolean includeStackTrace) { Map<String, Object> errorAttributes = new LinkedHashMap (); errorAttributes.put("timestamp" , new Date ()); this .addStatus(errorAttributes, webRequest); this .addErrorDetails(errorAttributes, webRequest, includeStackTrace); this .addPath(errorAttributes, webRequest); return errorAttributes; }
我们发现返回的json数据中没有真正的错误信息,展示错误信息有两种方法:
可以通过在配置文件中添加server.error.include-exception=true配置
可以在构造BasicErrorController时传入配置:
1 2 3 4 5 6 7 @Bean public BasicErrorController basicErrorController () { ErrorProperties errorProperties = new ErrorProperties (); errorProperties.setIncludeException(true ); return new BasicErrorController (new DefaultErrorAttributes (), errorProperties); }
运行启动类,使用postman进行测试:
1 2 3 4 5 6 7 { "timestamp" : 1680758791767 , "status" : 500 , "error" : "Internal Server Error" , "exception" : "java.lang.ArithmeticException" , "path" : "/test" }
已经成功添加了错误信息。
我们通过浏览器访问的方式测试BasicErrorController:
发现还是使用的是tomcat异常处理的方式,我们查看BasicErrorController源码:
1 2 3 4 5 6 7 8 9 10 @RequestMapping( produces = {"text/html"} ) public ModelAndView errorHtml (HttpServletRequest request, HttpServletResponse response) { HttpStatus status = this .getStatus(request); Map<String, Object> model = Collections.unmodifiableMap(this .getErrorAttributes(request, this .getErrorAttributeOptions(request, MediaType.TEXT_HTML))); response.setStatus(status.value()); ModelAndView modelAndView = this .resolveErrorView(request, response, status, model); return modelAndView != null ? modelAndView : new ModelAndView ("error" , model); }
发现最终返回的是一个ModelAndView对象,但此时我们没有添加名为error的视图,因此没有生效。
添加error视图以及视图解析器:
1 2 3 4 5 6 7 8 9 10 11 12 13 14 15 16 17 18 19 20 21 22 23 24 @Bean public View error () { return new View () { @Override public void render (Map<String, ?> model, HttpServletRequest request, HttpServletResponse response) throws Exception { System.out.println(model); response.setContentType("text/html;charset=utf-8" ); response.getWriter().print(""" <h3>服务器内部错误</h3> """ ); } }; } @Bean public ViewResolver viewResolver () { return new BeanNameViewResolver (); }
运行启动类,访问localhost:8080/test,浏览器上出现以下页面:
已经能正确解析我们的自定义视图。
springboot中其实就是采用的BasicErrorController来做错误处理。
BeanNameUrlHandlerMapping与SimpleControllerHandlerAdapter BeanNameUrlHandlerMapping与SimpleControllerHandlerAdapter是SpringMVC早期的实现,比RequestMappingHandlerMapping和RequestMappingHandlerAdapter的实现更加简单。
BeanNameUrlHandlerMapping
BeanNameUrlHandlerMapping的作用是通过请求路径去查找相应的控制器的名称,例如我们访问/test路径,BeanNameUrlHandlerMapping就回去查找容器中名为/test的Bean,以这种规则去做路径与控制器的映射。
以下这三个Bean分别映射路径/c1、/c2、/c3。
1 2 3 4 5 6 7 8 9 10 11 12 13 14 15 16 17 18 19 20 21 22 23 24 25 @Component("/c1") public static class Controller1 implements Controller { @Override public ModelAndView handleRequest (HttpServletRequest request, HttpServletResponse response) throws Exception { response.getWriter().print("this is c1" ); return null ; } } @Component("/c2") public static class Controller2 implements Controller { @Override public ModelAndView handleRequest (HttpServletRequest request, HttpServletResponse response) throws Exception { response.getWriter().print("this is c2" ); return null ; } } @Bean("/c3") public Controller controller3 () { return (request, response) -> { response.getWriter().print("this is c3" ); return null ; }; }
SimpleControllerHandlerAdapter
SimpleControllerHandlerAdapter的作用是调用控制器的方法,它要求每个控制器必须实现Controller,重写handleRequest()方法才能调用。
1 2 3 4 5 6 7 8 9 10 11 12 13 14 15 16 17 18 19 20 21 22 23 24 25 @Component("/c1") public static class Controller1 implements Controller { @Override public ModelAndView handleRequest (HttpServletRequest request, HttpServletResponse response) throws Exception { response.getWriter().print("this is c1" ); return null ; } } @Component("/c2") public static class Controller2 implements Controller { @Override public ModelAndView handleRequest (HttpServletRequest request, HttpServletResponse response) throws Exception { response.getWriter().print("this is c2" ); return null ; } } @Bean("/c3") public Controller controller3 () { return (request, response) -> { response.getWriter().print("this is c3" ); return null ; }; }
添加启动类:
1 2 3 4 5 6 public class A33 { public static void main (String[] args) { AnnotationConfigServletWebServerApplicationContext context = new AnnotationConfigServletWebServerApplicationContext (WebConfig.class); } }
运行启动类,访问http://localhost:8080/c1,浏览器输出:
访问http://localhost:8080/c2,浏览器输出:
访问http://localhost:8080/c3,浏览器输出:
都能映射到正确的控制器中。
自定义HandlerMapping与HandlerAdapter 我们自定义HandlerMapping与HandlerAdapter实现简单的BeanNameUrlHandlerMapping与SimpleControllerHandlerAdapter。
HandlerMapping的实现:
1 2 3 4 5 6 7 8 9 10 11 12 13 14 15 16 17 18 19 20 21 22 23 24 @Component static class MyHandlerMapping implements HandlerMapping { @Override public HandlerExecutionChain getHandler (HttpServletRequest request) throws Exception { String key = request.getRequestURI(); Controller controller = collect.get(key); if (controller == null ) { return null ; } return new HandlerExecutionChain (controller); } @Autowired private ApplicationContext context; private Map<String, Controller> collect; @PostConstruct public void init () { collect = context.getBeansOfType(Controller.class).entrySet() .stream().filter(e -> e.getKey().startsWith("/" )) .collect(Collectors.toMap(e -> e.getKey(), e -> e.getValue())); System.out.println(collect); } }
实现步骤:
在初始化方法中获取所有的Bean,并过滤不以"/"开头的名称
在映射时,根据请求路径获取Bean,并封装为HandlerExecutionChain。
HandlerAdapter的实现:
1 2 3 4 5 6 7 8 9 10 11 12 13 14 15 16 17 18 19 20 21 @Component static class MyHandlerAdapter implements HandlerAdapter { @Override public boolean supports (Object handler) { return handler instanceof Controller; } @Override public ModelAndView handle (HttpServletRequest request, HttpServletResponse response, Object handler) throws Exception { if (handler instanceof Controller controller) { controller.handleRequest(request, response); } return null ; } @Override public long getLastModified (HttpServletRequest request, Object handler) { return -1 ; } }
HandlerAdapter接口有三个方法需要实现:
supports():是否支持Controller调用handle():调用方法的具体逻辑getLastModified():处理修改时间,缓存相关
编写启动类:
1 2 3 4 5 6 public class A33_1 { public static void main (String[] args) { AnnotationConfigServletWebServerApplicationContext context = new AnnotationConfigServletWebServerApplicationContext (WebConfig_1.class); } }
运行启动类,访问http://localhost:8080/c1,浏览器输出:
RouterFunctionMapping与HandlerFunctionAdapter RouterFunctionMapping与HandlerFunctionAdapter是一对新的实现,在spring5.2版本引入的。
RouterFunctionMapping, 收集所有RouterFunction,它包括两部分: RequestPredicate设置映射条件,HandlerFunction包含处理逻辑请求到达,根据映射条件找到HandlerFunction,即handler
HandlerFunctionAdapter调用handler
编写配置类:
1 2 3 4 5 6 7 8 9 10 11 12 13 14 15 16 17 18 19 20 21 22 23 24 25 26 27 28 29 30 31 32 33 34 35 36 37 38 39 40 41 42 43 44 45 @Configuration public class WebConfig { @Bean public TomcatServletWebServerFactory servletWebServerFactory () { return new TomcatServletWebServerFactory (8080 ); } @Bean public DispatcherServlet dispatcherServlet () { return new DispatcherServlet (); } @Bean public DispatcherServletRegistrationBean servletRegistrationBean (DispatcherServlet dispatcherServlet) { return new DispatcherServletRegistrationBean (dispatcherServlet, "/" ); } @Bean public RouterFunctionMapping routerFunctionMapping () { return new RouterFunctionMapping (); } @Bean public HandlerFunctionAdapter handlerFunctionAdapter () { return new HandlerFunctionAdapter (); } @Bean public RouterFunction<ServerResponse> r1 () { return route(GET("/r1" ), request -> ok().body("this is r1" )); } @Bean public RouterFunction<ServerResponse> r2 () { return route(GET("/r2" ), request -> ok().body("this is r2" )); } }
编写启动类:
1 2 3 4 5 6 public class A34 { public static void main (String[] args) { AnnotationConfigServletWebServerApplicationContext context = new AnnotationConfigServletWebServerApplicationContext (WebConfig.class); } }
运行启动类,通过浏览器访问localhost:8080/r1,浏览器输出:
运行启动类,通过浏览器访问localhost:8080/r2,浏览器输出:
函数式控制器与经典控制器的对比:
函数式控制器:
RouterFunctionMapping,通过RequestPredicate映射handler要实现HandlerFunction接口HandlerFunctionAdapter,调用handler
经典控制器:
RequestMappingHandlerMapping,以@RequestMapping作为映射路径控制器的具体方法会被当作handler
RequestMappingHandlerAdapter,调用handler
函数式控制器的实现没有经典控制器实现功能强大,其特点是比较简洁,适合简单业务场景下使用。
SimpleUrlHandlerMapping与HttpRequestHandlerAdapter SimpleUrlHandlerMapping与HttpRequestHandlerAdapter主要用于处理静态资源:
SimpleUrlHandlerMapping做映射ResourceHttpRequestHandler作为处理器处理静态资源HttpRequestHandlerAdapter调用处理器
编写配置类:
1 2 3 4 5 6 7 8 9 10 11 12 13 14 15 16 17 18 19 20 21 22 23 24 25 26 27 28 29 30 31 32 33 34 35 36 37 38 39 40 41 42 43 44 45 46 47 48 49 50 51 52 53 54 55 56 57 58 59 60 61 62 63 @Configuration public class WebConfig { @Bean public TomcatServletWebServerFactory servletWebServerFactory () { return new TomcatServletWebServerFactory (8080 ); } @Bean public DispatcherServlet dispatcherServlet () { return new DispatcherServlet (); } @Bean public DispatcherServletRegistrationBean servletRegistrationBean (DispatcherServlet dispatcherServlet) { return new DispatcherServletRegistrationBean (dispatcherServlet, "/" ); } @Bean public SimpleUrlHandlerMapping simpleUrlHandlerMapping (ApplicationContext context) { SimpleUrlHandlerMapping handlerMapping = new SimpleUrlHandlerMapping (); Map<String, ResourceHttpRequestHandler> map = context.getBeansOfType(ResourceHttpRequestHandler.class); handlerMapping.setUrlMap(map); System.out.println(map); return handlerMapping; } @Bean public HttpRequestHandlerAdapter httpRequestHandlerAdapter () { return new HttpRequestHandlerAdapter (); } @Bean("/**") public ResourceHttpRequestHandler handler1 () { ResourceHttpRequestHandler handler = new ResourceHttpRequestHandler (); handler.setLocations(List.of(new ClassPathResource ("static/" ))); return handler; } @Bean("/img/**") public ResourceHttpRequestHandler handler2 () { ResourceHttpRequestHandler handler = new ResourceHttpRequestHandler (); handler.setLocations(List.of(new ClassPathResource ("images/" ))); return handler; } }
编写启动类:
1 2 3 4 5 6 public class A35 { public static void main (String[] args) { AnnotationConfigServletWebServerApplicationContext context = new AnnotationConfigServletWebServerApplicationContext (WebConfig.class); } }
运行启动类,通过浏览器访问localhost:8080/index.html,浏览器输出:
运行启动类,通过浏览器访问http://localhost:8080/img/1.jpg,浏览器能正确展示图片。
ResourceHttpRequestHandler中的afterPropertiesSet()会添加资源解析器:
1 2 3 4 5 6 7 8 9 10 11 12 13 14 15 16 17 18 19 20 21 22 23 24 25 26 27 28 29 30 31 32 public void afterPropertiesSet () throws Exception { this .resolveResourceLocations(); if (logger.isWarnEnabled() && CollectionUtils.isEmpty(this .getLocations())) { logger.warn("Locations list is empty. No resources will be served unless a custom ResourceResolver is configured as an alternative to PathResourceResolver." ); } if (this .resourceResolvers.isEmpty()) { this .resourceResolvers.add(new PathResourceResolver ()); } this .initAllowedLocations(); this .resolverChain = new DefaultResourceResolverChain (this .resourceResolvers); this .transformerChain = new DefaultResourceTransformerChain (this .resolverChain, this .resourceTransformers); if (this .resourceHttpMessageConverter == null ) { this .resourceHttpMessageConverter = new ResourceHttpMessageConverter (); } if (this .resourceRegionHttpMessageConverter == null ) { this .resourceRegionHttpMessageConverter = new ResourceRegionHttpMessageConverter (); } ContentNegotiationManager manager = this .getContentNegotiationManager(); if (manager != null ) { this .setMediaTypes(manager.getMediaTypeMappings()); } PathExtensionContentNegotiationStrategy strategy = this .initContentNegotiationStrategy(); if (strategy != null ) { this .setMediaTypes(strategy.getMediaTypes()); } }
它会判断resourceResolvers是否为空,如果为空则添加PathResourceResolver解析器,也就是进行路径资源解析。Spring中提供多种解析器,我们可以手动添加增强ResourceHttpRequestHandler的功能。
我们在ResourceHttpRequestHandler中添加更多的解析器:
1 2 3 4 5 6 7 8 9 10 11 12 13 14 15 @Bean("/**") public ResourceHttpRequestHandler handler1 () { ResourceHttpRequestHandler handler = new ResourceHttpRequestHandler (); handler.setLocations(List.of(new ClassPathResource ("static/" ))); handler.setResourceResolvers(List.of( new CachingResourceResolver (new ConcurrentMapCache ("cache1" )), new EncodedResourceResolver (), new PathResourceResolver () )); return handler; }
测试CachingResourceResolver的功能:
运行启动类,通过浏览器访问localhost:8080/index.html,第一次访问走的是正常逻辑,第二次访问后台输出:
1 2 3 4 5 [TRACE] 15:01:43.385 [http-nio-8080-exec-5] o.s.web.servlet.DispatcherServlet - GET "/index.html", parameters={}, headers={masked} in DispatcherServlet 'dispatcherServlet' [TRACE] 15:01:43.386 [http-nio-8080-exec-5] o.s.w.s.r.CachingResourceResolver - Resource resolved from cache [TRACE] 15:01:43.386 [http-nio-8080-exec-5] o.s.w.s.r.ResourceHttpRequestHandler - Resource not modified [TRACE] 15:01:43.386 [http-nio-8080-exec-5] o.s.web.servlet.DispatcherServlet - No view rendering, null ModelAndView returned. [DEBUG] 15:01:43.386 [http-nio-8080-exec-5] o.s.web.servlet.DispatcherServlet - Completed 304 NOT_MODIFIED, headers={masked}
发现使用了CachingResourceResolver中的缓存。
测试EncodedResourceResolver的功能:
EncodedResourceResolver可以读取压缩的文件,提高网络传输的速度,使用此解析器我们需要手动生成压缩文件:
1 2 3 4 5 6 7 8 9 10 11 12 13 14 15 16 @PostConstruct @SuppressWarnings("all") public void initGzip () throws IOException { Resource resource = new ClassPathResource ("static" ); File dir = resource.getFile(); for (File file : dir.listFiles(pathname -> pathname.getName().endsWith(".html" ))) { System.out.println(file); try (FileInputStream fis = new FileInputStream (file); GZIPOutputStream fos = new GZIPOutputStream (new FileOutputStream (file.getAbsoluteFile() + ".gz" ))) { byte [] bytes = new byte [8 * 1024 ]; int len; while ((len = fis.read(bytes)) != -1 ) { fos.write(bytes, 0 , len); } } } }
运行启动类,可以发现压缩后的.gz文件比原始的html文件要小很多,浏览器请求时会自动请求.gz文件,并进行解压。
如果我们访问http://localhost:8080/,根路径不对应任何资源,因此会返回404。一般情况下我们希望访问根路径能够跳转到欢迎页,有两种方式可以实现:
使用静态资源作为欢迎页
使用控制器映射作为欢迎页
这里演示使用静态资源作为欢迎页,另外,欢迎页的功能是由Spring提供的,在传统的SpringMVC中没有此功能。
我们在配置类中添加Bean:
1 2 3 4 5 6 7 8 9 10 11 @Bean public WelcomePageHandlerMapping welcomePageHandlerMapping (ApplicationContext context) { Resource resource = context.getResource("classpath:static/index.html" ); return new WelcomePageHandlerMapping (null , context, resource, "/**" ); } @Bean public SimpleControllerHandlerAdapter simpleControllerHandlerAdapter () { return new SimpleControllerHandlerAdapter (); }
welcomePageHandlerMapping用来映射到欢迎页,SimpleControllerHandlerAdapter用来调用welcomePageHandlerMapping生成的处理器。
运行启动类,通过浏览器访问localhost:8080,浏览器输出:
说明映射已经生效。
欢迎页的处理流程:
WelcomePageHandlerMapping,映射欢迎页(即只映射'/')
它内置了handler,ParameterizableViewController作用是不执行逻辑, 仅根据视图名找视图
视图名固定为forward:index.html
SimpleControllerHandlerAdapter调用handler
转发至/index.html
处理/index.html又会走静态资源处理流程
五大映射器与四大处理器总结:
HandlerMapping负责建立请求与控制器之间的映射关系
RequestMappingHandlerMapping:处理与@RequestMapping注解的匹配WelcomePageHandlerMapping:处理/路径,主要用于欢迎页的处理BeanNameUrlHandlerMapping:处理路径与bean的名字匹配,需要以/开头RouterFunctionMapping:支持函数式调用,RequestPredicate、HandlerFunctionSimpleUrlHandlerMapping:处理与静态资源的映射。
之间也会有顺序问题, springboot中默认顺序如上
HandlerAdapter负责实现对各种各样的handler的适配调用
RequestMappingHandlerAdapter:处理@RequestMapping方法,参数解析器、返回值处理器体现了组合模式SimpleControllerHandlerAdapter:处理Controller接口HandlerFunctionAdapter:处理HandlerFunction函数式接口HttpRequestHandlerAdapter:处理HttpRequestHandler接口,(静态资源处理)这也是典型适配器模式体现
ResourceHttpRequestHandler.setResourceResolvers这是典型责任链模式体现
SpringMVC处理流程 当浏览器发送一个请求 http://localhost:8080/hello 后,请求到达服务器,其处理流程是:
服务器提供了DispatcherServlet,它使用的是标准Servlet技术
路径:默认映射路径为/,即会匹配到所有请求URL,可作为请求的统一入口,也被称之为前控制器
jsp不会匹配到DispatcherServlet其它有路径的Servlet匹配优先级也高于DispatcherServlet
创建:在SpringBoot中,由DispatcherServletAutoConfiguration这个自动配置类提供 DispatcherServlet的bean
初始化:DispatcherServlet初始化时会优先到容器里寻找各种组件,作为它的成员变量
HandlerMapping,初始化时记录映射关系HandlerAdapter,初始化时准备参数解析器、返回值处理器、消息转换器HandlerExceptionResolver,初始化时准备参数解析器、返回值处理器、消息转换器ViewResolver
DispatcherServlet会利用RequestMappingHandlerMapping查找控制器方法
例如根据/hello路径找到@RequestMapping("/hello")对应的控制器方法
控制器方法会被封装为HandlerMethod对象,并结合匹配到的拦截器一起返回给DispatcherServlet
HandlerMethod和拦截器合在一起称为HandlerExecutionChain(调用链)对象
DispatcherServlet接下来会:
调用拦截器的preHandle方法
RequestMappingHandlerAdapter调用handle方法,准备数据绑定工厂、模型工厂、ModelAndViewContainer、将HandlerMethod完善为ServletInvocableHandlerMethod
@ControllerAdvice全局增强点:补充模型数据@ControllerAdvice全局增强点:补充自定义类型转换器使用HandlerMethodArgumentResolver准备参数
@ControllerAdvice全局增强点:RequestBody增强
调用ServletInvocableHandlerMethod
使用HandlerMethodReturnValueHandler处理返回值
@ControllerAdvice全局增强点:ResponseBody增强
根据ModelAndViewContainer获取ModelAndView
如果返回的ModelAndView为null,不走第4步视图解析及渲染流程
例如,有的返回值处理器调用了HttpMessageConverter来将结果转换为JSON,这时 ModelAndView就为null
如果返回的ModelAndView不为null,会在第4步走视图解析及渲染流程
调用拦截器的postHandle方法
处理异常或视图渲染
如果1~3出现异常,走ExceptionHandlerExceptionResolver处理异常流程
@ControllerAdvice全局增强点:@ExceptionHandler异常处理
正常,走视图解析及渲染流程
调用拦截器的afterCompletion方法