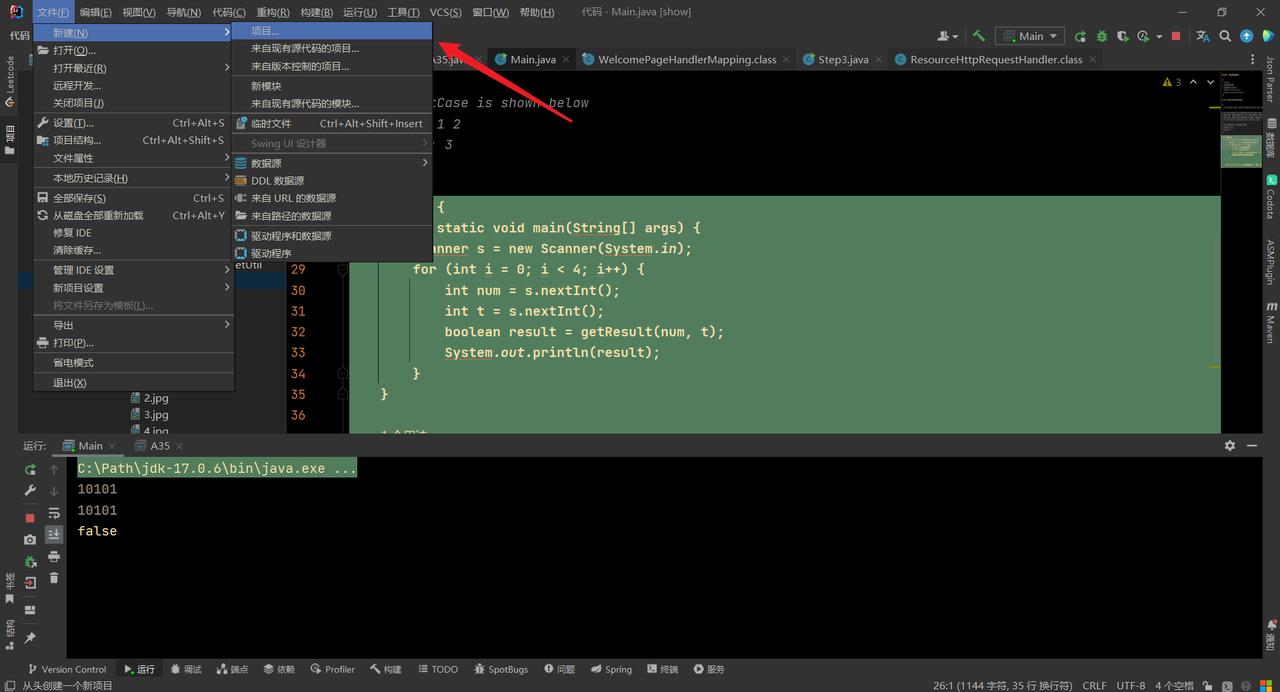
构建Boot项目 传统方式生成 使用IntelliJ IDEA软件,点击文件->新建->项目
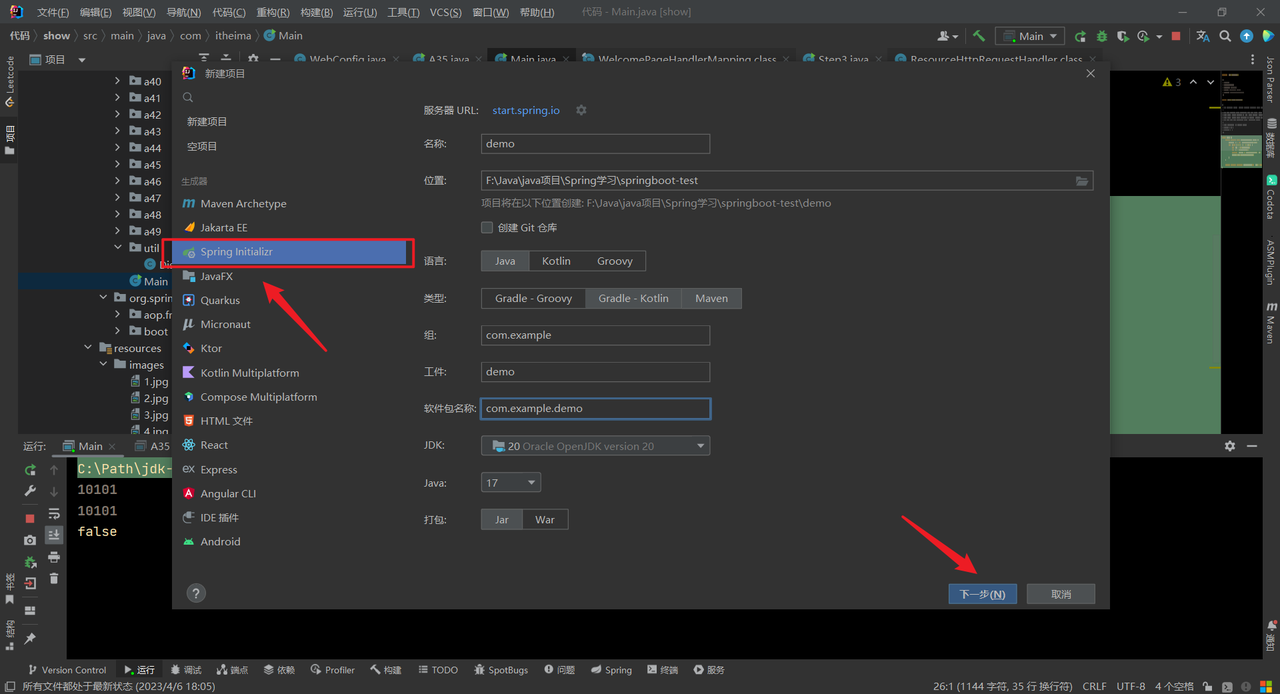
左侧选择Spring Initializr,右侧设置项目信息,点击下一步
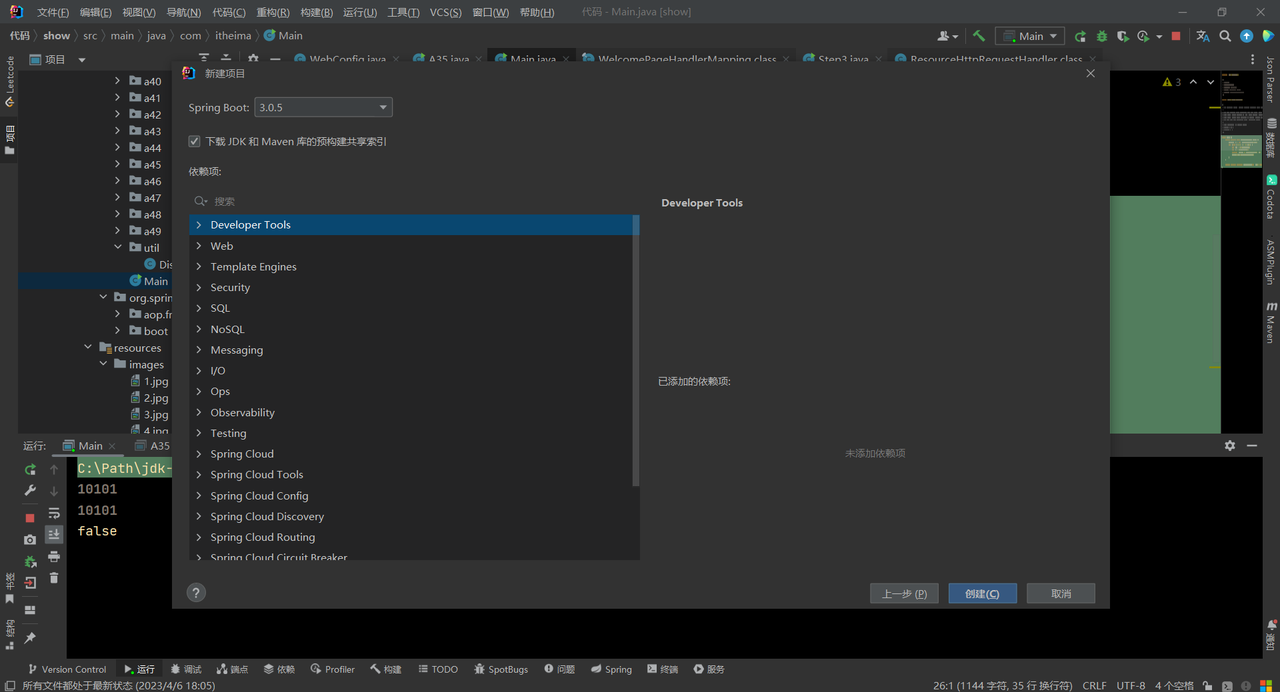
选择Spring Boot版本,添加依赖
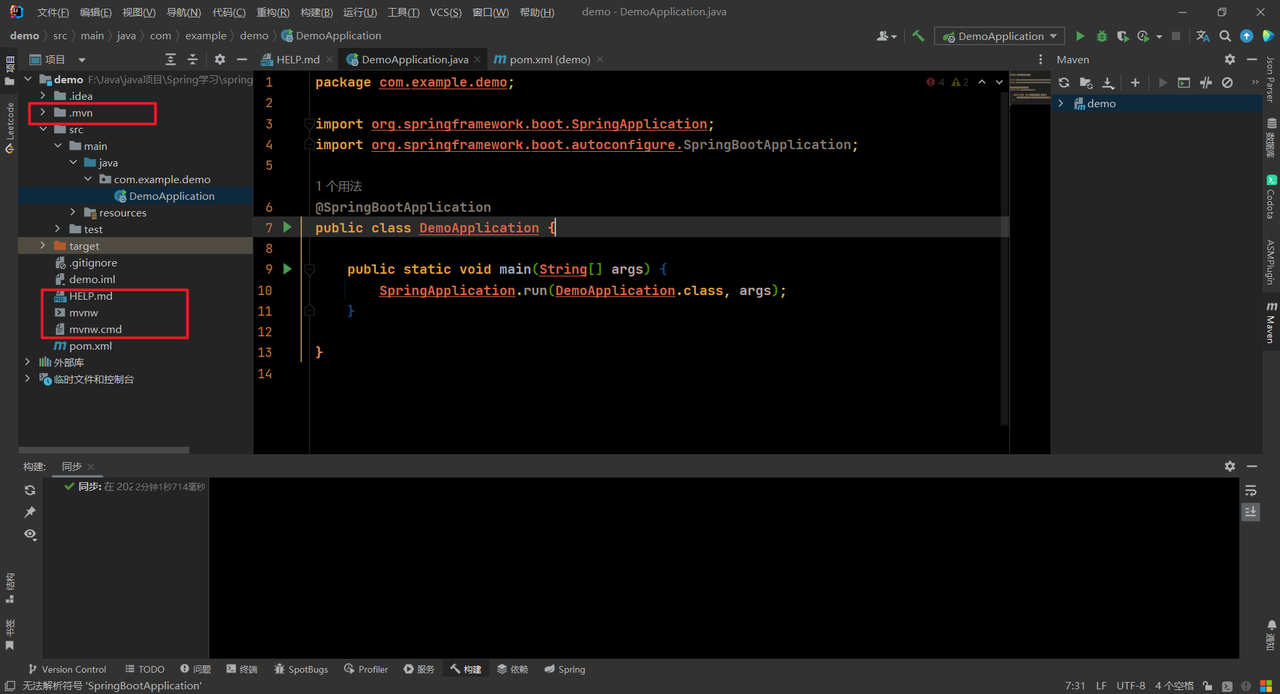
点击创建
SpringBoot项目构建成功,但是我们发现项目中会有很多额外的文件,例如.mvn文件夹、mvnw、mvnw.cmd等文件。
快捷方式生成 使用以下命令获取pom.xml:
1 curl https://start.spring.io/pom.xml
控制台输出:
1
2
3
4
5
6
7
8
9
10
11
12
13
14
15
16
17
18
19
20
21
22
23
24
25
26
27
28
29
30
31
32
33
34
35
36
37
38
39
40
41
<?xml version="1.0" encoding="UTF-8" ?> <project xmlns ="http://maven.apache.org/POM/4.0.0" xmlns:xsi ="http://www.w3.org/2001/XMLSchema-instance" xsi:schemaLocation ="http://maven.apache.org/POM/4.0.0 https://maven.apache.org/xsd/maven-4.0.0.xsd" > <modelVersion > 4.0.0</modelVersion > <parent > <groupId > org.springframework.boot</groupId > <artifactId > spring-boot-starter-parent</artifactId > <version > 3.0.5</version > <relativePath /> </parent > <groupId > com.example</groupId > <artifactId > demo</artifactId > <version > 0.0.1-SNAPSHOT</version > <name > demo</name > <description > Demo project for Spring Boot</description > <properties > <java.version > 17</java.version > </properties > <dependencies > <dependency > <groupId > org.springframework.boot</groupId > <artifactId > spring-boot-starter</artifactId > </dependency > <dependency > <groupId > org.springframework.boot</groupId > <artifactId > spring-boot-starter-test</artifactId > <scope > test</scope > </dependency > </dependencies > <build > <plugins > <plugin > <groupId > org.springframework.boot</groupId > <artifactId > spring-boot-maven-plugin</artifactId > </plugin > </plugins > </build > </project >
如果需要添加依赖,我们可以使用-d选项:
1 curl https://start.spring.io/pom.xml -d dependencies=mysql,mybatis,web
如果想要存成文件,可以使用-o选项:
1 curl https://start.spring.io/pom.xml -d dependencies=mysql,mybatis,web -o pom.xml
如果想要查看更多使用方式,可以访问https://start.spring.io
1
2
3
4
5
6
7
8
9
10
11
12
13
14
15
16
17
18
19
20
21
22
23
24
25
26
27
28
29
30
31
32
33
34
35
36
37
38
39
40
41
42
43
44
45
46
47
48
49
50
51
52
53
54
55
56
57
58
59
60
61
62
63
64
65
66
67
68
69
70
71
72
73
74
75
76
77
78
79
80
81
82
83
84
85
86
87
88
89
90
91
92
93
94
95
96
97
98
99
100
101
102
103
104
105
106
107
108
109
110
111
112
113
114
115
116
117
118
119
120
121
122
123
124
125
126
127
128
129
130
131
132
133
134
135
136
137
138
139
140
141
142
143
144
145
146
147
148
149
150
151
152
153
154
155
156
157
158
159
160
161
162
163
164
165
166
167
168
169
170
171
172
173
174
175
176
177
178
179
180
181
182
183
184
185
186
187
188
189
190
191
192
193
194
195
196
197
198
199
200
201
202
203
204
205
206
207
208
209
210
211
212
213
214
215
216
217
218
219
220
221
222
223
224
225
226
227
228
229
230
231
232
233
234
235
236
237
238
239
240
241
242
243
244
245
246
247
248
249
250
251
252
253
254
255
256
257
258
259
260
261
262
263
264
265
266
267
268
269
270
271
272
273
274
275
276
277
278
279
280
281
282
283
284
285
286
287
288
289
290
291
292
293
294
295
296
297
298
299
300
301
302
303
304
305
306
307
308
309
310
311
312
313
314
315
316
317
318
319
320
321
322
323
324
325
326
327
328
329
330
331
332
333
334
335
336
337
338
339
340
341
342
343
344
345
346
347
348
349
350
351
352
353
354
355
356
357
358
359
360
361
362
363
364
365
366
367
368
369
370
371
372
373
374
375
376
377
378
379
380
381
382
383
384
385
386
387
388
389
390
391
392
393
394
395
396
397
398
399
400
401
402
403
404
405
406
407
408
409
410
411
412
413
414
415
416
417
418
419
420
421
422
423
424
425
426
427
428
429
430
431
432
433
434
435
436
437
438
439
440
441
442
443
444
445
446
curl https://start.spring.io . ____ _ __ _ _ /\\ / ___'_ __ _ _(_)_ __ __ _ \ \ \ \ ( ( )\___ | '_ | '_| | '_ \/ _` | \ \ \ \ \\/ ___)| |_)| | | | | || (_| | ) ) ) ) ' |____| .__|_| |_|_| |_\__, | / / / / =========|_|==============|___/=/_/_/_/ :: Spring Initializr :: https://start.spring.io This service generates quickstart projects that can be easily customized. Possible customizations include a project's dependencies, Java version, and build system or build structure. See below for further details. The services uses a HAL based hypermedia format to expose a set of resources to interact with. If you access this root resource requesting application/json as media type the response will contain the following links: +-----------------------+--------------------------------------------------------------+ | Rel | Description | +-----------------------+--------------------------------------------------------------+ | gradle-build | Generate a Gradle build file. | | | | | gradle-project * | Generate a Gradle based project archive using the Groovy | | | DSL. | | | | | gradle-project-kotlin | Generate a Gradle based project archive using the Kotlin | | | DSL. | | | | | maven-build | Generate a Maven pom.xml. | | | | | maven-project | Generate a Maven based project archive. | +-----------------------+--------------------------------------------------------------+ The URI templates take a set of parameters to customize the result of a request to the linked resource. +-----------------+------------------------------------------+------------------------------+ | Parameter | Description | Default value | +-----------------+------------------------------------------+------------------------------+ | applicationName | application name | DemoApplication | | artifactId | project coordinates (infer archive name) | demo | | baseDir | base directory to create in the archive | no base dir | | bootVersion | spring boot version | 3.0.5 | | dependencies | dependency identifiers (comma-separated) | none | | description | project description | Demo project for Spring Boot | | groupId | project coordinates | com.example | | javaVersion | language level | 17 | | language | programming language | java | | name | project name (infer application name) | demo | | packageName | root package | com.example.demo | | packaging | project packaging | jar | | type | project type | gradle-project | | version | project version | 0.0.1-SNAPSHOT | +-----------------+------------------------------------------+------------------------------+ The following section has a list of supported identifiers for the comma-separated list of "dependencies". +--------------------------------------+--------------------------------------------------------------+-------------------------------+ | Id | Description | Required version | +--------------------------------------+--------------------------------------------------------------+-------------------------------+ | activemq | Spring JMS support with Apache ActiveMQ 'Classic'. | >=2.0.0.RELEASE and <3.0.0-M1 | | | | | | actuator | Supports built in (or custom) endpoints that let you monitor | | | | and manage your application - such as application health, | | | | metrics, sessions, etc. | | | | | | | amqp | Gives your applications a common platform to send and | | | | receive messages, and your messages a safe place to live | | | | until received. | | | | | | | artemis | Spring JMS support with Apache ActiveMQ Artemis. | | | | | | | azure-active-directory | Spring Security integration with Azure Active Directory for | >=2.5.0-M1 and <3.1.0-M1 | | | authentication. | | | | | | | azure-cosmos-db | Fully managed NoSQL database service for modern app | >=2.5.0-M1 and <3.0.0-M1 | | | development, including Spring Data support. | | | | | | | azure-keyvault | All key vault features are supported, e.g. manage | >=2.5.0-M1 and <3.1.0-M1 | | | application secrets and certificates. | | | | | | | azure-storage | All Storage features are supported, e.g. blob, fileshare and | >=2.5.0-M1 and <3.1.0-M1 | | | queue. | | | | | | | azure-support | Auto-configuration for Azure Services (Service Bus, Storage, | >=2.5.0-M1 and <3.1.0-M1 | | | Active Directory, Key Vault, and more). | | | | | | | batch | Batch applications with transactions, retry/skip and chunk | | | | based processing. | | | | | | | cache | Provides cache-related operations, such as the ability to | | | | update the content of the cache, but does not provide the | | | | actual data store. | | | | | | | camel | Apache Camel is an open source integration framework that | >=2.0.0.M1 and <3.1.0-M1 | | | empowers you to quickly and easily integrate various systems | | | | consuming or producing data. | | | | | | | cloud-bus | Links nodes of a distributed system with a lightweight | >=2.3.0.M1 and <3.1.0-M1 | | | message broker which can used to broadcast state changes or | | | | other management instructions (requires a binder, e.g. | | | | Apache Kafka or RabbitMQ). | | | | | | | cloud-cloudfoundry-discovery | Service discovery with Cloud Foundry. | >=2.3.0.M1 and <3.0.0-M1 | | | | | | cloud-config-client | Client that connects to a Spring Cloud Config Server to | >=2.3.0.M1 and <3.1.0-M1 | | | fetch the application's configuration. | | | | | | | cloud-config-server | Central management for configuration via Git, SVN, or | >=2.3.0.M1 and <3.1.0-M1 | | | HashiCorp Vault. | | | | | | | cloud-contract-stub-runner | Stub Runner for HTTP/Messaging based communication. Allows | >=2.3.0.M1 and <3.1.0-M1 | | | creating WireMock stubs from RestDocs tests. | | | | | | | cloud-contract-verifier | Moves TDD to the level of software architecture by enabling | >=2.3.0.M1 and <3.1.0-M1 | | | Consumer Driven Contract (CDC) development. | | | | | | | cloud-eureka | A REST based service for locating services for the purpose | >=2.3.0.M1 and <3.1.0-M1 | | | of load balancing and failover of middle-tier servers. | | | | | | | cloud-eureka-server | spring-cloud-netflix Eureka Server. | >=2.3.0.M1 and <3.1.0-M1 | | | | | | cloud-feign | Declarative REST Client. OpenFeign creates a dynamic | >=2.3.0.M1 and <3.1.0-M1 | | | implementation of an interface decorated with JAX-RS or | | | | Spring MVC annotations. | | | | | | | cloud-function | Promotes the implementation of business logic via functions | >=2.3.0.M1 and <3.1.0-M1 | | | and supports a uniform programming model across serverless | | | | providers, as well as the ability to run standalone (locally | | | | or in a PaaS). | | | | | | | cloud-gateway | Provides a simple, yet effective way to route to APIs and | >=2.3.0.M1 and <3.1.0-M1 | | | provide cross cutting concerns to them such as security, | | | | monitoring/metrics, and resiliency. | | | | | | | cloud-gcp | Contains auto-configuration support for every Spring Cloud | >=2.4.0-M1 and <3.1.0-M1 | | | GCP integration. Most of the auto-configuration code is only | | | | enabled if other dependencies are added to the classpath. | | | | | | | cloud-gcp-pubsub | Adds the GCP Support entry and all the required dependencies | >=2.4.0-M1 and <3.1.0-M1 | | | so that the Google Cloud Pub/Sub integration work out of the | | | | box. | | | | | | | cloud-gcp-storage | Adds the GCP Support entry and all the required dependencies | >=2.4.0-M1 and <3.1.0-M1 | | | so that the Google Cloud Storage integration work out of the | | | | box. | | | | | | | cloud-loadbalancer | Client-side load-balancing with Spring Cloud LoadBalancer. | >=2.3.0.M1 and <3.1.0-M1 | | | | | | cloud-resilience4j | Spring Cloud Circuit breaker with Resilience4j as the | >=2.3.0.M1 and <3.1.0-M1 | | | underlying implementation. | | | | | | | cloud-starter | Non-specific Spring Cloud features, unrelated to external | >=2.3.0.M1 and <3.1.0-M1 | | | libraries or integrations (e.g. Bootstrap context and | | | | @RefreshScope). | | | | | | | cloud-starter-consul-config | Enable and configure the common patterns inside your | >=2.3.0.M1 and <3.1.0-M1 | | | application and build large distributed systems with | | | | Hashicorp’s Consul. The patterns provided include Service | | | | Discovery, Distributed Configuration and Control Bus. | | | | | | | cloud-starter-consul-discovery | Service discovery with Hashicorp Consul. | >=2.3.0.M1 and <3.1.0-M1 | | | | | | cloud-starter-vault-config | Provides client-side support for externalized configuration | >=2.3.0.M1 and <3.1.0-M1 | | | in a distributed system. Using HashiCorp's Vault you have a | | | | central place to manage external secret properties for | | | | applications across all environments. | | | | | | | cloud-starter-zookeeper-config | Enable and configure common patterns inside your application | >=2.3.0.M1 and <3.1.0-M1 | | | and build large distributed systems with Apache Zookeeper | | | | based components. The provided patterns include Service | | | | Discovery and Configuration. | | | | | | | cloud-starter-zookeeper-discovery | Service discovery with Apache Zookeeper. | >=2.3.0.M1 and <3.1.0-M1 | | | | | | cloud-stream | Framework for building highly scalable event-driven | >=2.3.0.M1 and <3.1.0-M1 | | | microservices connected with shared messaging systems | | | | (requires a binder, e.g. Apache Kafka, Apache Pulsar, | | | | RabbitMQ, or Solace PubSub+). | | | | | | | cloud-task | Allows a user to develop and run short lived microservices | >=2.3.0.M1 and <3.1.0-M1 | | | using Spring Cloud. Run them locally, in the cloud, and on | | | | Spring Cloud Data Flow. | | | | | | | codecentric-spring-boot-admin-client | Required for your application to register with a | >=2.0.0.RELEASE and <3.1.0-M1 | | | Codecentric's Spring Boot Admin Server instance. | | | | | | | codecentric-spring-boot-admin-server | A community project to manage and monitor your Spring Boot | >=2.0.0.RELEASE and <3.1.0-M1 | | | applications. Provides a UI on top of the Spring Boot | | | | Actuator endpoints. | | | | | | | configuration-processor | Generate metadata for developers to offer contextual help | | | | and "code completion" when working with custom configuration | | | | keys (ex.application.properties/.yml files). | | | | | | | data-cassandra | A free and open-source, distributed, NoSQL database | | | | management system that offers high-scalability and | | | | high-performance. | | | | | | | data-cassandra-reactive | Access Cassandra NoSQL Database in a reactive fashion. | | | | | | | data-couchbase | NoSQL document-oriented database that offers in memory-first | | | | architecture, geo-distributed deployments, and workload | | | | isolation. | | | | | | | data-couchbase-reactive | Access Couchbase NoSQL database in a reactive fashion with | | | | Spring Data Couchbase. | | | | | | | data-elasticsearch | A distributed, RESTful search and analytics engine with | | | | Spring Data Elasticsearch. | | | | | | | data-jdbc | Persist data in SQL stores with plain JDBC using Spring | | | | Data. | | | | | | | data-jpa | Persist data in SQL stores with Java Persistence API using | | | | Spring Data and Hibernate. | | | | | | | data-ldap | Makes it easier to build Spring based applications that use | | | | the Lightweight Directory Access Protocol. | | | | | | | data-mongodb | Store data in flexible, JSON-like documents, meaning fields | | | | can vary from document to document and data structure can be | | | | changed over time. | | | | | | | data-mongodb-reactive | Provides asynchronous stream processing with non-blocking | | | | back pressure for MongoDB. | | | | | | | data-neo4j | An open source NoSQL database that stores data structured as | | | | graphs consisting of nodes, connected by relationships. | | | | | | | data-r2dbc | Provides Reactive Relational Database Connectivity to | | | | persist data in SQL stores using Spring Data in reactive | | | | applications. | | | | | | | data-redis | Advanced and thread-safe Java Redis client for synchronous, | | | | asynchronous, and reactive usage. Supports Cluster, | | | | Sentinel, Pipelining, Auto-Reconnect, Codecs and much more. | | | | | | | data-redis-reactive | Access Redis key-value data stores in a reactive fashion | | | | with Spring Data Redis. | | | | | | | data-rest | Exposing Spring Data repositories over REST via Spring Data | | | | REST. | | | | | | | data-rest-explorer | Browsing Spring Data REST repositories in your browser. | | | | | | | datadog | Publish Micrometer metrics to Datadog, a dimensional | | | | time-series SaaS with built-in dashboarding and alerting. | | | | | | | db2 | A JDBC driver that provides access to IBM DB2. | >=2.2.0.M6 | | | | | | derby | An open source relational database implemented entirely in | | | | Java. | | | | | | | devtools | Provides fast application restarts, LiveReload, and | | | | configurations for enhanced development experience. | | | | | | | distributed-tracing | Enable span and trace IDs in logs. | | | | | | | flapdoodle-mongo | Provides a platform neutral way for running MongoDB in unit | >=2.0.0.RELEASE and <3.0.0-M1 | | | tests. | | | | | | | flyway | Version control for your database so you can migrate from | | | | any version (incl. an empty database) to the latest version | | | | of the schema. | | | | | | | freemarker | Java library to generate text output (HTML web pages, | | | | e-mails, configuration files, source code, etc.) based on | | | | templates and changing data. | | | | | | | graphite | Publish Micrometer metrics to Graphite, a hierarchical | | | | metrics system backed by a fixed-size database. | | | | | | | graphql | Build GraphQL applications with Spring for GraphQL and | >=2.7.0.M1 | | | GraphQL Java. | | | | | | | groovy-templates | Groovy templating engine. | | | | | | | h2 | Provides a fast in-memory database that supports JDBC API | | | | and R2DBC access, with a small (2mb) footprint. Supports | | | | embedded and server modes as well as a browser based console | | | | application. | | | | | | | hateoas | Eases the creation of RESTful APIs that follow the HATEOAS | | | | principle when working with Spring / Spring MVC. | | | | | | | hsql | Lightweight 100% Java SQL Database Engine. | | | | | | | influx | Publish Micrometer metrics to InfluxDB, a dimensional | | | | time-series server that support real-time stream processing | | | | of data. | | | | | | | integration | Adds support for Enterprise Integration Patterns. Enables | | | | lightweight messaging and supports integration with external | | | | systems via declarative adapters. | | | | | | | jdbc | Database Connectivity API that defines how a client may | | | | connect and query a database. | | | | | | | jersey | Framework for developing RESTful Web Services in Java that | | | | provides support for JAX-RS APIs. | | | | | | | jooq | Generate Java code from your database and build type safe | | | | SQL queries through a fluent API. | | | | | | | kafka | Publish, subscribe, store, and process streams of records. | | | | | | | kafka-streams | Building stream processing applications with Apache Kafka | | | | Streams. | | | | | | | liquibase | Liquibase database migration and source control library. | | | | | | | lombok | Java annotation library which helps to reduce boilerplate | | | | code. | | | | | | | mail | Send email using Java Mail and Spring Framework's | | | | JavaMailSender. | | | | | | | mariadb | MariaDB JDBC and R2DBC driver. | | | | | | | mustache | Logic-less Templates. There are no if statements, else | | | | clauses, or for loops. Instead there are only tags. | | | | | | | mybatis | Persistence framework with support for custom SQL, stored | >=2.0.0.RELEASE and <3.1.0-M1 | | | procedures and advanced mappings. MyBatis couples objects | | | | with stored procedures or SQL statements using a XML | | | | descriptor or annotations. | | | | | | | mysql | MySQL JDBC driver. | | | | | | | native | Support for compiling Spring applications to native | >=3.0.0-M1 | | | executables using the GraalVM native-image compiler. | | | | | | | new-relic | Publish Micrometer metrics to New Relic, a SaaS offering | | | | with a full UI and a query language called NRQL. | | | | | | | oauth2-client | Spring Boot integration for Spring Security's OAuth2/OpenID | | | | Connect client features. | | | | | | | oauth2-resource-server | Spring Boot integration for Spring Security's OAuth2 | >=2.1.0.M2 | | | resource server features. | | | | | | | okta | Okta specific configuration for Spring Security/Spring Boot | >=2.0.0.RELEASE and <3.1.0-M1 | | | OAuth2 features. Enable your Spring Boot application to work | | | | with Okta via OAuth 2.0/OIDC. | | | | | | | open-service-broker | Framework for building Spring Boot apps that implement the | >=2.0.0.RELEASE and <2.7.0-M1 | | | Open Service Broker API, which can deliver services to | | | | applications running within cloud native platforms such as | | | | Cloud Foundry, Kubernetes and OpenShift. | | | | | | | oracle | A JDBC driver that provides access to Oracle. | | | | | | | picocli | Build command line applications with picocli. | >=2.5.0.RELEASE and <3.1.0-M1 | | | | | | postgresql | A JDBC and R2DBC driver that allows Java programs to connect | | | | to a PostgreSQL database using standard, database | | | | independent Java code. | | | | | | | prometheus | Expose Micrometer metrics in Prometheus format, an in-memory | | | | dimensional time series database with a simple built-in UI, | | | | a custom query language, and math operations. | | | | | | | pulsar | Build messaging applications with Apache Pulsar | >=3.0.0 and <3.1.0-M1 | | | | | | pulsar-reactive | Build reactive messaging applications with Apache Pulsar | >=3.0.0 and <3.1.0-M1 | | | | | | quartz | Schedule jobs using Quartz. | | | | | | | restdocs | Document RESTful services by combining hand-written with | | | | Asciidoctor and auto-generated snippets produced with Spring | | | | MVC Test. | | | | | | | rsocket | RSocket.io applications with Spring Messaging and Netty. | >=2.2.0.M2 | | | | | | scs-config-client | Config client on VMware Tanzu Application Service. | >=2.0.0.RELEASE and <3.0.0-M1 | | | | | | scs-service-registry | Eureka service discovery client on VMware Tanzu Application | >=2.0.0.RELEASE and <3.0.0-M1 | | | Service. | | | | | | | security | Highly customizable authentication and access-control | | | | framework for Spring applications. | | | | | | | session | Provides an API and implementations for managing user | | | | session information. | | | | | | | solace | Connect to a Solace PubSub+ Advanced Event Broker to | >=2.2.0.RELEASE and <3.0.0-M1 | | | publish, subscribe, request/reply and store/replay messages | | | | | | | spring-shell | Build command line applications with spring. | >=2.7.0 and <3.1.0-M1 | | | | | | sqlserver | A JDBC and R2DBC driver that provides access to Microsoft | | | | SQL Server and Azure SQL Database from any Java application. | | | | | | | testcontainers | Provide lightweight, throwaway instances of common | | | | databases, Selenium web browsers, or anything else that can | | | | run in a Docker container. | | | | | | | thymeleaf | A modern server-side Java template engine for both web and | | | | standalone environments. Allows HTML to be correctly | | | | displayed in browsers and as static prototypes. | | | | | | | unboundid-ldap | Provides a platform neutral way for running a LDAP server in | | | | unit tests. | | | | | | | vaadin | A web framework that allows you to write UI in pure Java | >=2.0.0.RELEASE and <3.1.0-M1 | | | without getting bogged down in JS, HTML, and CSS. | | | | | | | validation | Bean Validation with Hibernate validator. | | | | | | | wavefront | Publish metrics and optionally distributed traces to Tanzu | | | | Observability by Wavefront, a SaaS-based metrics monitoring | | | | and analytics platform that lets you visualize, query, and | | | | alert over data from across your entire stack. | | | | | | | web | Build web, including RESTful, applications using Spring MVC. | | | | Uses Apache Tomcat as the default embedded container. | | | | | | | web-services | Facilitates contract-first SOAP development. Allows for the | | | | creation of flexible web services using one of the many ways | | | | to manipulate XML payloads. | | | | | | | webflux | Build reactive web applications with Spring WebFlux and | | | | Netty. | | | | | | | websocket | Build Servlet-based WebSocket applications with SockJS and | | | | STOMP. | | | | | | | zipkin | Enable and expose span and trace IDs to Zipkin. | | +--------------------------------------+--------------------------------------------------------------+-------------------------------+ Examples: To create a default demo.zip: $ curl -G https://start.spring.io/starter.zip -o demo.zip To create a web project using Java 11: $ curl -G https://start.spring.io/starter.zip -d dependencies=web \ -d javaVersion=11 -o demo.zip To create a web/data-jpa gradle project unpacked: $ curl -G https://start.spring.io/starter.tgz -d dependencies=web,data-jpa \ -d type=gradle-project -d baseDir=my-dir | tar -xzvf - To generate a Maven POM with war packaging: $ curl -G https://start.spring.io/pom.xml -d packaging=war -o pom.xml
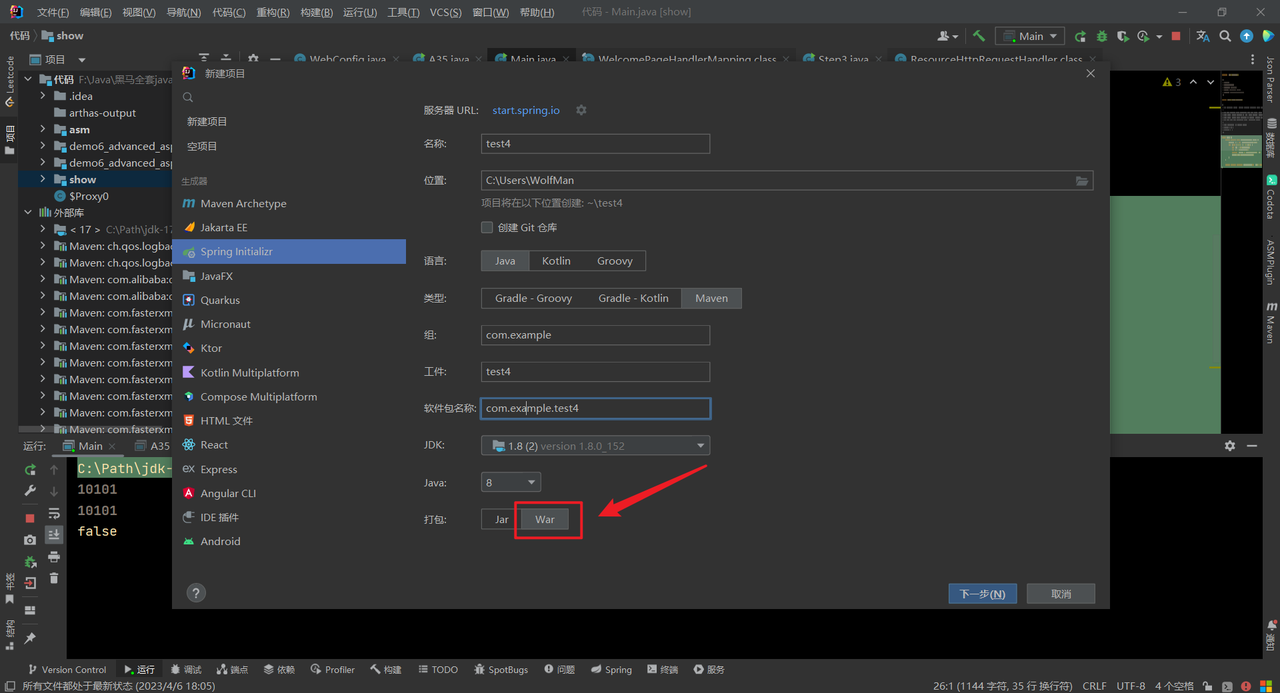
Boot War项目 创建War项目 创建一个SpringBoot War项目,点击文件->新建->项目,注意选择War打包方式
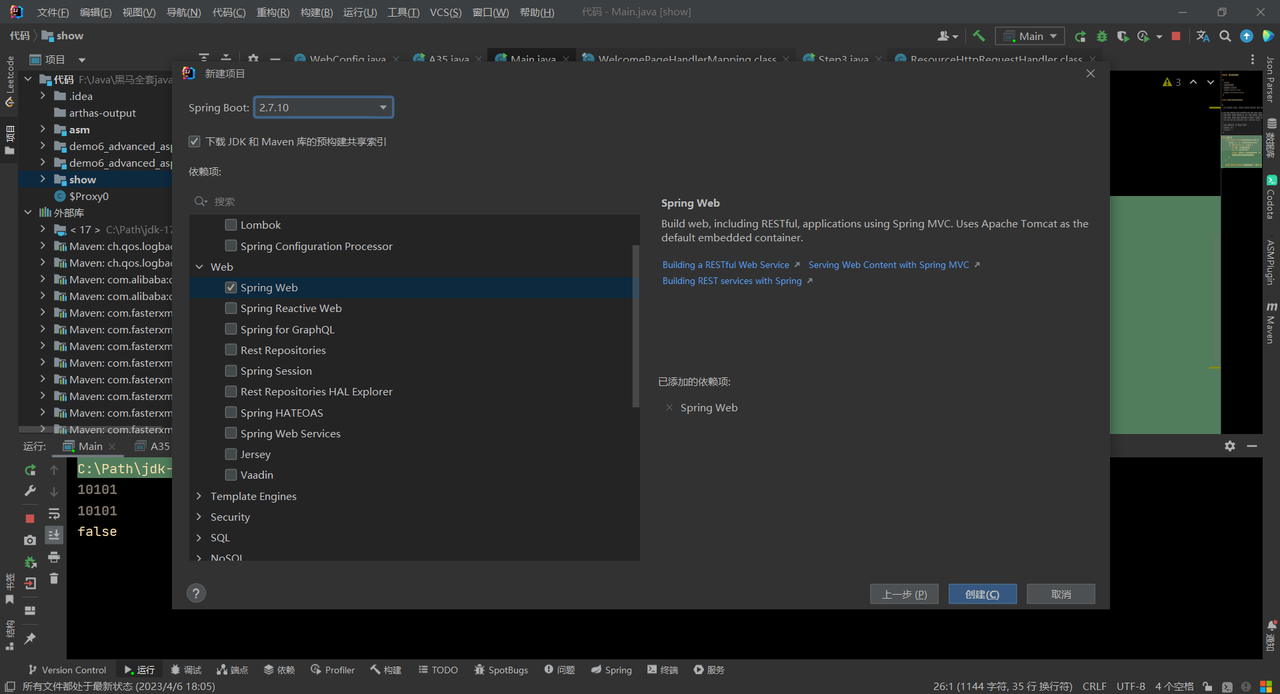
点击下一步,添加Spring Web依赖
点击创建。
如果想使用jsp技术一般以war方式打包项目,因为jsp是不能配合jar方式打包使用的。
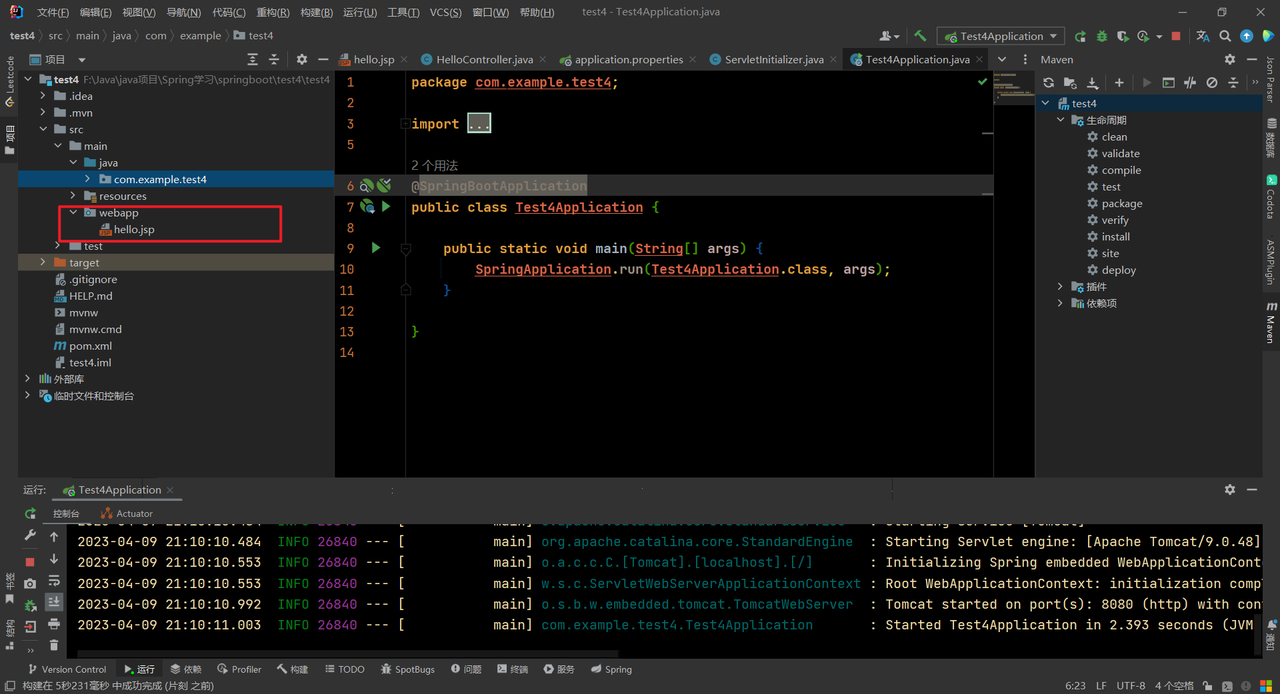
jsp视图放置的位置是固定的,必须在main文件夹下的webapp目录下,例如:
hello.jsp内容:
1
2
3
4
5
6
7
8
9
10
11
12
13
14
15
16
<%-- Created by IntelliJ IDEA. User: WolfMan Date: 2023/4/9 Time: 21:05 To change this template use File | Settings | File Templates. --%> <%@ page contentType="text/html;charset=UTF-8" language="java" %> <html > <head > <title > Title</title > </head > <body > <h1 > Hello, World</h1 > </body > </html >
我们创建一个Controller进行视图映射:
1
2
3
4
5
6
7
8
public class HelloController { @RequestMapping("/hello") public String hello () { return "hello" ; } }
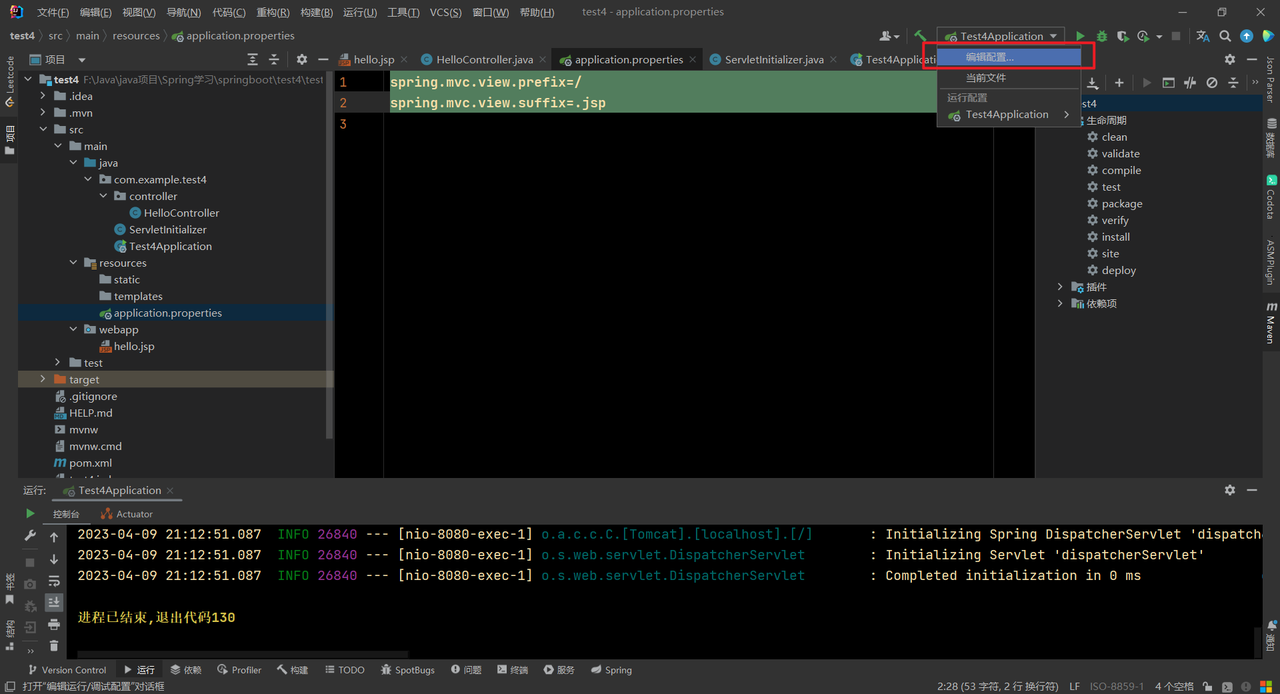
同时在application.properties文件中添加视图配置:
1
2
spring.mvc.view.prefix=/ spring.mvc.view.suffix=.jsp
这样一个简单的war项目就已经编写完毕
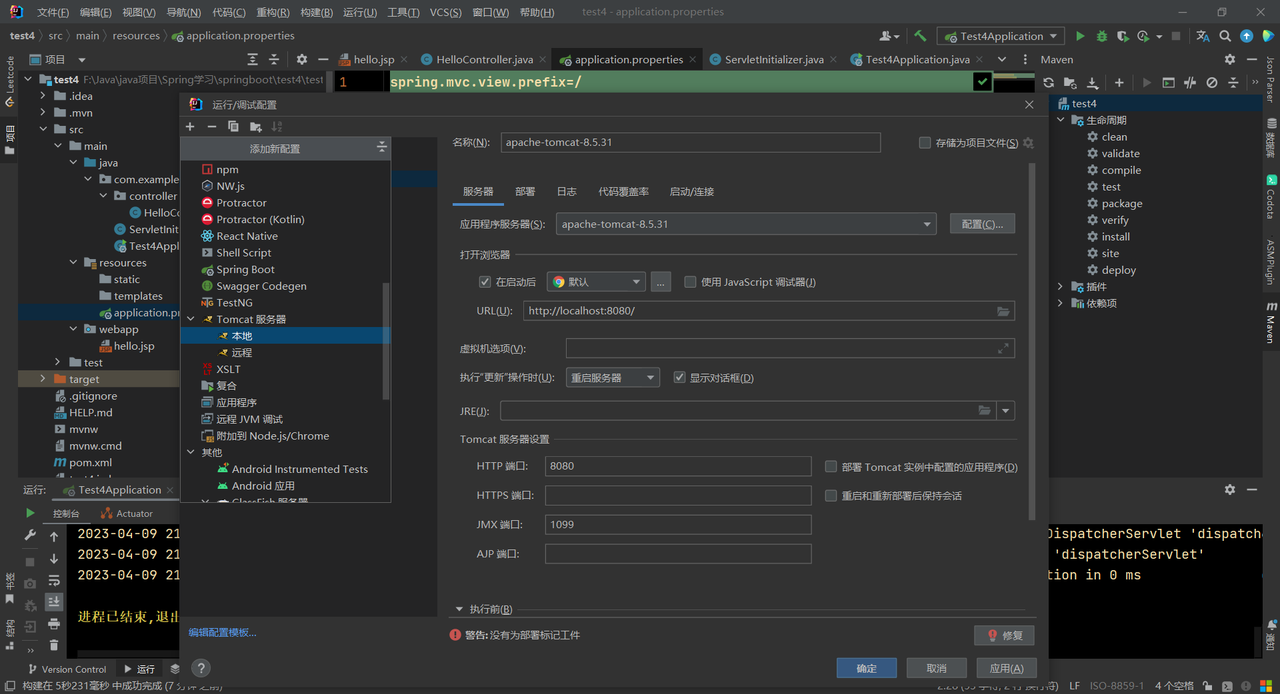
测试War项目 使用外置tomcat服务器 配置外置tomcat服务器,点击编辑配置:
点击+号,添加本地Tomcat服务器:
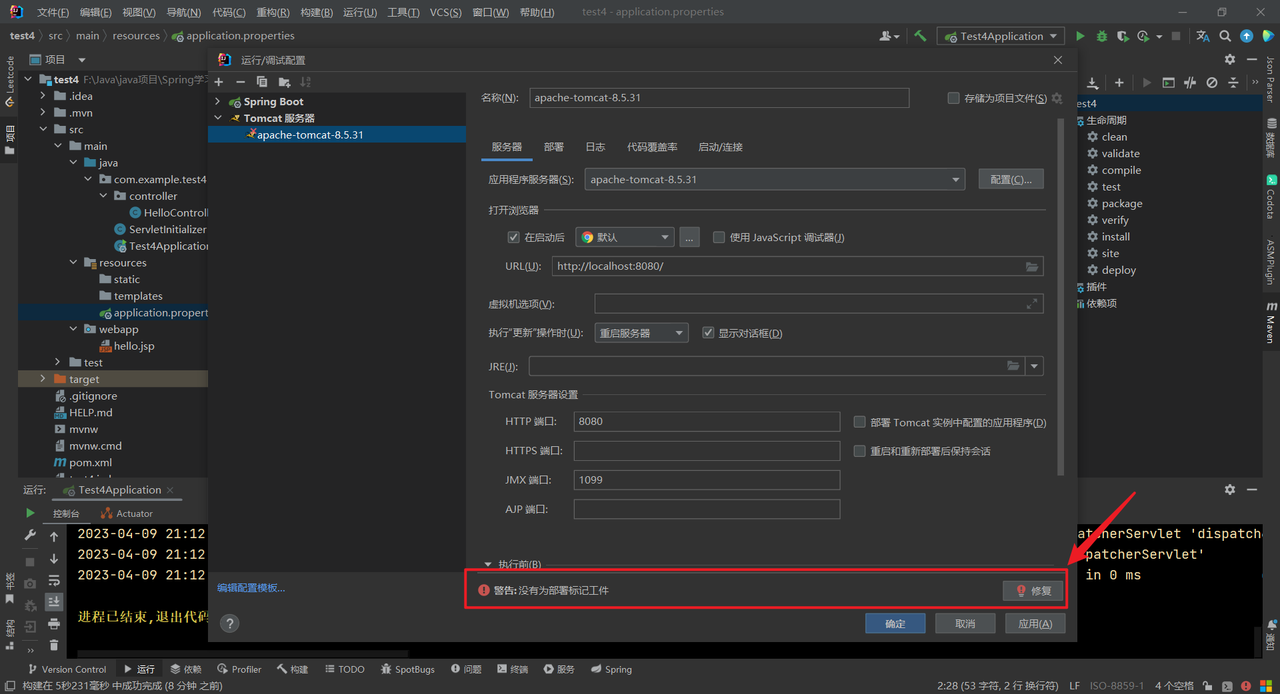
点击修复:
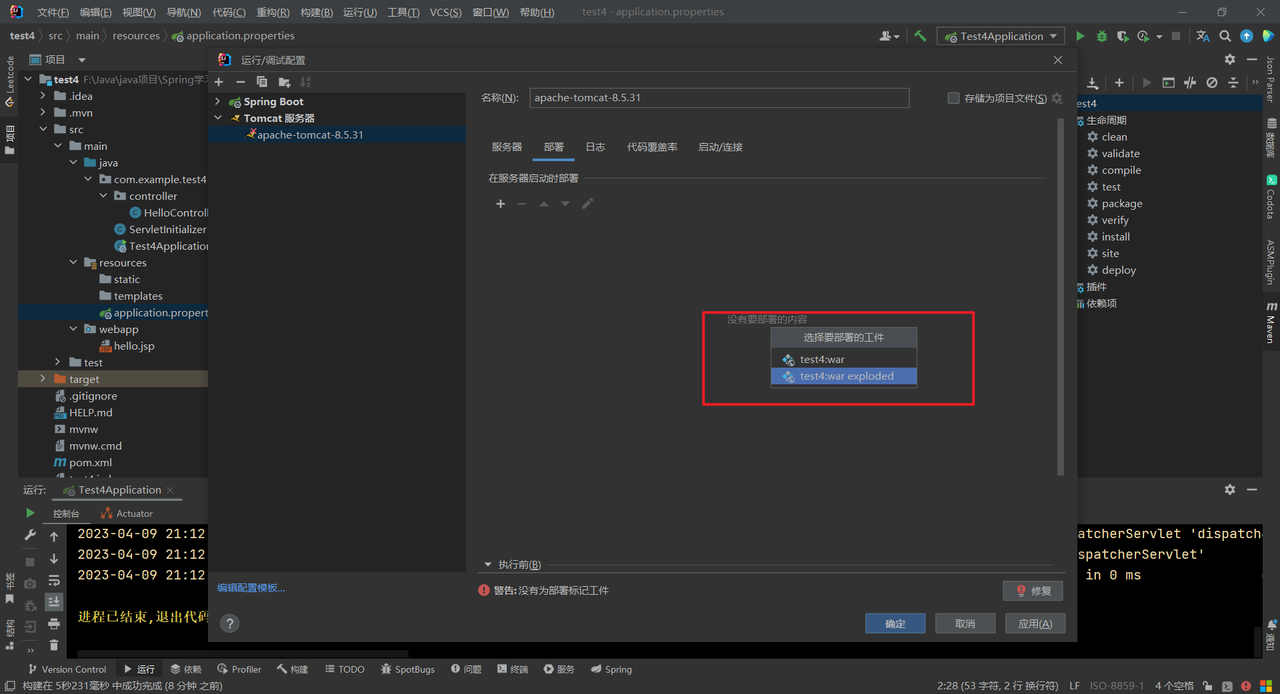
选择部署的工件,有两种选择:
war:打包成war包进行部署war exploded:不打成war包,只是将生成war包所在的目录进行部署
测试一般选择第二种方式。
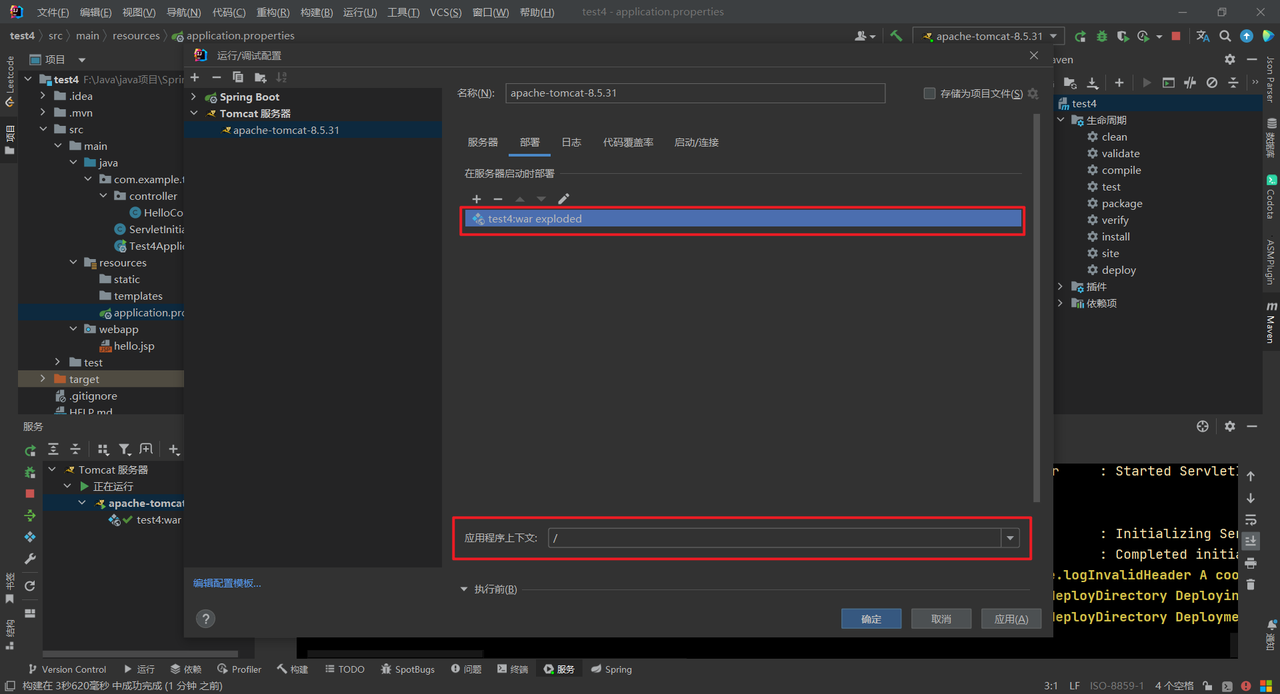
应用程序上下文一般为/:
点击应用。
运行tomcat服务器,访问http://localhost:8080/hello网址,浏览器展示:
执行流程简单梳理:
浏览器输入http://localhost:8080/hello
经过DispatcherServlet,由DispatcherServlet调用RequestMappingHandlerMapping找到控制器方法
使用RequestMappingHandlerAdapter调用控制器方法
方法的返回值由返回值处理器进行解析,对于字符串返回值将会解析成视图名
由视图解析器拼接成完整视图路径
最后由jsp解析器解析并相应html代码
值得注意的是,在骨架中生成了一个ServletInitializer类:
1
2
3
4
5
6
7
8
public class ServletInitializer extends SpringBootServletInitializer { @Override protected SpringApplicationBuilder configure (SpringApplicationBuilder application) { return application.sources(Test4Application.class); } }
这个类就是配合外置的tomcat进行使用,相当于初始化类在tomcat启动的时候找到SpringBoot相关的代码并运行。如果缺少此类就没法和外置的tomcat配合使用。
使用内置tomcat服务器 我们直接运行启动类:
1
2
3
4
5
6
7
8
9
10
11
12
13
14
15
16
17
. ____ _ __ _ _ /\\ / ___'_ __ _ _(_)_ __ __ _ \ \ \ \ ( ( )\___ | '_ | '_| | '_ \/ _` | \ \ \ \ \\/ ___)| |_)| | | | | || (_| | ) ) ) ) ' |____| .__|_| |_|_| |_\__, | / / / / =========|_|==============|___/=/_/_/_/ :: Spring Boot :: (v2.5.2) 2023-04-09 21:35:29.072 INFO 19168 --- [ main] com.example.test4.Test4Application : Starting Test4Application using Java 1.8.0_152 on LAPTOP-FBCMT03A with PID 19168 (F:\Java\java项目\Spring学习\springboot\test4\test4\target\classes started by WolfMan in F:\Java\java项目\Spring学习\springboot\test4\test4) 2023-04-09 21:35:29.075 INFO 19168 --- [ main] com.example.test4.Test4Application : No active profile set, falling back to default profiles: default 2023-04-09 21:35:29.873 INFO 19168 --- [ main] o.s.b.w.embedded.tomcat.TomcatWebServer : Tomcat initialized with port(s): 8080 (http) 2023-04-09 21:35:29.879 INFO 19168 --- [ main] o.apache.catalina.core.StandardService : Starting service [Tomcat] 2023-04-09 21:35:29.880 INFO 19168 --- [ main] org.apache.catalina.core.StandardEngine : Starting Servlet engine: [Apache Tomcat/9.0.48] 2023-04-09 21:35:29.931 INFO 19168 --- [ main] o.a.c.c.C.[Tomcat].[localhost].[/] : Initializing Spring embedded WebApplicationContext 2023-04-09 21:35:29.931 INFO 19168 --- [ main] w.s.c.ServletWebServerApplicationContext : Root WebApplicationContext: initialization completed in 805 ms 2023-04-09 21:35:30.180 INFO 19168 --- [ main] o.s.b.w.embedded.tomcat.TomcatWebServer : Tomcat started on port(s): 8080 (http) with context path '' 2023-04-09 21:35:30.188 INFO 19168 --- [ main] com.example.test4.Test4Application : Started Test4Application in 1.467 seconds (JVM running for 2.169)
查看日志发现,服务已经启动并且监听了8080端口。
访问http://localhost:8080/hello,我们发现浏览器直接将`hello.jsp`当成文件下载下来了,并没有解析页面。这是因为内嵌的`tomcat`服务器没有自带`jsp`的解析器。
我们在pom.xml中添加jsp解析器坐标:
1 2 3 4 <dependency > <groupId > org.apache.tomcat.embed</groupId > <artifactId > tomcat-embed-jasper</artifactId > </dependency >
重新运行启动类,访问http://localhost:8080/hello网址,浏览器展示:
Boot启动流程 SpringApplication构造分析 创建启动类:
1
2
3
4
5
6
7
8
@Configuration public class A39_1 { public static void main (String[] args) throws Exception { SpringApplication.run(A39_1.class,args); } }
我们进入SpringApplication的run()方法:
1
2
3
public static ConfigurableApplicationContext run (Class<?> primarySource, String... args) { return run(new Class []{primarySource}, args); }
进入重载的run()方法:
1
2
3
public static ConfigurableApplicationContext run (Class<?>[] primarySources, String[] args) { return (new SpringApplication (primarySources)).run(args); }
其中创建了一个SpringApplication实例,并调用了实例的run()方法。
进入SpringApplication的构造方法:
1
2
3
public SpringApplication (Class<?>... primarySources) { this ((ResourceLoader)null , primarySources); }
进入重载的构造方法:
1
2
3
4
5
6
7
8
9
10
11
12
13
14
15
16
17
18
19
20
21
22
public SpringApplication (ResourceLoader resourceLoader, Class<?>... primarySources) { this .sources = new LinkedHashSet (); this .bannerMode = Mode.CONSOLE; this .logStartupInfo = true ; this .addCommandLineProperties = true ; this .addConversionService = true ; this .headless = true ; this .registerShutdownHook = true ; this .additionalProfiles = Collections.emptySet(); this .isCustomEnvironment = false ; this .lazyInitialization = false ; this .applicationContextFactory = ApplicationContextFactory.DEFAULT; this .applicationStartup = ApplicationStartup.DEFAULT; this .resourceLoader = resourceLoader; Assert.notNull(primarySources, "PrimarySources must not be null" ); this .primarySources = new LinkedHashSet (Arrays.asList(primarySources)); this .webApplicationType = WebApplicationType.deduceFromClasspath(); this .bootstrapRegistryInitializers = this .getBootstrapRegistryInitializersFromSpringFactories(); this .setInitializers(this .getSpringFactoriesInstances(ApplicationContextInitializer.class)); this .setListeners(this .getSpringFactoriesInstances(ApplicationListener.class)); this .mainApplicationClass = this .deduceMainApplicationClass(); }
SpringApplication的构造方法主要做了以下五件事:
记录BeanDefinition源,配置类或者xml配置文件等,根据引导类寻找BeanDefinition源
推断应用类型,非web程序、基于servlet的web程序、基于reactive的web容器,根据当前类路径下的jar包中的关键类推断
记录ApplicationContext初始化器,ApplicationContext初始化器可以对Application做一些功能上的扩展
记录监听器与事件,监听SpringBoot在启动过程中的一些关键事件
推断主启动类,推断运行SpringBoot项目的类
SpringApplication的构造方法主要是做一些准备工作,并没有真正创建spring容器,spring容器的创建是在SpringApplication的run()方法中。
演示获取BeanDefinition源
编写测试代码:
1
2
3
4
5
6
7
8
9
10
11
12
13
14
15
16
17
18
19
20
21
22
23
24
25
26
27
28
29
30
31
32
33
34
35
36
37
38
39
@Configuration public class A39_1 { public static void main (String[] args) throws Exception { System.out.println("1. 演示获取 Bean Definition 源" ); SpringApplication spring = new SpringApplication (A39_1.class); spring.setSources(Set.of("classpath:b01.xml" )); ConfigurableApplicationContext context = spring.run(args); for (String name : context.getBeanDefinitionNames()) { System.out.println("name: " + name + " 来源:" + context.getBeanFactory().getBeanDefinition(name).getResourceDescription()); } context.close(); } static class Bean1 { } static class Bean2 { } static class Bean3 { } @Bean public Bean2 bean2 () { return new Bean2 (); } @Bean public TomcatServletWebServerFactory servletWebServerFactory () { return new TomcatServletWebServerFactory (); } }
编写配置文件:
1
2
3
4
5
6
7
8
<?xml version="1.0" encoding="UTF-8" ?> <beans xmlns ="http://www.springframework.org/schema/beans" xmlns:xsi ="http://www.w3.org/2001/XMLSchema-instance" xsi:schemaLocation ="http://www.springframework.org/schema/beans http://www.springframework.org/schema/beans/spring-beans.xsd" > <bean id ="bean1" class ="com.itheima.a39.A39_1.Bean1" /> </beans >
运行启动类,查看控制台:
1
2
3
4
5
6
7
8
9
10
11
1. 演示获取 Bean Definition 源 name: org.springframework.context.annotation.internalConfigurationAnnotationProcessor 来源:null name: org.springframework.context.annotation.internalAutowiredAnnotationProcessor 来源:null name: org.springframework.context.annotation.internalCommonAnnotationProcessor 来源:null name: org.springframework.context.event.internalEventListenerProcessor 来源:null name: org.springframework.context.event.internalEventListenerFactory 来源:null name: a39_1 来源:null name: bean1 来源:class path resource [b01.xml] name: org.springframework.boot.autoconfigure.internalCachingMetadataReaderFactory 来源:null name: bean2 来源:com.itheima.a39.A39_1 name: servletWebServerFactory 来源:com.itheima.a39.A39_1
发现将我们自定义的Bean的来源都已打印,来源为null的是spring自己添加的Bean,并且我们设置的xml的配置文件也已经生效。
演示推断应用类型
进入SpringApplication的构造方法:
1
2
3
4
5
6
7
8
9
10
11
12
13
14
15
16
17
18
19
20
21
22
public SpringApplication (ResourceLoader resourceLoader, Class<?>... primarySources) { this .sources = new LinkedHashSet (); this .bannerMode = Mode.CONSOLE; this .logStartupInfo = true ; this .addCommandLineProperties = true ; this .addConversionService = true ; this .headless = true ; this .registerShutdownHook = true ; this .additionalProfiles = Collections.emptySet(); this .isCustomEnvironment = false ; this .lazyInitialization = false ; this .applicationContextFactory = ApplicationContextFactory.DEFAULT; this .applicationStartup = ApplicationStartup.DEFAULT; this .resourceLoader = resourceLoader; Assert.notNull(primarySources, "PrimarySources must not be null" ); this .primarySources = new LinkedHashSet (Arrays.asList(primarySources)); this .webApplicationType = WebApplicationType.deduceFromClasspath(); this .bootstrapRegistryInitializers = this .getBootstrapRegistryInitializersFromSpringFactories(); this .setInitializers(this .getSpringFactoriesInstances(ApplicationContextInitializer.class)); this .setListeners(this .getSpringFactoriesInstances(ApplicationListener.class)); this .mainApplicationClass = this .deduceMainApplicationClass(); }
推断类型的逻辑在WebApplicationType的deduceFromClasspath()方法中:
1
2
3
4
5
6
7
8
9
10
11
12
13
14
15
16
17
static WebApplicationType deduceFromClasspath () { if (ClassUtils.isPresent("org.springframework.web.reactive.DispatcherHandler" , (ClassLoader)null ) && !ClassUtils.isPresent("org.springframework.web.servlet.DispatcherServlet" , (ClassLoader)null ) && !ClassUtils.isPresent("org.glassfish.jersey.servlet.ServletContainer" , (ClassLoader)null )) { return REACTIVE; } else { String[] var0 = SERVLET_INDICATOR_CLASSES; int var1 = var0.length; for (int var2 = 0 ; var2 < var1; ++var2) { String className = var0[var2]; if (!ClassUtils.isPresent(className, (ClassLoader)null )) { return NONE; } } return SERVLET; } }
主要判断逻辑为类路径下是否存在某些类,或者不存在某些类。
我们通过反射来调用WebApplicationType的deduceFromClasspath()方法:
1
2
3
4
5
6
7
8
9
10
11
12
13
14
15
16
17
18
19
20
21
22
23
24
25
26
27
28
29
30
31
32
33
34
35
@Configuration public class A39_1 { public static void main (String[] args) throws Exception { SpringApplication spring = new SpringApplication (A39_1.class); System.out.println("2. 演示推断应用类型" ); Method deduceFromClasspath = WebApplicationType.class.getDeclaredMethod("deduceFromClasspath" ); deduceFromClasspath.setAccessible(true ); System.out.println("应用类型为:" +deduceFromClasspath.invoke(null )); ConfigurableApplicationContext context = spring.run(args); context.close(); } static class Bean1 { } static class Bean2 { } static class Bean3 { } @Bean public Bean2 bean2 () { return new Bean2 (); } @Bean public TomcatServletWebServerFactory servletWebServerFactory () { return new TomcatServletWebServerFactory (); } }
运行启动类,查看控制台:
1
2
2. 演示推断应用类型 应用类型为:SERVLET
演示ApplicationContext初始化器
查看ApplicationContext构造方法:
1 2 3 this .setInitializers(this .getSpringFactoriesInstances(ApplicationContextInitializer.class));
以上代码就是读取配置文件中的初始化器。
编写测试代码:
1
2
3
4
5
6
7
8
9
10
11
12
13
14
15
16
17
18
19
20
21
22
23
24
25
26
27
28
29
30
31
32
33
34
35
36
37
38
39
40
@Configuration public class A39_1 { public static void main (String[] args) throws Exception { SpringApplication spring = new SpringApplication (A39_1.class); System.out.println("3. 演示 ApplicationContext 初始化器" ); spring.addInitializers(applicationContext -> { if (applicationContext instanceof GenericApplicationContext gac) { gac.registerBean("bean3" , Bean3.class); } }); ConfigurableApplicationContext context = spring.run(args); for (String name : context.getBeanDefinitionNames()) { System.out.println("name: " + name + " 来源:" + context.getBeanFactory().getBeanDefinition(name).getResourceDescription()); } context.close(); } static class Bean1 { } static class Bean2 { } static class Bean3 { } @Bean public Bean2 bean2 () { return new Bean2 (); } @Bean public TomcatServletWebServerFactory servletWebServerFactory () { return new TomcatServletWebServerFactory (); } }
运行启动类,查看控制台:
1
2
3
4
5
6
7
8
9
10
11
3. 演示 ApplicationContext 初始化器 name: org.springframework.context.annotation.internalConfigurationAnnotationProcessor 来源:null name: org.springframework.context.annotation.internalAutowiredAnnotationProcessor 来源:null name: org.springframework.context.annotation.internalCommonAnnotationProcessor 来源:null name: org.springframework.context.event.internalEventListenerProcessor 来源:null name: org.springframework.context.event.internalEventListenerFactory 来源:null name: bean3 来源:null name: a39_1 来源:null name: org.springframework.boot.autoconfigure.internalCachingMetadataReaderFactory 来源:null name: bean2 来源:com.itheima.a39.A39_1 name: servletWebServerFactory 来源:com.itheima.a39.A39_1
我们发现bean3已经注册在容器中。
演示监听器与事件
查看ApplicationContext构造方法:
1 2 3 this .setListeners(this .getSpringFactoriesInstances(ApplicationListener.class));
以上代码就是读取配置文件中的监听器。
编写测试代码:
1
2
3
4
5
6
7
8
9
10
11
12
13
14
15
16
17
18
19
20
21
22
23
24
25
26
27
28
29
30
31
32
33
34
35
36
@Configuration public class A39_1 { public static void main (String[] args) throws Exception { SpringApplication spring = new SpringApplication (A39_1.class); System.out.println("4. 演示监听器与事件" ); spring.addListeners(event -> System.out.println("\t事件为:" + event.getClass())); ConfigurableApplicationContext context = spring.run(args); for (String name : context.getBeanDefinitionNames()) { System.out.println("name: " + name + " 来源:" + context.getBeanFactory().getBeanDefinition(name).getResourceDescription()); } context.close(); } static class Bean1 { } static class Bean2 { } static class Bean3 { } @Bean public Bean2 bean2 () { return new Bean2 (); } @Bean public TomcatServletWebServerFactory servletWebServerFactory () { return new TomcatServletWebServerFactory (); } }
运行启动类,查看控制台:
1
2
3
4
5
6
7
8
9
10
11
12
13
14
15
16
17
18
19
20
21
22
23
24
25
26
27
28
29
30
31
32
33
34
4. 演示监听器与事件 事件为:class org.springframework.boot.context.event.ApplicationStartingEvent 事件为:class org.springframework.boot.context.event.ApplicationEnvironmentPreparedEvent . ____ _ __ _ _ /\\ / ___'_ __ _ _(_)_ __ __ _ \ \ \ \ ( ( )\___ | '_ | '_| | '_ \/ _` | \ \ \ \ \\/ ___)| |_)| | | | | || (_| | ) ) ) ) ' |____| .__|_| |_|_| |_\__, | / / / / =========|_|==============|___/=/_/_/_/ :: Spring Boot :: (v2.5.5) 事件为:class org.springframework.boot.context.event.ApplicationContextInitializedEvent [INFO ] 13:58:33.919 [main] com.itheima.a39.A39_1 - Starting A39_1 using Java 17.0.6 on LAPTOP-FBCMT03A with PID 29512 (F:\Java\黑马全套java教程\第2阶段企业级开发—基础框架\7、spring高级45讲\代码\代码\show\target\classes started by WolfMan in F:\Java\黑马全套java教程\第2阶段企业级开发—基础框架\7、spring高级45讲\代码\代码) [DEBUG] 13:58:33.926 [main] com.itheima.a39.A39_1 - Running with Spring Boot v2.5.5, Spring v5.3.10 [INFO ] 13:58:33.927 [main] com.itheima.a39.A39_1 - No active profile set, falling back to default profiles: default 事件为:class org.springframework.boot.context.event.ApplicationPreparedEvent [INFO ] 13:58:34.398 [main] o.s.b.w.e.tomcat.TomcatWebServer - Tomcat initialized with port(s): 8080 (http) [INFO ] 13:58:34.413 [main] o.a.coyote.http11.Http11NioProtocol - Initializing ProtocolHandler ["http-nio-8080"] [INFO ] 13:58:34.414 [main] o.a.catalina.core.StandardService - Starting service [Tomcat] [INFO ] 13:58:34.414 [main] o.a.catalina.core.StandardEngine - Starting Servlet engine: [Apache Tomcat/9.0.53] [INFO ] 13:58:34.560 [main] o.a.c.c.C.[Tomcat].[localhost].[/] - Initializing Spring embedded WebApplicationContext [INFO ] 13:58:34.560 [main] o.s.b.w.s.c.ServletWebServerApplicationContext - Root WebApplicationContext: initialization completed in 597 ms [INFO ] 13:58:34.617 [main] o.a.coyote.http11.Http11NioProtocol - Starting ProtocolHandler ["http-nio-8080"] [INFO ] 13:58:34.670 [main] o.s.b.w.e.tomcat.TomcatWebServer - Tomcat started on port(s): 8080 (http) with context path '' 事件为:class org.springframework.boot.web.servlet.context.ServletWebServerInitializedEvent 事件为:class org.springframework.context.event.ContextRefreshedEvent [INFO ] 13:58:34.678 [main] com.itheima.a39.A39_1 - Started A39_1 in 1.214 seconds (JVM running for 1.692) 事件为:class org.springframework.boot.context.event.ApplicationStartedEvent 事件为:class org.springframework.boot.availability.AvailabilityChangeEvent 事件为:class org.springframework.boot.context.event.ApplicationReadyEvent 事件为:class org.springframework.boot.availability.AvailabilityChangeEvent 事件为:class org.springframework.boot.availability.AvailabilityChangeEvent 事件为:class org.springframework.context.event.ContextClosedEvent
事件被触发时会打印相应的事件名。
演示主类推断
查看ApplicationContext构造方法:
1 2 3 this .mainApplicationClass = this .deduceMainApplicationClass();
以上代码就是推断主类方法,我们反射调用。
编写测试代码:
1
2
3
4
5
6
7
8
9
10
11
12
13
14
15
16
17
18
19
20
21
22
23
24
25
26
27
28
29
30
31
32
33
34
35
36
@Configuration public class A39_1 { public static void main (String[] args) throws Exception { SpringApplication spring = new SpringApplication (A39_1.class); System.out.println("5. 演示主类推断" ); Method deduceMainApplicationClass = SpringApplication.class.getDeclaredMethod("deduceMainApplicationClass" ); deduceMainApplicationClass.setAccessible(true ); System.out.println("\t主类是:" +deduceMainApplicationClass.invoke(spring)); ConfigurableApplicationContext context = spring.run(args); context.close(); } static class Bean1 { } static class Bean2 { } static class Bean3 { } @Bean public Bean2 bean2 () { return new Bean2 (); } @Bean public TomcatServletWebServerFactory servletWebServerFactory () { return new TomcatServletWebServerFactory (); } }
运行启动类,查看控制台:
1
2
5. 演示主类推断 主类是:class com.itheima.a39.A39_1
SpringApplication run()方法分析 进入SpringApplication的run()方法:
1
2
3
4
5
6
7
8
9
10
11
12
13
14
15
16
17
18
19
20
21
22
23
24
25
26
27
28
29
30
31
32
33
34
35
36
37
38
39
public ConfigurableApplicationContext run (String... args) { StopWatch stopWatch = new StopWatch (); stopWatch.start(); DefaultBootstrapContext bootstrapContext = this .createBootstrapContext(); ConfigurableApplicationContext context = null ; this .configureHeadlessProperty(); SpringApplicationRunListeners listeners = this .getRunListeners(args); listeners.starting(bootstrapContext, this .mainApplicationClass); try { ApplicationArguments applicationArguments = new DefaultApplicationArguments (args); ConfigurableEnvironment environment = this .prepareEnvironment(listeners, bootstrapContext, applicationArguments); this .configureIgnoreBeanInfo(environment); Banner printedBanner = this .printBanner(environment); context = this .createApplicationContext(); context.setApplicationStartup(this .applicationStartup); this .prepareContext(bootstrapContext, context, environment, listeners, applicationArguments, printedBanner); this .refreshContext(context); this .afterRefresh(context, applicationArguments); stopWatch.stop(); if (this .logStartupInfo) { (new StartupInfoLogger (this .mainApplicationClass)).logStarted(this .getApplicationLog(), stopWatch); } listeners.started(context); this .callRunners(context, applicationArguments); } catch (Throwable var10) { this .handleRunFailure(context, var10, listeners); throw new IllegalStateException (var10); } try { listeners.running(context); return context; } catch (Throwable var9) { this .handleRunFailure(context, var9, (SpringApplicationRunListeners)null ); throw new IllegalStateException (var9); } }
SpringApplication的run()方法步骤:
得到SpringApplicationRunListeners,名字取得不好,实际是事件发布器
发布application starting事件
封装启动args
准备Environment添加命令行参数
ConfigurationPropertySources处理
发布application environment已准备事件
通过EnvironmentPostProcessorApplicationListener进行 env 后处理
application.properties,由StandardConfigDataLocationResolver解析spring.application.json
绑定spring.main到SpringApplication对象
打印banner
创建容器
准备容器
发布application context已初始化事件
加载bean定义
发布application prepared事件
refresh容器
发布application started事件
执行runner
发布application ready事件
这其中有异常,发布application failed事件
演示SpringApplication的run()方法第1步:
事件发布器的类型为SpringApplicationRunListener,SpringApplicationRunListeners可以组合多个事件发布器。SpringApplicationRunListener有一个实现为EventPublishingRunListener,虽然只有一个实现,但spring没有写死在代码中,而是将接口与实现写在了org.springframework.boot:spring-boot:2.5.5包下的spring.factories配置文件中。
1 2 3 org.springframework.boot.SpringApplicationRunListener =\ org.springframework.boot.context.event.EventPublishingRunListener
编写代码查看EventPublishingRunListener实现类:
1
2
3
4
5
6
7
8
9
10
11
12
public class A39_2 { public static void main (String[] args) throws Exception{ SpringApplication app = new SpringApplication (); app.addListeners(e -> System.out.println(e.getClass())); List<String> names = SpringFactoriesLoader.loadFactoryNames(SpringApplicationRunListener.class, A39_2.class.getClassLoader()); for (String name : names) { System.out.println(name); } } }
运行启动类,查看控制台:
1 org.springframework.boot.context.event.EventPublishingRunListener
我们使用EventPublishingRunListener来发布各种事件:
class org.springframework.boot.context.event.ApplicationStartingEventclass org.springframework.boot.context.event.ApplicationEnvironmentPreparedEventclass org.springframework.boot.context.event.ApplicationContextInitializedEventclass org.springframework.boot.context.event.ApplicationPreparedEventclass org.springframework.boot.context.event.ApplicationStartedEventclass org.springframework.boot.context.event.ApplicationReadyEventclass org.springframework.boot.context.event.ApplicationFailedEvent
一共有以上七个事件。
1
2
3
4
5
6
7
8
9
10
11
12
13
14
15
16
17
18
19
20
21
22
23
24
25
26
27
28
29
30
31
32
33
public class A39_2 { public static void main (String[] args) throws Exception { SpringApplication app = new SpringApplication (); app.addListeners(e -> System.out.println(e.getClass())); List<String> names = SpringFactoriesLoader.loadFactoryNames(SpringApplicationRunListener.class, A39_2.class.getClassLoader()); for (String name : names) { System.out.println(name); Class<?> clazz = Class.forName(name); Constructor<?> constructor = clazz.getConstructor(SpringApplication.class, String[].class); SpringApplicationRunListener publisher = (SpringApplicationRunListener) constructor.newInstance(app, args); DefaultBootstrapContext bootstrapContext = new DefaultBootstrapContext (); publisher.starting(bootstrapContext); publisher.environmentPrepared(bootstrapContext, new StandardEnvironment ()); GenericApplicationContext context = new GenericApplicationContext (); publisher.contextPrepared(context); publisher.contextLoaded(context); context.refresh(); publisher.started(context); publisher.running(context); publisher.failed(context, new Exception ("出错了" )); } } }
运行启动类,查看控制台:
1
2
3
4
5
6
7
8
9
10
11
org.springframework.boot.context.event.EventPublishingRunListener class org.springframework.boot.context.event.ApplicationStartingEvent class org.springframework.boot.context.event.ApplicationEnvironmentPreparedEvent class org.springframework.boot.context.event.ApplicationContextInitializedEvent class org.springframework.boot.context.event.ApplicationPreparedEvent class org.springframework.context.event.ContextRefreshedEvent class org.springframework.boot.context.event.ApplicationStartedEvent class org.springframework.boot.availability.AvailabilityChangeEvent class org.springframework.boot.context.event.ApplicationReadyEvent class org.springframework.boot.availability.AvailabilityChangeEvent class org.springframework.boot.context.event.ApplicationFailedEvent
发现控制台不止七个事件,其实有些事件是由容器内的事件发布器发布的。
演示SpringApplication的run()方法第2、8~12步:
1 2 3 4 5 6 7 8 9 10 11 12 13 14 15 16 17 18 19 20 21 22 23 24 25 26 27 28 29 30 31 32 33 34 35 36 37 38 39 40 41 42 43 44 45 46 47 48 49 50 51 52 53 54 55 56 57 58 59 60 61 62 63 64 65 66 67 68 69 70 71 72 73 74 75 76 77 78 79 80 81 82 83 84 85 86 87 88 89 90 91 92 93 94 95 96 97 98 99 100 101 public class A39_3 { @SuppressWarnings("all") public static void main (String[] args) throws Exception { SpringApplication app = new SpringApplication (); app.addInitializers(new ApplicationContextInitializer <ConfigurableApplicationContext>() { @Override public void initialize (ConfigurableApplicationContext applicationContext) { System.out.println("执行初始化器增强..." ); } }); System.out.println(">>>>>>>>>>>>>>>>>>>>>>>> 2. 封装启动 args" ); DefaultApplicationArguments arguments = new DefaultApplicationArguments (args); System.out.println(">>>>>>>>>>>>>>>>>>>>>>>> 8. 创建容器" ); GenericApplicationContext context = createApplicationContext(WebApplicationType.SERVLET); System.out.println(">>>>>>>>>>>>>>>>>>>>>>>> 9. 准备容器" ); for (ApplicationContextInitializer initializer : app.getInitializers()) { initializer.initialize(context); } System.out.println(">>>>>>>>>>>>>>>>>>>>>>>> 10. 加载 bean 定义" ); DefaultListableBeanFactory beanFactory = context.getDefaultListableBeanFactory(); AnnotatedBeanDefinitionReader reader1 = new AnnotatedBeanDefinitionReader (beanFactory); XmlBeanDefinitionReader reader2 = new XmlBeanDefinitionReader (beanFactory); ClassPathBeanDefinitionScanner scanner = new ClassPathBeanDefinitionScanner (beanFactory); reader1.register(Config.class); reader2.loadBeanDefinitions(new ClassPathResource ("b03.xml" )); scanner.scan("com.itheima.a39.sub" ); System.out.println(">>>>>>>>>>>>>>>>>>>>>>>> 11. refresh 容器" ); context.refresh(); for (String name : context.getBeanDefinitionNames()) { System.out.println("name:" + name + " 来源:" + beanFactory.getBeanDefinition(name).getResourceDescription()); } System.out.println(">>>>>>>>>>>>>>>>>>>>>>>> 12. 执行 runner" ); for (CommandLineRunner runner : context.getBeansOfType(CommandLineRunner.class).values()) { runner.run(args); } for (ApplicationRunner runner : context.getBeansOfType(ApplicationRunner.class).values()) { runner.run(arguments); } } private static GenericApplicationContext createApplicationContext (WebApplicationType type) { GenericApplicationContext context = null ; switch (type) { case SERVLET -> context = new AnnotationConfigServletWebServerApplicationContext (); case REACTIVE -> context = new AnnotationConfigReactiveWebServerApplicationContext (); case NONE -> context = new AnnotationConfigApplicationContext (); } return context; } static class Bean4 { } static class Bean5 { } static class Bean6 { } @Configuration static class Config { @Bean public Bean5 bean5 () { return new Bean5 (); } @Bean public ServletWebServerFactory servletWebServerFactory () { return new TomcatServletWebServerFactory (); } @Bean public CommandLineRunner commandLineRunner () { return new CommandLineRunner () { @Override public void run (String... args) throws Exception { System.out.println("commandLineRunner()..." + Arrays.toString(args)); } }; } @Bean public ApplicationRunner applicationRunner () { return new ApplicationRunner () { @Override public void run (ApplicationArguments args) throws Exception { System.out.println("applicationRunner()..." + Arrays.toString(args.getSourceArgs())); System.out.println(args.getOptionNames()); System.out.println(args.getOptionValues("server.port" )); System.out.println(args.getNonOptionArgs()); } }; } } }
b03.xml文件内容为:
1
2
3
4
5
6
7
8
<?xml version="1.0" encoding="UTF-8" ?> <beans xmlns ="http://www.springframework.org/schema/beans" xmlns:xsi ="http://www.w3.org/2001/XMLSchema-instance" xmlns:context ="http://www.springframework.org/schema/context" xsi:schemaLocation ="http://www.springframework.org/schema/beans http://www.springframework.org/schema/beans/spring-beans.xsd http://www.springframework.org/schema/context https://www.springframework.org/schema/context/spring-context.xsd" > <bean id ="bean4" class ="com.itheima.a39.A39_3.Bean4" /> </beans >
com.itheima.a39.sub包中内容为:
1
2
3
@Component public class Bean7 {}
运行启动类,查看控制台:
1
2
3
4
5
6
7
8
9
10
11
12
13
14
15
16
17
18
19
20
21
22
23
24
25
26
27
28
29
30
31
32
33
34
35
36
37
38
>>>>>>>>>>>>>>>>>>>>>>>> 2. 封装启动 args >>>>>>>>>>>>>>>>>>>>>>>> 8. 创建容器 >>>>>>>>>>>>>>>>>>>>>>>> 9. 准备容器 执行初始化器增强... >>>>>>>>>>>>>>>>>>>>>>>> 10. 加载 bean 定义 >>>>>>>>>>>>>>>>>>>>>>>> 11. refresh 容器 [INFO ] 16:05:35.122 [main] o.s.b.w.e.tomcat.TomcatWebServer - Tomcat initialized with port(s): 8080 (http) 4月 12, 2023 4:05:35 下午 org.apache.coyote.AbstractProtocol init 信息: Initializing ProtocolHandler ["http-nio-8080"] 4月 12, 2023 4:05:35 下午 org.apache.catalina.core.StandardService startInternal 信息: Starting service [Tomcat] 4月 12, 2023 4:05:35 下午 org.apache.catalina.core.StandardEngine startInternal 信息: Starting Servlet engine: [Apache Tomcat/9.0.53] 4月 12, 2023 4:05:35 下午 org.apache.catalina.core.ApplicationContext log 信息: Initializing Spring embedded WebApplicationContext [INFO ] 16:05:35.292 [main] o.s.b.w.s.c.ServletWebServerApplicationContext - Root WebApplicationContext: initialization completed in 652 ms 4月 12, 2023 4:05:35 下午 org.apache.coyote.AbstractProtocol start 信息: Starting ProtocolHandler ["http-nio-8080"] [INFO ] 16:05:35.413 [main] o.s.b.w.e.tomcat.TomcatWebServer - Tomcat started on port(s): 8080 (http) with context path '' name:org.springframework.context.annotation.internalConfigurationAnnotationProcessor 来源:null name:org.springframework.context.annotation.internalAutowiredAnnotationProcessor 来源:null name:org.springframework.context.annotation.internalCommonAnnotationProcessor 来源:null name:org.springframework.context.event.internalEventListenerProcessor 来源:null name:org.springframework.context.event.internalEventListenerFactory 来源:null name:a39_3.Config 来源:null name:bean4 来源:class path resource [b03.xml] name:bean7 来源:file [F:\Java\黑马全套java教程\第2阶段企业级开发—基础框架\7、spring高级45讲\代码\代码\show\target\classes\com\itheima\a39\sub\Bean7.class] name:org.springframework.boot.autoconfigure.internalCachingMetadataReaderFactory 来源:null name:bean5 来源:com.itheima.a39.A39_3$Config name:servletWebServerFactory 来源:com.itheima.a39.A39_3$Config name:commandLineRunner 来源:com.itheima.a39.A39_3$Config name:applicationRunner 来源:com.itheima.a39.A39_3$Config >>>>>>>>>>>>>>>>>>>>>>>> 12. 执行 runner commandLineRunner()...[--server.port=8080, debug] applicationRunner()...[--server.port=8080, debug] [server.port] [8080] [debug]
发现我们手动添加的Bean都已注入,添加的启动参数也能正常读取。
演示SpringApplication的run()方法第3步:
SpringApplication的run()方法的第3~6步都与一个环境对象有关,环境对象即配置信息的抽象。配置信息有多种来源,例如系统环境变量、properties文件、yaml文件等。环境对象对这些配置信息的整合,将来读取配置时使用此对象即可。
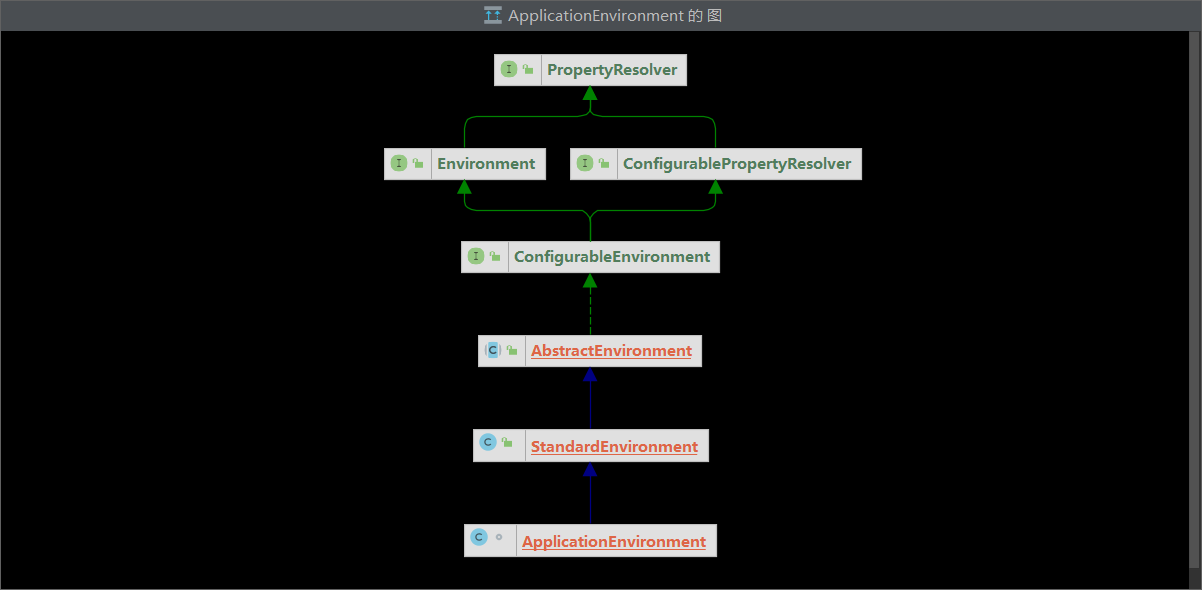
在spring中,环境对象的实现为StandardEnvironment,而在springboot中,环境对象的实现为ApplicationEnvironment类,查看其继承关系:
其主要作用就是根据给定键找到对应的值,默认情况下我们创建的环境对象里只有两个来源:
系统属性
系统变量
我们可以打印一下:
1
2
3
4
5
6
7
8
9
public class Step3 { public static void main (String[] args) throws IOException { ApplicationEnvironment env = new ApplicationEnvironment (); for (PropertySource<?> ps : env.getPropertySources()) { System.out.println(ps); } } }
运行启动类,查看控制台:
1
2
PropertiesPropertySource {name='systemProperties'} SystemEnvironmentPropertySource {name='systemEnvironment'}
在查找键的时候,从上到下会有一个优先级,如果有同名的键,优先使用靠前的来源。
我们测试一下优先级:
1
2
3
4
5
6
public class Step3 { public static void main (String[] args) throws IOException { ApplicationEnvironment env = new ApplicationEnvironment (); System.out.println(env.getProperty("JAVA_HOME" )); } }
控制台输出:
接下来我们在运行时添加系统属性,即添加虚拟机参数:
再次运行,控制台输出:
因此优先查找的来源是systemProperties,其次是systemEnvironment。
我们可以自定义来源:
1
2
3
4
5
6
7
8
public class Step3 { public static void main (String[] args) throws IOException { ApplicationEnvironment env = new ApplicationEnvironment (); env.getPropertySources().addLast(new ResourcePropertySource (new ClassPathResource ("step3.properties" ))); env.getPropertySources().addFirst(new SimpleCommandLinePropertySource (args)); System.out.println(env.getProperty("server.port" )); } }
优先级为PropertySources中的顺序,排在最前面的优先级最高。
在以上代码中我们在PropertySources添加了配置文件,以及命令行来源,同时配置文件优先级最低,命令行来源优先级最高。
在配置文件中配置server.port=8080,运行代码时添加参数--server.port=8081,运行代码,查看控制台:
最后输出的是8081,说明命令行来源优先级最高。
SpringApplication的run()方法第3步做了以下事情:
准备ApplicationEnvironment对象
添加了SimpleCommandLinePropertySource来源
添加ResourcePropertySource来源是后续步骤做的事情。
演示SpringApplication的run()方法第4步:
我们先看一个例子:
1
2
3
4
5
6
7
8
9
10
11
12
public class Step4 { public static void main (String[] args) throws IOException, NoSuchFieldException { ApplicationEnvironment env = new ApplicationEnvironment (); env.getPropertySources().addLast( new ResourcePropertySource ("step4" , new ClassPathResource ("step4.properties" )) ); System.out.println(env.getProperty("user.first-name" )); System.out.println(env.getProperty("user.middle-name" )); System.out.println(env.getProperty("user.last-name" )); } }
step4.properties配置文件的内容为:
1
2
3
user.first-name =George user.middle_name =Walker user.lastName =Bush
我们发现代码中读取的键与配置文件中的键是不一样的,因此读取不到:
第4步加入了一个特殊的PropertySource源,这个特殊的源就是将配置文件的命名统一成由-号分割的,我们此源:
1 2 3 4 5 6 7 8 9 10 11 12 13 14 15 16 public class Step4 { public static void main (String[] args) throws IOException, NoSuchFieldException { ApplicationEnvironment env = new ApplicationEnvironment (); env.getPropertySources().addLast( new ResourcePropertySource ("step4" , new ClassPathResource ("step4.properties" )) ); ConfigurationPropertySources.attach(env); for (PropertySource<?> ps : env.getPropertySources()) { System.out.println(ps); } System.out.println(env.getProperty("user.first-name" )); System.out.println(env.getProperty("user.middle-name" )); System.out.println(env.getProperty("user.last-name" )); } }
运行启动类,查看控制台:
1 2 3 4 5 6 7 ConfigurationPropertySourcesPropertySource {name='configurationProperties'} PropertiesPropertySource {name='systemProperties'} SystemEnvironmentPropertySource {name='systemEnvironment'} ResourcePropertySource {name='step4'} George Walker Bush
发现一共有四个来源,并且配置文件也能正确读取。
演示SpringApplication的run()方法第5步:
第5步是对ApplicationEnvironment再做进一步的增强处理,在给其补充一些新的PropertySource。它是通过Environment后处理器来完成的,因此它具备一定的扩展性,可以由我们自己补充新的实现。
值得提到的是,读取application.properties的源就是在第5步被加入的。
我们查看对应的接口:
1 2 3 4 @FunctionalInterface public interface EnvironmentPostProcessor { void postProcessEnvironment (ConfigurableEnvironment environment, SpringApplication application) ; }
EnvironmentPostProcessor有一个重要实现ConfigDataEnvironmentPostProcessor,其作用就是读取application.properties中的内容。
演示ConfigDataEnvironmentPostProcessor的作用:
1 2 3 4 5 6 7 8 9 10 11 12 13 14 15 16 17 18 19 public class Step5 { public static void main (String[] args) { SpringApplication app = new SpringApplication (); ApplicationEnvironment env = new ApplicationEnvironment (); System.out.println(">>>>>>>>>>>>>>>>>>>>>>>>> 增强前" ); for (PropertySource<?> ps : env.getPropertySources()) { System.out.println(ps); } ConfigDataEnvironmentPostProcessor postProcessor1 = new ConfigDataEnvironmentPostProcessor (new DeferredLogs (), new DefaultBootstrapContext ()); postProcessor1.postProcessEnvironment(env,app); System.out.println(">>>>>>>>>>>>>>>>>>>>>>>>> 增强后" ); for (PropertySource<?> ps : env.getPropertySources()) { System.out.println(ps); } System.out.println(env.getProperty("server.port" )); } }
运行启动类,查看控制台:
1 2 3 4 5 6 7 8 >>>>>>>>>>>>>>>>>>>>>>>>> 增强前 PropertiesPropertySource {name='systemProperties'} SystemEnvironmentPropertySource {name='systemEnvironment'} >>>>>>>>>>>>>>>>>>>>>>>>> 增强后 PropertiesPropertySource {name='systemProperties'} SystemEnvironmentPropertySource {name='systemEnvironment'} OriginTrackedMapPropertySource {name='Config resource 'class path resource [application.properties]' via location 'optional:classpath:/''} 8080
增强后多了一个PropertySource源,同时也能读取配置文件中的内容。
我们也可以测试另一个实现RandomValuePropertySourceEnvironmentPostProcessor,这个实现可以随机产生值,我们只需要读取random开头的键即可。
1 2 3 4 5 6 7 8 9 10 11 12 13 14 15 16 17 18 19 20 21 22 23 public class Step5 { public static void main (String[] args) { SpringApplication app = new SpringApplication (); ApplicationEnvironment env = new ApplicationEnvironment (); System.out.println(">>>>>>>>>>>>>>>>>>>>>>>>> 增强前" ); for (PropertySource<?> ps : env.getPropertySources()) { System.out.println(ps); } RandomValuePropertySourceEnvironmentPostProcessor postProcessor2 = new RandomValuePropertySourceEnvironmentPostProcessor (new DeferredLog ()); postProcessor2.postProcessEnvironment(env, app); System.out.println(">>>>>>>>>>>>>>>>>>>>>>>>> 增强后" ); for (PropertySource<?> ps : env.getPropertySources()) { System.out.println(ps); } System.out.println(env.getProperty("random.int" )); System.out.println(env.getProperty("random.int" )); System.out.println(env.getProperty("random.int" )); System.out.println(env.getProperty("random.uuid" )); System.out.println(env.getProperty("random.uuid" )); System.out.println(env.getProperty("random.uuid" )); } }
运行启动类,查看控制台:
1 2 3 4 5 6 7 8 9 10 11 12 13 >>>>>>>>>>>>>>>>>>>>>>>>> 增强前 PropertiesPropertySource {name='systemProperties'} SystemEnvironmentPropertySource {name='systemEnvironment'} >>>>>>>>>>>>>>>>>>>>>>>>> 增强后 PropertiesPropertySource {name='systemProperties'} SystemEnvironmentPropertySource {name='systemEnvironment'} RandomValuePropertySource {name='random'} 2112811766 -176261027 1122993668 115cf977-b2c4-4853-bd79-1ce543ace40c 173de9ff-b916-4bfb-b426-eed474e518ee ff051847-0940-4664-89b4-41bc9f042dde
springboot会在spring.factories配置文件中读取所有的EnvironmentPostProcessor:
1 2 3 4 5 6 7 8 org.springframework.boot.env.EnvironmentPostProcessor=\ org.springframework.boot.cloud.CloudFoundryVcapEnvironmentPostProcessor,\ org.springframework.boot.context.config.ConfigDataEnvironmentPostProcessor,\ org.springframework.boot.env.RandomValuePropertySourceEnvironmentPostProcessor,\ org.springframework.boot.env.SpringApplicationJsonEnvironmentPostProcessor,\ org.springframework.boot.env.SystemEnvironmentPropertySourceEnvironmentPostProcessor,\ org.springframework.boot.reactor.DebugAgentEnvironmentPostProcessor
我们手动获取这些EnvironmentPostProcessor:
1 2 3 4 5 6 7 8 9 10 11 public class Step5 { public static void main (String[] args) { SpringApplication app = new SpringApplication (); List<String> names = SpringFactoriesLoader.loadFactoryNames(EnvironmentPostProcessor.class, Step5.class.getClassLoader()); for (String name : names) { System.out.println(name); } } }
运行启动类,查看控制台:
1 2 3 4 5 6 7 org.springframework.boot.cloud.CloudFoundryVcapEnvironmentPostProcessor org.springframework.boot.context.config.ConfigDataEnvironmentPostProcessor org.springframework.boot.env.RandomValuePropertySourceEnvironmentPostProcessor org.springframework.boot.env.SpringApplicationJsonEnvironmentPostProcessor org.springframework.boot.env.SystemEnvironmentPropertySourceEnvironmentPostProcessor org.springframework.boot.reactor.DebugAgentEnvironmentPostProcessor org.springframework.boot.autoconfigure.integration.IntegrationPropertiesEnvironmentPostProcessor
这些EnvironmentPostProcessor的增强方法是通过监听器的方式来调用的。同样,监听器的实现也在spring.factories配置文件中:
1 2 3 4 5 6 7 8 9 # Application Listeners org.springframework.context.ApplicationListener=\ org.springframework.boot.ClearCachesApplicationListener,\ org.springframework.boot.builder.ParentContextCloserApplicationListener,\ org.springframework.boot.context.FileEncodingApplicationListener,\ org.springframework.boot.context.config.AnsiOutputApplicationListener,\ org.springframework.boot.context.config.DelegatingApplicationListener,\ org.springframework.boot.context.logging.LoggingApplicationListener,\ org.springframework.boot.env.EnvironmentPostProcessorApplicationListener
其中EnvironmentPostProcessorApplicationListener就是去调用各个EnvironmentPostProcessor的postProcessEnvironment()增强方法。
我们使用EnvironmentPostProcessorApplicationListener手动去增加PropertySource源:
1 2 3 4 5 6 7 8 9 10 11 12 13 14 15 16 17 public class Step5 { public static void main (String[] args) { SpringApplication app = new SpringApplication (); app.addListeners(new EnvironmentPostProcessorApplicationListener ()); EventPublishingRunListener publisher = new EventPublishingRunListener (app, args); ApplicationEnvironment env = new ApplicationEnvironment (); System.out.println(">>>>>>>>>>>>>>>>>>>>>>>>> 增强前" ); for (PropertySource<?> ps : env.getPropertySources()) { System.out.println(ps); } publisher.environmentPrepared(new DefaultBootstrapContext (), env); System.out.println(">>>>>>>>>>>>>>>>>>>>>>>>> 增强后" ); for (PropertySource<?> ps : env.getPropertySources()) { System.out.println(ps); } }
运行启动类,查看控制台:
1 2 3 4 5 6 7 8 >>>>>>>>>>>>>>>>>>>>>>>>> 增强前 PropertiesPropertySource {name='systemProperties'} SystemEnvironmentPropertySource {name='systemEnvironment'} >>>>>>>>>>>>>>>>>>>>>>>>> 增强后 PropertiesPropertySource {name='systemProperties'} OriginAwareSystemEnvironmentPropertySource {name='systemEnvironment'} RandomValuePropertySource {name='random'} OriginTrackedMapPropertySource {name='Config resource 'class path resource [application.properties]' via location 'optional:classpath:/''}
发现增强后有些PropertySource源不生效,是与初始化环境有关。
演示SpringApplication的run()方法第6步:
@ConfigurationProperties注解的原理是使用Binder进行绑定:
1 2 3 4 5 6 7 8 9 10 11 12 13 14 15 16 17 18 19 20 21 22 23 24 25 26 27 28 29 30 31 32 33 34 35 36 37 38 39 40 public class Step6 { public static void main (String[] args) throws IOException { ApplicationEnvironment env = new ApplicationEnvironment (); env.getPropertySources().addLast(new ResourcePropertySource ("step4" , new ClassPathResource ("step4.properties" ))); User user = Binder.get(env).bind("user" , User.class).get(); System.out.println(user); } static class User { private String firstName; private String middleName; private String lastName; public String getFirstName () { return firstName; } public void setFirstName (String firstName) { this .firstName = firstName; } public String getMiddleName () { return middleName; } public void setMiddleName (String middleName) { this .middleName = middleName; } public String getLastName () { return lastName; } public void setLastName (String lastName) { this .lastName = lastName; } @Override public String toString () { return "User{" + "firstName='" + firstName + '\'' + ", middleName='" + middleName + '\'' + ", lastName='" + lastName + '\'' + '}' ; } } }
运行启动类,查看控制台:
1 User{firstName='George', middleName='Walker', lastName='Bush'}
step4.properties配置文件中的信息已经成功绑定到User对象上
也可以使用另一种方式绑定数据到已有的对象上
1 2 3 User user = new User ();Binder.get(env).bind("user" , Bindable.ofInstance(user)); System.out.println(user);
SpringApplication的run()方法第6步的作用就是将配置文件或者环境变量中的这些键值绑定到SpringApplication属性中。
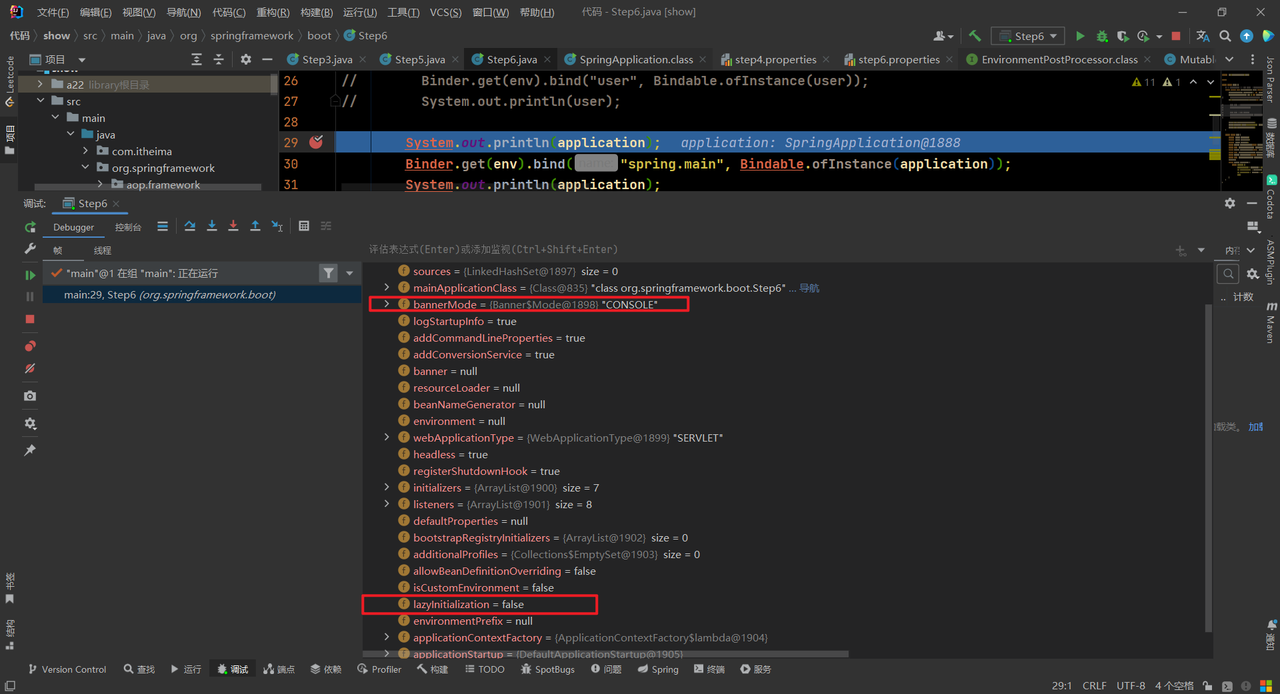
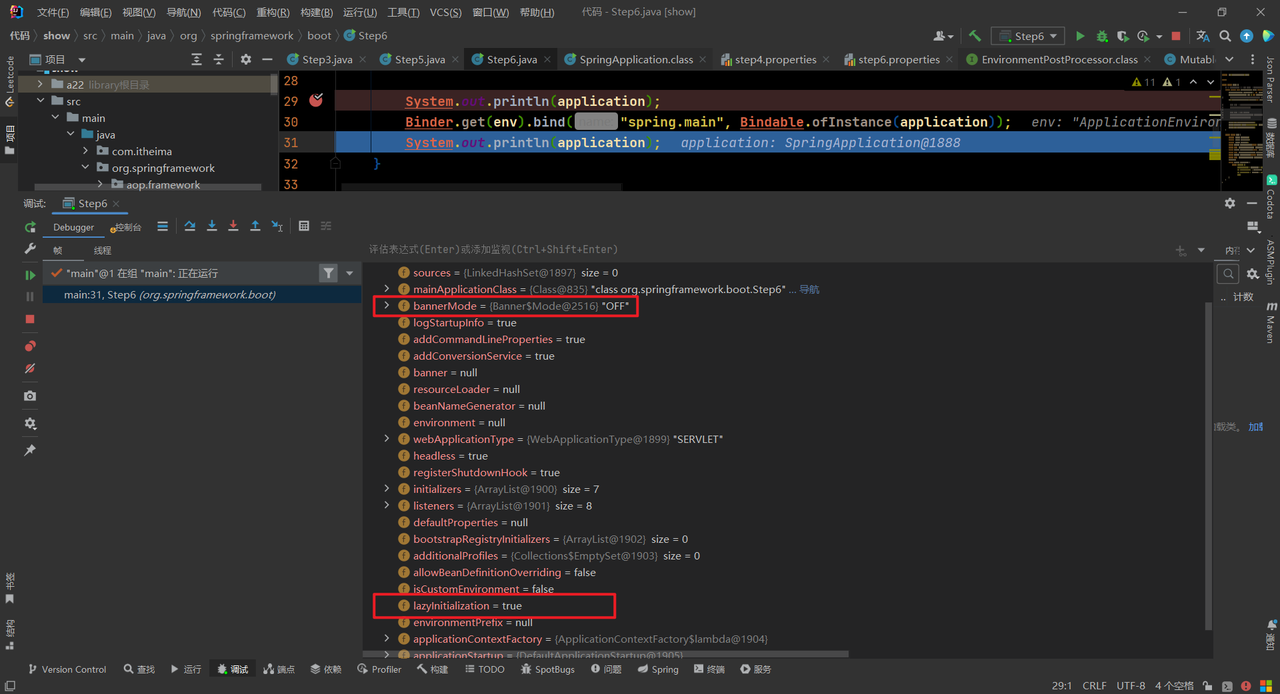
演示示例,准备配置文件,这些属性在SpringApplication都有对应值:
1 2 spring.main.banner-mode =off spring.main.lazy-initialization =true
编写代码绑定数据:
1 2 3 4 5 6 7 8 9 10 11 public class Step6 { public static void main (String[] args) throws IOException { SpringApplication application = new SpringApplication (); ApplicationEnvironment env = new ApplicationEnvironment (); env.getPropertySources().addLast(new ResourcePropertySource ("step6" , new ClassPathResource ("step6.properties" ))); System.out.println(application); Binder.get(env).bind("spring.main" , Bindable.ofInstance(application)); System.out.println(application); } }
绑定之前的值:
绑定之后的值:
演示SpringApplication的run()方法第7步:
SpringApplication的run()方法第7步主要是输出Banner信息,springboot中有默认的实现SpringBootBanner,我们也可以配置自己的Banner信息:
配置文字Banner:指定spring.banner.location值,即新的Banner
配置图片Banner:指定spring.banner.image.location值,最终图片会转换为文字。
1 2 3 4 5 6 7 8 9 10 11 12 13 14 15 16 public class Step7 { public static void main (String[] args) { ApplicationEnvironment env = new ApplicationEnvironment (); SpringApplicationBannerPrinter printer = new SpringApplicationBannerPrinter ( new DefaultResourceLoader (), new SpringBootBanner () ); env.getPropertySources().addLast(new MapPropertySource ("custom" , Map.of("spring.banner.location" ,"banner1.txt" ))); env.getPropertySources().addLast(new MapPropertySource ("custom" , Map.of("spring.banner.image.location" ,"banner2.png" ))); System.out.println(SpringBootVersion.getVersion()); printer.print(env, Step7.class, System.out); } }
最后回顾一下SpringApplication的run()方法:
1 2 3 4 5 6 7 8 9 10 11 12 13 14 15 16 17 18 19 20 21 22 23 24 25 26 27 28 29 30 31 32 33 34 35 36 37 38 39 40 41 42 43 44 45 46 47 48 49 50 51 52 53 54 public ConfigurableApplicationContext run (String... args) { StopWatch stopWatch = new StopWatch (); stopWatch.start(); DefaultBootstrapContext bootstrapContext = this .createBootstrapContext(); ConfigurableApplicationContext context = null ; this .configureHeadlessProperty(); SpringApplicationRunListeners listeners = this .getRunListeners(args); listeners.starting(bootstrapContext, this .mainApplicationClass); try { ApplicationArguments applicationArguments = new DefaultApplicationArguments (args); ConfigurableEnvironment environment = this .prepareEnvironment(listeners, bootstrapContext, applicationArguments); this .configureIgnoreBeanInfo(environment); Banner printedBanner = this .printBanner(environment); context = this .createApplicationContext(); context.setApplicationStartup(this .applicationStartup); this .prepareContext(bootstrapContext, context, environment, listeners, applicationArguments, printedBanner); this .refreshContext(context); this .afterRefresh(context, applicationArguments); stopWatch.stop(); if (this .logStartupInfo) { (new StartupInfoLogger (this .mainApplicationClass)).logStarted(this .getApplicationLog(), stopWatch); } listeners.started(context); this .callRunners(context, applicationArguments); } catch (Throwable var10) { this .handleRunFailure(context, var10, listeners); throw new IllegalStateException (var10); } try { listeners.running(context); return context; } catch (Throwable var9) { this .handleRunFailure(context, var9, (SpringApplicationRunListeners)null ); throw new IllegalStateException (var9); } }
prepareEnvironment()方法详情:
1 2 3 4 5 6 7 8 9 10 11 12 13 14 15 16 17 18 19 private ConfigurableEnvironment prepareEnvironment (SpringApplicationRunListeners listeners, DefaultBootstrapContext bootstrapContext, ApplicationArguments applicationArguments) { ConfigurableEnvironment environment = this .getOrCreateEnvironment(); this .configureEnvironment((ConfigurableEnvironment)environment, applicationArguments.getSourceArgs()); ConfigurationPropertySources.attach((Environment)environment); listeners.environmentPrepared(bootstrapContext, (ConfigurableEnvironment)environment); DefaultPropertiesPropertySource.moveToEnd((ConfigurableEnvironment)environment); Assert.state(!((ConfigurableEnvironment)environment).containsProperty("spring.main.environment-prefix" ), "Environment prefix cannot be set via properties." ); this .bindToSpringApplication((ConfigurableEnvironment)environment); if (!this .isCustomEnvironment) { environment = (new EnvironmentConverter (this .getClassLoader())).convertEnvironmentIfNecessary((ConfigurableEnvironment)environment, this .deduceEnvironmentClass()); } ConfigurationPropertySources.attach((Environment)environment); return (ConfigurableEnvironment)environment; }
prepareContext()方法详情:
1 2 3 4 5 6 7 8 9 10 11 12 13 14 15 16 17 18 19 20 21 22 23 24 25 26 27 28 29 30 31 32 33 34 private void prepareContext (DefaultBootstrapContext bootstrapContext, ConfigurableApplicationContext context, ConfigurableEnvironment environment, SpringApplicationRunListeners listeners, ApplicationArguments applicationArguments, Banner printedBanner) { context.setEnvironment(environment); this .postProcessApplicationContext(context); this .applyInitializers(context); listeners.contextPrepared(context); bootstrapContext.close(context); if (this .logStartupInfo) { this .logStartupInfo(context.getParent() == null ); this .logStartupProfileInfo(context); } ConfigurableListableBeanFactory beanFactory = context.getBeanFactory(); beanFactory.registerSingleton("springApplicationArguments" , applicationArguments); if (printedBanner != null ) { beanFactory.registerSingleton("springBootBanner" , printedBanner); } if (beanFactory instanceof DefaultListableBeanFactory) { ((DefaultListableBeanFactory)beanFactory).setAllowBeanDefinitionOverriding(this .allowBeanDefinitionOverriding); } if (this .lazyInitialization) { context.addBeanFactoryPostProcessor(new LazyInitializationBeanFactoryPostProcessor ()); } Set<Object> sources = this .getAllSources(); Assert.notEmpty(sources, "Sources must not be empty" ); this .load(context, sources.toArray(new Object [0 ])); listeners.contextLoaded(context); }
Tomcat内嵌容器 Tomcat内嵌容器 Tomcat基本结构:
1 2 3 4 5 6 7 8 9 10 11 12 13 14 15 16 Server └───Service ├───Connector (协议, 端口) └───Engine └───Host(虚拟主机 localhost) ├───Context1 (应用1, 可以设置虚拟路径, / 即 url 起始路径; 项目磁盘路径, 即 docBase ) │ │ index.html │ └───WEB-INF │ │ web.xml (servlet, filter, listener) 3.0之后不需要web.xml,可以通过编程的方式实现 │ ├───classes (servlet, controller, service ...) │ ├───jsp │ └───lib (第三方 jar 包) └───Context2 (应用2) │ index.html └───WEB-INF web.xml
创建内嵌的Tomcat:
1 2 3 4 5 6 7 8 9 10 11 12 13 14 15 16 17 18 19 20 21 22 23 24 25 26 27 28 29 30 31 32 33 34 35 36 37 38 39 40 41 42 43 public class HelloServlet extends HttpServlet { @Override protected void doGet (HttpServletRequest req, HttpServletResponse resp) throws ServletException, IOException { resp.setContentType("text/html;charset=utf-8" ); resp.getWriter().print(""" <h3>hello</h3> """ ); } } public class TestTomcat { @SuppressWarnings("all") public static void main (String[] args) throws LifecycleException, IOException { Tomcat tomcat = new Tomcat (); tomcat.setBaseDir("tomcat" ); File docBase = Files.createTempDirectory("boot." ).toFile(); docBase.deleteOnExit(); Context context = tomcat.addContext("" , docBase.getAbsolutePath()); context.addServletContainerInitializer(new ServletContainerInitializer () { @Override public void onStartup (Set<Class<?>> c, ServletContext ctx) throws ServletException { HelloServlet helloServlet = new HelloServlet (); ctx.addServlet("aaa" , helloServlet).addMapping("/hello" ); } }, Collections.emptySet()); tomcat.start(); Connector connector = new Connector (new Http11Nio2Protocol ()); connector.setPort(8080 ); tomcat.setConnector(connector); } }
启动Tomcat容器,访问http://localhost:8080/hello,浏览器输出:
Spring集成内嵌Tomcat 1 2 3 4 5 6 7 8 9 10 11 12 13 14 15 16 17 18 19 20 21 22 23 24 25 26 27 28 29 30 31 32 33 34 35 36 37 38 39 40 41 42 43 44 45 46 47 48 49 50 51 52 53 54 55 56 57 58 59 60 61 62 63 64 65 66 67 68 69 70 71 72 73 74 75 76 77 78 79 80 81 82 83 84 85 public class HelloServlet extends HttpServlet { @Override protected void doGet (HttpServletRequest req, HttpServletResponse resp) throws ServletException, IOException { resp.setContentType("text/html;charset=utf-8" ); resp.getWriter().print(""" <h3>hello</h3> """ ); } } public class TestTomcat { @SuppressWarnings("all") public static void main (String[] args) throws LifecycleException, IOException { Tomcat tomcat = new Tomcat (); tomcat.setBaseDir("tomcat" ); File docBase = Files.createTempDirectory("boot." ).toFile(); docBase.deleteOnExit(); Context context = tomcat.addContext("" , docBase.getAbsolutePath()); WebApplicationContext springContext = getApplicationContext(); context.addServletContainerInitializer(new ServletContainerInitializer () { @Override public void onStartup (Set<Class<?>> c, ServletContext ctx) throws ServletException { HelloServlet helloServlet = new HelloServlet (); ctx.addServlet("aaa" , helloServlet).addMapping("/hello" ); DispatcherServlet dispatcherServlet = springContext.getBean(DispatcherServlet.class); ctx.addServlet("dispatcherServlet" , dispatcherServlet).addMapping("/" ); } }, Collections.emptySet()); tomcat.start(); Connector connector = new Connector (new Http11Nio2Protocol ()); connector.setPort(8080 ); tomcat.setConnector(connector); } public static WebApplicationContext getApplicationContext () { AnnotationConfigWebApplicationContext context = new AnnotationConfigWebApplicationContext (); context.register(Config.class); context.refresh(); return context; } @Configuration static class Config { @Bean public DispatcherServletRegistrationBean registrationBean (DispatcherServlet dispatcherServlet) { return new DispatcherServletRegistrationBean (dispatcherServlet, "/" ); } @Bean public DispatcherServlet dispatcherServlet (WebApplicationContext applicationContext) { return new DispatcherServlet (applicationContext); } @Bean public RequestMappingHandlerAdapter requestMappingHandlerAdapter () { RequestMappingHandlerAdapter handlerAdapter = new RequestMappingHandlerAdapter (); handlerAdapter.setMessageConverters(List.of(new MappingJackson2HttpMessageConverter ())); return handlerAdapter; } @RestController static class MyController { @GetMapping("hello2") public Map<String,Object> hello () { return Map.of("hello2" , "hello2, spring!" ); } } } }
启动Tomcat容器,访问http://localhost:8080/hello2,浏览器输出:
1 2 3 { "hello2" : "hello2, spring!" }
在context的addServletContainerInitializer()方法我们注册Servlet不够通用,应该交由ServletRegistrationBean进行注册:
1 2 3 4 5 6 7 8 9 10 context.addServletContainerInitializer(new ServletContainerInitializer () { @Override public void onStartup (Set<Class<?>> c, ServletContext ctx) throws ServletException { HelloServlet helloServlet = new HelloServlet (); ctx.addServlet("aaa" , helloServlet).addMapping("/hello" ); for (ServletRegistrationBean registrationBean : springContext.getBeansOfType(ServletRegistrationBean.class).values()) { registrationBean.onStartup(ctx); } } }, Collections.emptySet());
springboot在整合tomcat时,先创建spring容器,在调用refresh()方法;refresh()方法中的onRefresh()就是以上演示的1~4步,最后在finishRefresh()方法中启动tomcat。
1 2 3 4 5 6 7 8 9 10 11 12 13 14 15 16 17 18 19 20 21 22 23 24 25 26 27 28 29 30 31 32 33 34 public void refresh () throws BeansException, IllegalStateException { synchronized (this .startupShutdownMonitor) { StartupStep contextRefresh = this .applicationStartup.start("spring.context.refresh" ); this .prepareRefresh(); ConfigurableListableBeanFactory beanFactory = this .obtainFreshBeanFactory(); this .prepareBeanFactory(beanFactory); try { this .postProcessBeanFactory(beanFactory); StartupStep beanPostProcess = this .applicationStartup.start("spring.context.beans.post-process" ); this .invokeBeanFactoryPostProcessors(beanFactory); this .registerBeanPostProcessors(beanFactory); beanPostProcess.end(); this .initMessageSource(); this .initApplicationEventMulticaster(); this .onRefresh(); this .registerListeners(); this .finishBeanFactoryInitialization(beanFactory); this .finishRefresh(); } catch (BeansException var10) { if (this .logger.isWarnEnabled()) { this .logger.warn("Exception encountered during context initialization - cancelling refresh attempt: " + var10); } this .destroyBeans(); this .cancelRefresh(var10); throw var10; } finally { this .resetCommonCaches(); contextRefresh.end(); } } }
Boot自动配置原理 Boot自动配置原理 手动导入第三方配置类的通用方法,可以使用@Import注解:
1 2 3 4 5 6 7 8 9 10 11 12 13 14 15 16 17 18 19 20 21 22 23 24 25 26 27 28 29 30 31 32 33 34 35 36 37 38 39 40 41 42 43 44 45 46 47 48 49 50 51 52 53 54 55 56 public class A41_1 { @SuppressWarnings("all") public static void main (String[] args) throws IOException { GenericApplicationContext context = new GenericApplicationContext (); context.registerBean("config" , Config.class); context.registerBean(ConfigurationClassPostProcessor.class); context.refresh(); for (String name : context.getBeanDefinitionNames()) { System.out.println(name); } } @Configuration @Import({AutoConfiguration1.class,AutoConfiguration2.class}) static class Config { } @Configuration static class AutoConfiguration1 { @Bean public Bean1 bean1 () { return new Bean1 (); } } static class Bean1 { private String name; public Bean1 () { } public Bean1 (String name) { this .name = name; } @Override public String toString () { return "Bean1{" + "name='" + name + '\'' + '}' ; } } @Configuration static class AutoConfiguration2 { @Bean public Bean2 bean2 () { return new Bean2 (); } } static class Bean2 { } }
运行启动类,查看控制台:
1 2 3 4 5 6 config org.springframework.context.annotation.ConfigurationClassPostProcessor com.itheima.a41.A41_1$AutoConfiguration1 bean1 com.itheima.a41.A41_1$AutoConfiguration2 bean2
第三方的配置类也已经加入容器中。
以上代码有一定的局限性,因为第三方的配置可能很多,写在代码中不方便管理,希望写在配置中,我们可以实现一个ImportSelector接口:
1 2 3 4 5 6 7 8 9 10 11 12 13 static class MyImportSelector implements ImportSelector { @Override public String[] selectImports(AnnotationMetadata importingClassMetadata) { return new String []{AutoConfiguration1.class.getName(), AutoConfiguration2.class.getName()}; } }
再Config类上添加@Import(MyImportSelector.class)注解,此注解会读取MyImportSelector的返回值,并解析返回的配置类。
运行启动类,查看控制台:
1 2 3 4 5 6 config org.springframework.context.annotation.ConfigurationClassPostProcessor com.itheima.a41.A41_1$AutoConfiguration1 bean1 com.itheima.a41.A41_1$AutoConfiguration2 bean2
效果和最初的一样。
以上代码还可以进一步改进,我们希望配置不写在代码中,而是写在配置文件中。这些配置必须在resources下的名为META-INF目录下的名叫spring.factories的配置文件中。
编写spring.factories配置文件:
1 2 3 com.itheima.a41.A41_1$MyImportSelector =\ com.itheima.a41.A41_1.AutoConfiguration1,\ com.itheima.a41.A41_1.AutoConfiguration2
修改MyImportSelector的实现:
1 2 3 4 5 6 7 8 9 10 11 12 13 14 static class MyImportSelector implements ImportSelector { @Override public String[] selectImports(AnnotationMetadata importingClassMetadata) { List<String> names = SpringFactoriesLoader.loadFactoryNames(MyImportSelector.class, null ); return names.toArray(new String [0 ]); } }
运行启动类,查看控制台:
1 2 3 4 5 6 config org.springframework.context.annotation.ConfigurationClassPostProcessor com.itheima.a41.A41_1$AutoConfiguration1 bean1 com.itheima.a41.A41_1$AutoConfiguration2 bean2
也能成功解析第三方配置。
SpringFactoriesLoader的扫描范围非常广,不仅扫描当前项目下的spring.factories配置文件,也会扫描依赖包中的spring.factories配置文件。
我们可以打印一下spring的spring.factories配置文件中的部分类:
1 2 3 4 5 6 7 8 9 10 11 12 13 14 15 16 17 static class MyImportSelector implements ImportSelector { @Override public String[] selectImports(AnnotationMetadata importingClassMetadata) { for (String name : SpringFactoriesLoader.loadFactoryNames(EnableAutoConfiguration.class, null )) { System.out.println(name); } List<String> names = SpringFactoriesLoader.loadFactoryNames(MyImportSelector.class, null ); return names.toArray(new String [0 ]); } }
运行启动类,查看控制台:
1 2 3 4 5 6 7 8 9 10 11 12 13 14 15 16 17 18 19 20 21 22 23 24 25 26 27 28 29 30 31 32 33 34 35 36 37 38 39 40 41 42 43 44 45 46 47 48 49 50 51 52 53 54 55 56 57 58 59 60 61 62 63 64 65 66 67 68 69 70 71 72 73 74 75 76 77 78 79 80 81 82 83 84 85 86 87 88 89 90 91 92 93 94 95 96 97 98 99 100 101 102 103 104 105 106 107 108 109 110 111 112 113 114 115 116 117 118 119 120 121 122 123 124 125 126 127 128 129 130 131 132 133 134 org.springframework.boot.autoconfigure.admin.SpringApplicationAdminJmxAutoConfiguration org.springframework.boot.autoconfigure.aop.AopAutoConfiguration org.springframework.boot.autoconfigure.amqp.RabbitAutoConfiguration org.springframework.boot.autoconfigure.batch.BatchAutoConfiguration org.springframework.boot.autoconfigure.cache.CacheAutoConfiguration org.springframework.boot.autoconfigure.cassandra.CassandraAutoConfiguration org.springframework.boot.autoconfigure.context.ConfigurationPropertiesAutoConfiguration org.springframework.boot.autoconfigure.context.LifecycleAutoConfiguration org.springframework.boot.autoconfigure.context.MessageSourceAutoConfiguration org.springframework.boot.autoconfigure.context.PropertyPlaceholderAutoConfiguration org.springframework.boot.autoconfigure.couchbase.CouchbaseAutoConfiguration org.springframework.boot.autoconfigure.dao.PersistenceExceptionTranslationAutoConfiguration org.springframework.boot.autoconfigure.data.cassandra.CassandraDataAutoConfiguration org.springframework.boot.autoconfigure.data.cassandra.CassandraReactiveDataAutoConfiguration org.springframework.boot.autoconfigure.data.cassandra.CassandraReactiveRepositoriesAutoConfiguration org.springframework.boot.autoconfigure.data.cassandra.CassandraRepositoriesAutoConfiguration org.springframework.boot.autoconfigure.data.couchbase.CouchbaseDataAutoConfiguration org.springframework.boot.autoconfigure.data.couchbase.CouchbaseReactiveDataAutoConfiguration org.springframework.boot.autoconfigure.data.couchbase.CouchbaseReactiveRepositoriesAutoConfiguration org.springframework.boot.autoconfigure.data.couchbase.CouchbaseRepositoriesAutoConfiguration org.springframework.boot.autoconfigure.data.elasticsearch.ElasticsearchDataAutoConfiguration org.springframework.boot.autoconfigure.data.elasticsearch.ElasticsearchRepositoriesAutoConfiguration org.springframework.boot.autoconfigure.data.elasticsearch.ReactiveElasticsearchRepositoriesAutoConfiguration org.springframework.boot.autoconfigure.data.elasticsearch.ReactiveElasticsearchRestClientAutoConfiguration org.springframework.boot.autoconfigure.data.jdbc.JdbcRepositoriesAutoConfiguration org.springframework.boot.autoconfigure.data.jpa.JpaRepositoriesAutoConfiguration org.springframework.boot.autoconfigure.data.ldap.LdapRepositoriesAutoConfiguration org.springframework.boot.autoconfigure.data.mongo.MongoDataAutoConfiguration org.springframework.boot.autoconfigure.data.mongo.MongoReactiveDataAutoConfiguration org.springframework.boot.autoconfigure.data.mongo.MongoReactiveRepositoriesAutoConfiguration org.springframework.boot.autoconfigure.data.mongo.MongoRepositoriesAutoConfiguration org.springframework.boot.autoconfigure.data.neo4j.Neo4jDataAutoConfiguration org.springframework.boot.autoconfigure.data.neo4j.Neo4jReactiveDataAutoConfiguration org.springframework.boot.autoconfigure.data.neo4j.Neo4jReactiveRepositoriesAutoConfiguration org.springframework.boot.autoconfigure.data.neo4j.Neo4jRepositoriesAutoConfiguration org.springframework.boot.autoconfigure.data.r2dbc.R2dbcDataAutoConfiguration org.springframework.boot.autoconfigure.data.r2dbc.R2dbcRepositoriesAutoConfiguration org.springframework.boot.autoconfigure.data.redis.RedisAutoConfiguration org.springframework.boot.autoconfigure.data.redis.RedisReactiveAutoConfiguration org.springframework.boot.autoconfigure.data.redis.RedisRepositoriesAutoConfiguration org.springframework.boot.autoconfigure.data.rest.RepositoryRestMvcAutoConfiguration org.springframework.boot.autoconfigure.data.web.SpringDataWebAutoConfiguration org.springframework.boot.autoconfigure.elasticsearch.ElasticsearchRestClientAutoConfiguration org.springframework.boot.autoconfigure.flyway.FlywayAutoConfiguration org.springframework.boot.autoconfigure.freemarker.FreeMarkerAutoConfiguration org.springframework.boot.autoconfigure.groovy.template.GroovyTemplateAutoConfiguration org.springframework.boot.autoconfigure.gson.GsonAutoConfiguration org.springframework.boot.autoconfigure.h2.H2ConsoleAutoConfiguration org.springframework.boot.autoconfigure.hateoas.HypermediaAutoConfiguration org.springframework.boot.autoconfigure.hazelcast.HazelcastAutoConfiguration org.springframework.boot.autoconfigure.hazelcast.HazelcastJpaDependencyAutoConfiguration org.springframework.boot.autoconfigure.http.HttpMessageConvertersAutoConfiguration org.springframework.boot.autoconfigure.http.codec.CodecsAutoConfiguration org.springframework.boot.autoconfigure.influx.InfluxDbAutoConfiguration org.springframework.boot.autoconfigure.info.ProjectInfoAutoConfiguration org.springframework.boot.autoconfigure.integration.IntegrationAutoConfiguration org.springframework.boot.autoconfigure.jackson.JacksonAutoConfiguration org.springframework.boot.autoconfigure.jdbc.DataSourceAutoConfiguration org.springframework.boot.autoconfigure.jdbc.JdbcTemplateAutoConfiguration org.springframework.boot.autoconfigure.jdbc.JndiDataSourceAutoConfiguration org.springframework.boot.autoconfigure.jdbc.XADataSourceAutoConfiguration org.springframework.boot.autoconfigure.jdbc.DataSourceTransactionManagerAutoConfiguration org.springframework.boot.autoconfigure.jms.JmsAutoConfiguration org.springframework.boot.autoconfigure.jmx.JmxAutoConfiguration org.springframework.boot.autoconfigure.jms.JndiConnectionFactoryAutoConfiguration org.springframework.boot.autoconfigure.jms.activemq.ActiveMQAutoConfiguration org.springframework.boot.autoconfigure.jms.artemis.ArtemisAutoConfiguration org.springframework.boot.autoconfigure.jersey.JerseyAutoConfiguration org.springframework.boot.autoconfigure.jooq.JooqAutoConfiguration org.springframework.boot.autoconfigure.jsonb.JsonbAutoConfiguration org.springframework.boot.autoconfigure.kafka.KafkaAutoConfiguration org.springframework.boot.autoconfigure.availability.ApplicationAvailabilityAutoConfiguration org.springframework.boot.autoconfigure.ldap.embedded.EmbeddedLdapAutoConfiguration org.springframework.boot.autoconfigure.ldap.LdapAutoConfiguration org.springframework.boot.autoconfigure.liquibase.LiquibaseAutoConfiguration org.springframework.boot.autoconfigure.mail.MailSenderAutoConfiguration org.springframework.boot.autoconfigure.mail.MailSenderValidatorAutoConfiguration org.springframework.boot.autoconfigure.mongo.embedded.EmbeddedMongoAutoConfiguration org.springframework.boot.autoconfigure.mongo.MongoAutoConfiguration org.springframework.boot.autoconfigure.mongo.MongoReactiveAutoConfiguration org.springframework.boot.autoconfigure.mustache.MustacheAutoConfiguration org.springframework.boot.autoconfigure.neo4j.Neo4jAutoConfiguration org.springframework.boot.autoconfigure.netty.NettyAutoConfiguration org.springframework.boot.autoconfigure.orm.jpa.HibernateJpaAutoConfiguration org.springframework.boot.autoconfigure.quartz.QuartzAutoConfiguration org.springframework.boot.autoconfigure.r2dbc.R2dbcAutoConfiguration org.springframework.boot.autoconfigure.r2dbc.R2dbcTransactionManagerAutoConfiguration org.springframework.boot.autoconfigure.rsocket.RSocketMessagingAutoConfiguration org.springframework.boot.autoconfigure.rsocket.RSocketRequesterAutoConfiguration org.springframework.boot.autoconfigure.rsocket.RSocketServerAutoConfiguration org.springframework.boot.autoconfigure.rsocket.RSocketStrategiesAutoConfiguration org.springframework.boot.autoconfigure.security.servlet.SecurityAutoConfiguration org.springframework.boot.autoconfigure.security.servlet.UserDetailsServiceAutoConfiguration org.springframework.boot.autoconfigure.security.servlet.SecurityFilterAutoConfiguration org.springframework.boot.autoconfigure.security.reactive.ReactiveSecurityAutoConfiguration org.springframework.boot.autoconfigure.security.reactive.ReactiveUserDetailsServiceAutoConfiguration org.springframework.boot.autoconfigure.security.rsocket.RSocketSecurityAutoConfiguration org.springframework.boot.autoconfigure.security.saml2.Saml2RelyingPartyAutoConfiguration org.springframework.boot.autoconfigure.sendgrid.SendGridAutoConfiguration org.springframework.boot.autoconfigure.session.SessionAutoConfiguration org.springframework.boot.autoconfigure.security.oauth2.client.servlet.OAuth2ClientAutoConfiguration org.springframework.boot.autoconfigure.security.oauth2.client.reactive.ReactiveOAuth2ClientAutoConfiguration org.springframework.boot.autoconfigure.security.oauth2.resource.servlet.OAuth2ResourceServerAutoConfiguration org.springframework.boot.autoconfigure.security.oauth2.resource.reactive.ReactiveOAuth2ResourceServerAutoConfiguration org.springframework.boot.autoconfigure.solr.SolrAutoConfiguration org.springframework.boot.autoconfigure.sql.init.SqlInitializationAutoConfiguration org.springframework.boot.autoconfigure.task.TaskExecutionAutoConfiguration org.springframework.boot.autoconfigure.task.TaskSchedulingAutoConfiguration org.springframework.boot.autoconfigure.thymeleaf.ThymeleafAutoConfiguration org.springframework.boot.autoconfigure.transaction.TransactionAutoConfiguration org.springframework.boot.autoconfigure.transaction.jta.JtaAutoConfiguration org.springframework.boot.autoconfigure.validation.ValidationAutoConfiguration org.springframework.boot.autoconfigure.web.client.RestTemplateAutoConfiguration org.springframework.boot.autoconfigure.web.embedded.EmbeddedWebServerFactoryCustomizerAutoConfiguration org.springframework.boot.autoconfigure.web.reactive.HttpHandlerAutoConfiguration org.springframework.boot.autoconfigure.web.reactive.ReactiveWebServerFactoryAutoConfiguration org.springframework.boot.autoconfigure.web.reactive.WebFluxAutoConfiguration org.springframework.boot.autoconfigure.web.reactive.error.ErrorWebFluxAutoConfiguration org.springframework.boot.autoconfigure.web.reactive.function.client.ClientHttpConnectorAutoConfiguration org.springframework.boot.autoconfigure.web.reactive.function.client.WebClientAutoConfiguration org.springframework.boot.autoconfigure.web.servlet.DispatcherServletAutoConfiguration org.springframework.boot.autoconfigure.web.servlet.ServletWebServerFactoryAutoConfiguration org.springframework.boot.autoconfigure.web.servlet.error.ErrorMvcAutoConfiguration org.springframework.boot.autoconfigure.web.servlet.HttpEncodingAutoConfiguration org.springframework.boot.autoconfigure.web.servlet.MultipartAutoConfiguration org.springframework.boot.autoconfigure.web.servlet.WebMvcAutoConfiguration org.springframework.boot.autoconfigure.websocket.reactive.WebSocketReactiveAutoConfiguration org.springframework.boot.autoconfigure.websocket.servlet.WebSocketServletAutoConfiguration org.springframework.boot.autoconfigure.websocket.servlet.WebSocketMessagingAutoConfiguration org.springframework.boot.autoconfigure.webservices.WebServicesAutoConfiguration org.springframework.boot.autoconfigure.webservices.client.WebServiceTemplateAutoConfiguration org.mybatis.spring.boot.autoconfigure.MybatisLanguageDriverAutoConfiguration org.mybatis.spring.boot.autoconfigure.MybatisAutoConfiguration com.alibaba.druid.spring.boot.autoconfigure.DruidDataSourceAutoConfigure
如果本项目的配置类和第三方的配置类冲突了会怎么样?
我们在本项目中添加一个Bean1:
1 2 3 4 5 6 static class Config { @Bean public Bean1 bean1 () { return new Bean1 ("本项目" ); } }
在第三方配置中也添加一个Bean1:
1 2 3 4 5 6 7 @Configuration static class AutoConfiguration1 { @Bean public Bean1 bean1 () { return new Bean1 ("第三方" ); } }
我们打印一下Bean1的名称:
1 System.out.println(context.getBean(Bean1.class));
运行启动类,查看控制台:
发现是本项目中的Bean优先生效。
由于@Import()首先解析第三方配置,再解析本项目配置,而spring中默认的BeanFactory支持同类型的Bean覆盖,因此最终是本项目中的Bean优先生效。
但springboot中默认是不允许同名的Bean覆盖的,但可以进行设置:
1 context.getDefaultListableBeanFactory().setAllowBeanDefinitionOverriding(false );
我们先设置为false,即不允许覆盖,查看控制台,发现报错:
1 2 3 4 5 6 7 8 9 10 11 12 Exception in thread "main" org.springframework.beans.factory.support.BeanDefinitionOverrideException: Invalid bean definition with name 'bean1' defined in com.itheima.a41.A41_1$Config: Cannot register bean definition [Root bean: class [null]; scope=; abstract=false; lazyInit=null; autowireMode=3; dependencyCheck=0; autowireCandidate=true; primary=false; factoryBeanName=config; factoryMethodName=bean1; initMethodName=null; destroyMethodName=(inferred); defined in com.itheima.a41.A41_1$Config] for bean 'bean1': There is already [Root bean: class [null]; scope=; abstract=false; lazyInit=null; autowireMode=3; dependencyCheck=0; autowireCandidate=true; primary=false; factoryBeanName=com.itheima.a41.A41_1$AutoConfiguration1; factoryMethodName=bean1; initMethodName=null; destroyMethodName=(inferred); defined in class path resource [com/itheima/a41/A41_1$AutoConfiguration1.class]] bound. at org.springframework.beans.factory.support.DefaultListableBeanFactory.registerBeanDefinition(DefaultListableBeanFactory.java:995) at org.springframework.context.annotation.ConfigurationClassBeanDefinitionReader.loadBeanDefinitionsForBeanMethod(ConfigurationClassBeanDefinitionReader.java:295) at org.springframework.context.annotation.ConfigurationClassBeanDefinitionReader.loadBeanDefinitionsForConfigurationClass(ConfigurationClassBeanDefinitionReader.java:153) at org.springframework.context.annotation.ConfigurationClassBeanDefinitionReader.loadBeanDefinitions(ConfigurationClassBeanDefinitionReader.java:129) at org.springframework.context.annotation.ConfigurationClassPostProcessor.processConfigBeanDefinitions(ConfigurationClassPostProcessor.java:343) at org.springframework.context.annotation.ConfigurationClassPostProcessor.postProcessBeanDefinitionRegistry(ConfigurationClassPostProcessor.java:247) at org.springframework.context.support.PostProcessorRegistrationDelegate.invokeBeanDefinitionRegistryPostProcessors(PostProcessorRegistrationDelegate.java:311) at org.springframework.context.support.PostProcessorRegistrationDelegate.invokeBeanFactoryPostProcessors(PostProcessorRegistrationDelegate.java:112) at org.springframework.context.support.AbstractApplicationContext.invokeBeanFactoryPostProcessors(AbstractApplicationContext.java:746) at org.springframework.context.support.AbstractApplicationContext.refresh(AbstractApplicationContext.java:564) at com.itheima.a41.A41_1.main(A41_1.java:20)
在AllowBeanDefinitionOverriding为false的情况下,如果本项目的配置类和第三方的配置类冲突,我们更希望使用本项目的配置,因此我们可以调整@Import()注解解析的顺序,我们可以实现DeferredImportSelector接口。这是一个延迟解析接口,它的解析顺序是先解析本项目的Bean,再去解析第三方的Bean。
1 2 3 4 5 6 7 8 9 10 11 12 13 14 static class MyImportSelector implements DeferredImportSelector { @Override public String[] selectImports(AnnotationMetadata importingClassMetadata) { List<String> names = SpringFactoriesLoader.loadFactoryNames(MyImportSelector.class, null ); return names.toArray(new String [0 ]); } }
再次运行,发现报错:
1 2 3 4 5 6 7 8 9 10 11 12 Exception in thread "main" org.springframework.beans.factory.support.BeanDefinitionOverrideException: Invalid bean definition with name 'bean1' defined in class path resource [com/itheima/a41/A41_1$AutoConfiguration1.class]: Cannot register bean definition [Root bean: class [null]; scope=; abstract=false; lazyInit=null; autowireMode=3; dependencyCheck=0; autowireCandidate=true; primary=false; factoryBeanName=com.itheima.a41.A41_1$AutoConfiguration1; factoryMethodName=bean1; initMethodName=null; destroyMethodName=(inferred); defined in class path resource [com/itheima/a41/A41_1$AutoConfiguration1.class]] for bean 'bean1': There is already [Root bean: class [null]; scope=; abstract=false; lazyInit=null; autowireMode=3; dependencyCheck=0; autowireCandidate=true; primary=false; factoryBeanName=config; factoryMethodName=bean1; initMethodName=null; destroyMethodName=(inferred); defined in com.itheima.a41.A41_1$Config] bound. at org.springframework.beans.factory.support.DefaultListableBeanFactory.registerBeanDefinition(DefaultListableBeanFactory.java:995) at org.springframework.context.annotation.ConfigurationClassBeanDefinitionReader.loadBeanDefinitionsForBeanMethod(ConfigurationClassBeanDefinitionReader.java:295) at org.springframework.context.annotation.ConfigurationClassBeanDefinitionReader.loadBeanDefinitionsForConfigurationClass(ConfigurationClassBeanDefinitionReader.java:153) at org.springframework.context.annotation.ConfigurationClassBeanDefinitionReader.loadBeanDefinitions(ConfigurationClassBeanDefinitionReader.java:129) at org.springframework.context.annotation.ConfigurationClassPostProcessor.processConfigBeanDefinitions(ConfigurationClassPostProcessor.java:343) at org.springframework.context.annotation.ConfigurationClassPostProcessor.postProcessBeanDefinitionRegistry(ConfigurationClassPostProcessor.java:247) at org.springframework.context.support.PostProcessorRegistrationDelegate.invokeBeanDefinitionRegistryPostProcessors(PostProcessorRegistrationDelegate.java:311) at org.springframework.context.support.PostProcessorRegistrationDelegate.invokeBeanFactoryPostProcessors(PostProcessorRegistrationDelegate.java:112) at org.springframework.context.support.AbstractApplicationContext.invokeBeanFactoryPostProcessors(AbstractApplicationContext.java:746) at org.springframework.context.support.AbstractApplicationContext.refresh(AbstractApplicationContext.java:564) at com.itheima.a41.A41_1.main(A41_1.java:20)
观察报错,发现首先加载的是本项目中的Bean。
我们可以在第三方配置中添加@ConditionalOnMissingBean注解,也就是本项目没有此类型,才添加。
1 2 3 4 5 6 7 8 @Configuration static class AutoConfiguration1 { @Bean @ConditionalOnMissingBean public Bean1 bean1 () { return new Bean1 ("第三方" ); } }
经典自动配置实现
AopAutoConfiguration
我们先看一个示例:
1 2 3 4 5 6 7 8 9 10 11 12 13 14 15 16 17 18 19 20 21 22 23 24 public class TestAopAuto { public static void main (String[] args) { GenericApplicationContext context = new GenericApplicationContext (); AnnotationConfigUtils.registerAnnotationConfigProcessors(context.getDefaultListableBeanFactory()); context.registerBean(Config.class); context.refresh(); for (String name : context.getBeanDefinitionNames()) { System.out.println(name); } } @Configuration @Import(MyImportSelector.class) static class Config { } static class MyImportSelector implements DeferredImportSelector { @Override public String[] selectImports(AnnotationMetadata importingClassMetadata) { return new String []{AopAutoConfiguration.class.getName()}; } } }
运行启动类,查看控制台:
1 2 3 4 5 6 7 8 9 10 org.springframework.context.annotation.internalConfigurationAnnotationProcessor org.springframework.context.annotation.internalAutowiredAnnotationProcessor org.springframework.context.annotation.internalCommonAnnotationProcessor org.springframework.context.event.internalEventListenerProcessor org.springframework.context.event.internalEventListenerFactory com.itheima.a41.TestAopAuto$Config org.springframework.boot.autoconfigure.aop.AopAutoConfiguration$AspectJAutoProxyingConfiguration$CglibAutoProxyConfiguration org.springframework.aop.config.internalAutoProxyCreator org.springframework.boot.autoconfigure.aop.AopAutoConfiguration$AspectJAutoProxyingConfiguration org.springframework.boot.autoconfigure.aop.AopAutoConfiguration
其中:
1 2 3 4 org.springframework.boot.autoconfigure.aop.AopAutoConfiguration$AspectJAutoProxyingConfiguration$CglibAutoProxyConfiguration org.springframework.aop.config.internalAutoProxyCreator org.springframework.boot.autoconfigure.aop.AopAutoConfiguration$AspectJAutoProxyingConfiguration org.springframework.boot.autoconfigure.aop.AopAutoConfiguration
都是AopAutoConfiguration帮我们添加的Bean,接下来我们学习一下这四个Bean是如何添加进容器中的,分别有什么作用。
我们进入AopAutoConfiguration源码:
1 2 3 4 5 6 7 8 9 10 11 12 13 14 15 16 17 18 19 20 21 22 23 24 25 26 27 28 29 30 31 32 33 34 35 36 37 38 39 40 41 42 43 44 45 46 47 48 49 50 51 52 53 54 55 56 57 58 59 60 61 62 63 64 65 66 67 68 69 70 71 72 73 74 75 76 77 78 79 80 81 82 83 84 85 86 87 88 89 90 91 @Configuration( proxyBeanMethods = false ) @ConditionalOnProperty( prefix = "spring.aop", name = {"auto"}, havingValue = "true", matchIfMissing = true ) public class AopAutoConfiguration { public AopAutoConfiguration () { } @Configuration( proxyBeanMethods = false ) @ConditionalOnMissingClass({"org.aspectj.weaver.Advice"}) @ConditionalOnProperty( prefix = "spring.aop", name = {"proxy-target-class"}, havingValue = "true", matchIfMissing = true ) static class ClassProxyingConfiguration { ClassProxyingConfiguration() { } @Bean static BeanFactoryPostProcessor forceAutoProxyCreatorToUseClassProxying () { return (beanFactory) -> { if (beanFactory instanceof BeanDefinitionRegistry) { BeanDefinitionRegistry registry = (BeanDefinitionRegistry)beanFactory; AopConfigUtils.registerAutoProxyCreatorIfNecessary(registry); AopConfigUtils.forceAutoProxyCreatorToUseClassProxying(registry); } }; } } @Configuration( proxyBeanMethods = false ) @ConditionalOnClass({Advice.class}) static class AspectJAutoProxyingConfiguration { AspectJAutoProxyingConfiguration() { } @Configuration( proxyBeanMethods = false ) @EnableAspectJAutoProxy( proxyTargetClass = true ) @ConditionalOnProperty( prefix = "spring.aop", name = {"proxy-target-class"}, havingValue = "true", matchIfMissing = true ) static class CglibAutoProxyConfiguration { CglibAutoProxyConfiguration() { } } @Configuration( proxyBeanMethods = false ) @EnableAspectJAutoProxy( proxyTargetClass = false ) @ConditionalOnProperty( prefix = "spring.aop", name = {"proxy-target-class"}, havingValue = "false" ) static class JdkDynamicAutoProxyConfiguration { JdkDynamicAutoProxyConfiguration() { } } } }
我们可以尝试手动添加配置,将spring.aop.auto置为false:
1 2 3 StandardEnvironment env = new StandardEnvironment ();env.getPropertySources().addLast(new SimpleCommandLinePropertySource ("--spring.aop.auto=false" )); context.setEnvironment(env);
查看控制台:
1 2 3 4 5 6 org.springframework.context.annotation.internalConfigurationAnnotationProcessor org.springframework.context.annotation.internalAutowiredAnnotationProcessor org.springframework.context.annotation.internalCommonAnnotationProcessor org.springframework.context.event.internalEventListenerProcessor org.springframework.context.event.internalEventListenerFactory com.itheima.a41.TestAopAuto$Config
发现AopAutoConfiguration配置已经不生效了。
进入@EnableAspectJAutoProxy注解:
1 2 3 4 5 6 7 8 9 @Target({ElementType.TYPE}) @Retention(RetentionPolicy.RUNTIME) @Documented @Import({AspectJAutoProxyRegistrar.class}) public @interface EnableAspectJAutoProxy { boolean proxyTargetClass () default false ; boolean exposeProxy () default false ; }
@Import注解导入AspectJAutoProxyRegistrar类型的配置类,继续进入AspectJAutoProxyRegistrar源码:
1 2 3 4 5 6 7 8 9 10 11 12 13 14 15 16 17 18 19 20 21 22 23 class AspectJAutoProxyRegistrar implements ImportBeanDefinitionRegistrar { AspectJAutoProxyRegistrar() { } public void registerBeanDefinitions (AnnotationMetadata importingClassMetadata, BeanDefinitionRegistry registry) { AopConfigUtils.registerAspectJAnnotationAutoProxyCreatorIfNecessary(registry); AnnotationAttributes enableAspectJAutoProxy = AnnotationConfigUtils.attributesFor(importingClassMetadata, EnableAspectJAutoProxy.class); if (enableAspectJAutoProxy != null ) { if (enableAspectJAutoProxy.getBoolean("proxyTargetClass" )) { AopConfigUtils.forceAutoProxyCreatorToUseClassProxying(registry); } if (enableAspectJAutoProxy.getBoolean("exposeProxy" )) { AopConfigUtils.forceAutoProxyCreatorToExposeProxy(registry); } } } }
我们进入registerAspectJAnnotationAutoProxyCreatorIfNecessary()方法:
1 2 3 4 @Nullable public static BeanDefinition registerAspectJAnnotationAutoProxyCreatorIfNecessary (BeanDefinitionRegistry registry) { return registerAspectJAnnotationAutoProxyCreatorIfNecessary(registry, (Object)null ); }
再进入重载的registerAspectJAnnotationAutoProxyCreatorIfNecessary()方法:
1 2 3 4 @Nullable public static BeanDefinition registerAspectJAnnotationAutoProxyCreatorIfNecessary (BeanDefinitionRegistry registry, @Nullable Object source) { return registerOrEscalateApcAsRequired(AnnotationAwareAspectJAutoProxyCreator.class, registry, source); }
此方法加入了AnnotationAwareAspectJAutoProxyCreator,这是一个Bean的后处理器,主要作用就是为了创建代理。
我们可以查看一下本项目使用的代理方式:
1 2 3 AnnotationAwareAspectJAutoProxyCreator creator = context.getBean( "org.springframework.aop.config.internalAutoProxyCreator" , AnnotationAwareAspectJAutoProxyCreator.class); System.out.println(creator.isProxyTargetClass());
控制台输出:
AopAutoConfiguration总结:
AOP 自动配置类为 org.springframework.boot.autoconfigure.aop.AopAutoConfiguration
可以通过 spring.aop.auto=false 禁用 aop 自动配置
AOP 自动配置的本质是通过 @EnableAspectJAutoProxy 来开启了自动代理,如果在引导类上自己添加了 @EnableAspectJAutoProxy 那么以自己添加的为准
@EnableAspectJAutoProxy 的本质是向容器中添加了 AnnotationAwareAspectJAutoProxyCreator 这个bean后处理器,它能够找到容器中所有切面,并为匹配切点的目标类创建代理,创建代理的工作一般是在 bean的初始化阶段完成的
DataSourceAutoConfiguration
编写以下代码,添加DataSourceAutoConfiguration、MybatisAutoConfiguration、DataSourceTransactionManagerAutoConfiguration、TransactionAutoConfiguration等第三方配置。
1 2 3 4 5 6 7 8 9 10 11 12 13 14 15 16 17 18 19 20 21 22 23 24 25 26 27 28 29 30 31 32 33 34 35 36 37 38 39 public class TestDataSourceAuto { @SuppressWarnings("all") public static void main (String[] args) { GenericApplicationContext context = new GenericApplicationContext (); StandardEnvironment env = new StandardEnvironment (); env.getPropertySources().addLast(new SimpleCommandLinePropertySource ( "--spring.datasource.url=jdbc:mysql://localhost:3306/secondhandtradingplatform" , "--spring.datasource.username=root" , "--spring.datasource.password=2001" )); context.setEnvironment(env); AnnotationConfigUtils.registerAnnotationConfigProcessors(context.getDefaultListableBeanFactory()); context.registerBean(Config.class); context.refresh(); for (String name : context.getBeanDefinitionNames()) { String resourceDescription = context.getBeanDefinition(name).getResourceDescription(); if (resourceDescription != null ) System.out.println(name + " 来源:" + resourceDescription); } } @Configuration @Import(MyImportSelector.class) static class Config { } static class MyImportSelector implements DeferredImportSelector { @Override public String[] selectImports(AnnotationMetadata importingClassMetadata) { return new String []{ DataSourceAutoConfiguration.class.getName(), MybatisAutoConfiguration.class.getName(), DataSourceTransactionManagerAutoConfiguration.class.getName(), TransactionAutoConfiguration.class.getName() }; } } }
查看输出:
1 2 3 4 5 6 7 8 9 10 11 dataSource 来源:class path resource [org/springframework/boot/autoconfigure/jdbc/DataSourceConfiguration$Hikari.class] hikariPoolDataSourceMetadataProvider 来源:class path resource [org/springframework/boot/autoconfigure/jdbc/metadata/DataSourcePoolMetadataProvidersConfiguration$HikariPoolDataSourceMetadataProviderConfiguration.class] sqlSessionFactory 来源:class path resource [org/mybatis/spring/boot/autoconfigure/MybatisAutoConfiguration.class] sqlSessionTemplate 来源:class path resource [org/mybatis/spring/boot/autoconfigure/MybatisAutoConfiguration.class] transactionManager 来源:class path resource [org/springframework/boot/autoconfigure/jdbc/DataSourceTransactionManagerAutoConfiguration$JdbcTransactionManagerConfiguration.class] org.springframework.transaction.config.internalTransactionAdvisor 来源:class path resource [org/springframework/transaction/annotation/ProxyTransactionManagementConfiguration.class] transactionAttributeSource 来源:class path resource [org/springframework/transaction/annotation/ProxyTransactionManagementConfiguration.class] transactionInterceptor 来源:class path resource [org/springframework/transaction/annotation/ProxyTransactionManagementConfiguration.class] org.springframework.transaction.config.internalTransactionalEventListenerFactory 来源:class path resource [org/springframework/transaction/annotation/ProxyTransactionManagementConfiguration.class] transactionTemplate 来源:class path resource [org/springframework/boot/autoconfigure/transaction/TransactionAutoConfiguration$TransactionTemplateConfiguration.class] platformTransactionManagerCustomizers 来源:class path resource [org/springframework/boot/autoconfigure/transaction/TransactionAutoConfiguration.class]
这些第三方配置给我们添加了很多Bean。
进入DataSourceAutoConfiguration中:
1 2 3 4 5 6 7 8 9 10 11 12 13 14 15 16 17 18 19 20 21 22 23 24 25 26 27 28 29 30 31 32 33 34 35 36 37 38 39 40 41 42 43 44 45 46 47 48 49 50 51 52 53 54 55 56 57 58 59 60 61 62 63 64 65 66 67 68 69 70 71 72 73 74 75 76 77 78 79 80 81 82 83 84 85 86 87 88 89 90 91 92 93 94 95 96 97 98 99 100 101 102 @Configuration( proxyBeanMethods = false ) @ConditionalOnClass({DataSource.class, EmbeddedDatabaseType.class}) @ConditionalOnMissingBean( type = {"io.r2dbc.spi.ConnectionFactory"} ) @EnableConfigurationProperties({DataSourceProperties.class}) @Import({DataSourcePoolMetadataProvidersConfiguration.class, DataSourceInitializationConfiguration.InitializationSpecificCredentialsDataSourceInitializationConfiguration.class, DataSourceInitializationConfiguration.SharedCredentialsDataSourceInitializationConfiguration.class}) public class DataSourceAutoConfiguration { public DataSourceAutoConfiguration () { } static class EmbeddedDatabaseCondition extends SpringBootCondition { private static final String DATASOURCE_URL_PROPERTY = "spring.datasource.url" ; private final SpringBootCondition pooledCondition = new PooledDataSourceCondition (); EmbeddedDatabaseCondition() { } public ConditionOutcome getMatchOutcome (ConditionContext context, AnnotatedTypeMetadata metadata) { ConditionMessage.Builder message = ConditionMessage.forCondition("EmbeddedDataSource" , new Object [0 ]); if (this .hasDataSourceUrlProperty(context)) { return ConditionOutcome.noMatch(message.because("spring.datasource.url is set" )); } else if (this .anyMatches(context, metadata, new Condition []{this .pooledCondition})) { return ConditionOutcome.noMatch(message.foundExactly("supported pooled data source" )); } else { EmbeddedDatabaseType type = EmbeddedDatabaseConnection.get(context.getClassLoader()).getType(); return type == null ? ConditionOutcome.noMatch(message.didNotFind("embedded database" ).atAll()) : ConditionOutcome.match(message.found("embedded database" ).items(new Object []{type})); } } private boolean hasDataSourceUrlProperty (ConditionContext context) { Environment environment = context.getEnvironment(); if (environment.containsProperty("spring.datasource.url" )) { try { return StringUtils.hasText(environment.getProperty("spring.datasource.url" )); } catch (IllegalArgumentException var4) { } } return false ; } } static class PooledDataSourceAvailableCondition extends SpringBootCondition { PooledDataSourceAvailableCondition() { } public ConditionOutcome getMatchOutcome (ConditionContext context, AnnotatedTypeMetadata metadata) { ConditionMessage.Builder message = ConditionMessage.forCondition("PooledDataSource" , new Object [0 ]); return DataSourceBuilder.findType(context.getClassLoader()) != null ? ConditionOutcome.match(message.foundExactly("supported DataSource" )) : ConditionOutcome.noMatch(message.didNotFind("supported DataSource" ).atAll()); } } static class PooledDataSourceCondition extends AnyNestedCondition { PooledDataSourceCondition() { super (ConfigurationPhase.PARSE_CONFIGURATION); } @Conditional({PooledDataSourceAvailableCondition.class}) static class PooledDataSourceAvailable { PooledDataSourceAvailable() { } } @ConditionalOnProperty( prefix = "spring.datasource", name = {"type"} ) static class ExplicitType { ExplicitType() { } } } @Configuration( proxyBeanMethods = false ) @Conditional({PooledDataSourceCondition.class}) @ConditionalOnMissingBean({DataSource.class, XADataSource.class}) @Import({DataSourceConfiguration.Hikari.class, DataSourceConfiguration.Tomcat.class, DataSourceConfiguration.Dbcp2.class, DataSourceConfiguration.OracleUcp.class, DataSourceConfiguration.Generic.class, DataSourceJmxConfiguration.class}) protected static class PooledDataSourceConfiguration { protected PooledDataSourceConfiguration () { } } @Configuration( proxyBeanMethods = false ) @Conditional({EmbeddedDatabaseCondition.class}) @ConditionalOnMissingBean({DataSource.class, XADataSource.class}) @Import({EmbeddedDataSourceConfiguration.class}) protected static class EmbeddedDatabaseConfiguration { protected EmbeddedDatabaseConfiguration () { } } }
在spring容器创建时候DataSourceProperties会绑定以spring.datasource为前缀的键值信息,我们这里可以打印一下:
1 2 3 4 DataSourceProperties dataSourceProperties = context.getBean(DataSourceProperties.class);System.out.println(dataSourceProperties.getUrl()); System.out.println(dataSourceProperties.getUsername()); System.out.println(dataSourceProperties.getPassword());
查看输出:
1 2 3 jdbc:mysql://localhost:3306/secondhandtradingplatform root 2001
我们可以查看DataSourceConfiguration.Hikari.class类:
1 2 3 4 5 6 7 8 9 10 11 12 13 14 15 16 17 static class Hikari { Hikari() { } @Bean @ConfigurationProperties( prefix = "spring.datasource.hikari" ) HikariDataSource dataSource (DataSourceProperties properties) { HikariDataSource dataSource = (HikariDataSource)DataSourceConfiguration.createDataSource(properties, HikariDataSource.class); if (StringUtils.hasText(properties.getName())) { dataSource.setPoolName(properties.getName()); } return dataSource; } }
dataSource()方法上标注了@Bean注解,参数依赖注入了DataSourceProperties,在createDataSource()方法中会使用到DataSourceProperties。
1 2 3 protected static <T> T createDataSource (DataSourceProperties properties, Class<? extends DataSource> type) { return properties.initializeDataSourceBuilder().type(type).build(); }
DataSourceAutoConfiguration总结:
对应的自动配置类为:org.springframework.boot.autoconfigure.jdbc.DataSourceAutoConfiguration
它内部采用了条件装配,通过检查容器的bean,以及类路径下的class,来决定该@Bean是否生效
Spring Boot支持两大类数据源:
EmbeddedDatabase - 内嵌数据库连接池PooledDataSource - 非内嵌数据库连接池
PooledDataSource又支持如下数据源
hikari提供的HikariDataSourcetomcat-jdbc提供的DataSourcedbcp2提供的BasicDataSourceoracle提供的PoolDataSourceImpl
如果知道数据源的实现类类型,即指定了 spring.datasource.type,理论上可以支持所有数据源,但这样做的一个最大问题是无法订制每种数据源的详细配置(如最大、最小连接数等)
MybatisAutoConfiguration
进入MybatisAutoConfiguration类:
1 2 3 4 5 6 7 8 9 10 11 12 13 14 15 16 17 18 19 20 21 22 23 24 25 26 27 28 29 30 31 32 33 34 35 36 37 38 39 40 41 42 43 44 45 46 47 48 49 50 51 52 53 54 55 56 57 58 59 60 61 62 63 64 65 66 67 68 69 70 71 72 73 74 75 76 77 78 79 80 81 82 83 84 85 86 87 88 89 90 91 92 93 94 95 96 97 98 99 100 101 102 103 104 105 106 107 108 109 110 111 112 113 114 115 116 117 118 119 120 121 122 123 124 125 126 127 128 129 130 131 132 133 134 135 136 137 138 139 140 141 142 143 144 145 146 147 148 149 150 151 152 153 154 155 156 157 158 159 160 161 162 163 164 165 166 167 168 169 170 171 172 173 174 175 176 177 178 179 180 181 @Configuration @ConditionalOnClass({SqlSessionFactory.class, SqlSessionFactoryBean.class}) @ConditionalOnSingleCandidate(DataSource.class) @EnableConfigurationProperties({MybatisProperties.class}) @AutoConfigureAfter({DataSourceAutoConfiguration.class, MybatisLanguageDriverAutoConfiguration.class}) public class MybatisAutoConfiguration implements InitializingBean { private static final Logger logger = LoggerFactory.getLogger(MybatisAutoConfiguration.class); private final MybatisProperties properties; private final Interceptor[] interceptors; private final TypeHandler[] typeHandlers; private final LanguageDriver[] languageDrivers; private final ResourceLoader resourceLoader; private final DatabaseIdProvider databaseIdProvider; private final List<ConfigurationCustomizer> configurationCustomizers; public MybatisAutoConfiguration (MybatisProperties properties, ObjectProvider<Interceptor[]> interceptorsProvider, ObjectProvider<TypeHandler[]> typeHandlersProvider, ObjectProvider<LanguageDriver[]> languageDriversProvider, ResourceLoader resourceLoader, ObjectProvider<DatabaseIdProvider> databaseIdProvider, ObjectProvider<List<ConfigurationCustomizer>> configurationCustomizersProvider) { this .properties = properties; this .interceptors = (Interceptor[])interceptorsProvider.getIfAvailable(); this .typeHandlers = (TypeHandler[])typeHandlersProvider.getIfAvailable(); this .languageDrivers = (LanguageDriver[])languageDriversProvider.getIfAvailable(); this .resourceLoader = resourceLoader; this .databaseIdProvider = (DatabaseIdProvider)databaseIdProvider.getIfAvailable(); this .configurationCustomizers = (List)configurationCustomizersProvider.getIfAvailable(); } public void afterPropertiesSet () { this .checkConfigFileExists(); } private void checkConfigFileExists () { if (this .properties.isCheckConfigLocation() && StringUtils.hasText(this .properties.getConfigLocation())) { Resource resource = this .resourceLoader.getResource(this .properties.getConfigLocation()); Assert.state(resource.exists(), "Cannot find config location: " + resource + " (please add config file or check your Mybatis configuration)" ); } } @Bean @ConditionalOnMissingBean public SqlSessionFactory sqlSessionFactory (DataSource dataSource) throws Exception { SqlSessionFactoryBean factory = new SqlSessionFactoryBean (); factory.setDataSource(dataSource); factory.setVfs(SpringBootVFS.class); if (StringUtils.hasText(this .properties.getConfigLocation())) { factory.setConfigLocation(this .resourceLoader.getResource(this .properties.getConfigLocation())); } this .applyConfiguration(factory); if (this .properties.getConfigurationProperties() != null ) { factory.setConfigurationProperties(this .properties.getConfigurationProperties()); } if (!ObjectUtils.isEmpty(this .interceptors)) { factory.setPlugins(this .interceptors); } if (this .databaseIdProvider != null ) { factory.setDatabaseIdProvider(this .databaseIdProvider); } if (StringUtils.hasLength(this .properties.getTypeAliasesPackage())) { factory.setTypeAliasesPackage(this .properties.getTypeAliasesPackage()); } if (this .properties.getTypeAliasesSuperType() != null ) { factory.setTypeAliasesSuperType(this .properties.getTypeAliasesSuperType()); } if (StringUtils.hasLength(this .properties.getTypeHandlersPackage())) { factory.setTypeHandlersPackage(this .properties.getTypeHandlersPackage()); } if (!ObjectUtils.isEmpty(this .typeHandlers)) { factory.setTypeHandlers(this .typeHandlers); } if (!ObjectUtils.isEmpty(this .properties.resolveMapperLocations())) { factory.setMapperLocations(this .properties.resolveMapperLocations()); } Set<String> factoryPropertyNames = (Set)Stream.of((new BeanWrapperImpl (SqlSessionFactoryBean.class)).getPropertyDescriptors()).map(FeatureDescriptor::getName).collect(Collectors.toSet()); Class<? extends LanguageDriver > defaultLanguageDriver = this .properties.getDefaultScriptingLanguageDriver(); if (factoryPropertyNames.contains("scriptingLanguageDrivers" ) && !ObjectUtils.isEmpty(this .languageDrivers)) { factory.setScriptingLanguageDrivers(this .languageDrivers); if (defaultLanguageDriver == null && this .languageDrivers.length == 1 ) { defaultLanguageDriver = this .languageDrivers[0 ].getClass(); } } if (factoryPropertyNames.contains("defaultScriptingLanguageDriver" )) { factory.setDefaultScriptingLanguageDriver(defaultLanguageDriver); } return factory.getObject(); } private void applyConfiguration (SqlSessionFactoryBean factory) { org.apache.ibatis.session.Configuration configuration = this .properties.getConfiguration(); if (configuration == null && !StringUtils.hasText(this .properties.getConfigLocation())) { configuration = new org .apache.ibatis.session.Configuration(); } if (configuration != null && !CollectionUtils.isEmpty(this .configurationCustomizers)) { Iterator var3 = this .configurationCustomizers.iterator(); while (var3.hasNext()) { ConfigurationCustomizer customizer = (ConfigurationCustomizer)var3.next(); customizer.customize(configuration); } } factory.setConfiguration(configuration); } @Bean @ConditionalOnMissingBean public SqlSessionTemplate sqlSessionTemplate (SqlSessionFactory sqlSessionFactory) { ExecutorType executorType = this .properties.getExecutorType(); return executorType != null ? new SqlSessionTemplate (sqlSessionFactory, executorType) : new SqlSessionTemplate (sqlSessionFactory); } @Configuration @Import({AutoConfiguredMapperScannerRegistrar.class}) @ConditionalOnMissingBean({MapperFactoryBean.class, MapperScannerConfigurer.class}) public static class MapperScannerRegistrarNotFoundConfiguration implements InitializingBean { public MapperScannerRegistrarNotFoundConfiguration () { } public void afterPropertiesSet () { MybatisAutoConfiguration.logger.debug("Not found configuration for registering mapper bean using @MapperScan, MapperFactoryBean and MapperScannerConfigurer." ); } } public static class AutoConfiguredMapperScannerRegistrar implements BeanFactoryAware , ImportBeanDefinitionRegistrar { private BeanFactory beanFactory; public AutoConfiguredMapperScannerRegistrar () { } public void registerBeanDefinitions (AnnotationMetadata importingClassMetadata, BeanDefinitionRegistry registry) { if (!AutoConfigurationPackages.has(this .beanFactory)) { MybatisAutoConfiguration.logger.debug("Could not determine auto-configuration package, automatic mapper scanning disabled." ); } else { MybatisAutoConfiguration.logger.debug("Searching for mappers annotated with @Mapper" ); List<String> packages = AutoConfigurationPackages.get(this .beanFactory); if (MybatisAutoConfiguration.logger.isDebugEnabled()) { packages.forEach((pkg) -> { MybatisAutoConfiguration.logger.debug("Using auto-configuration base package '{}'" , pkg); }); } BeanDefinitionBuilder builder = BeanDefinitionBuilder.genericBeanDefinition(MapperScannerConfigurer.class); builder.addPropertyValue("processPropertyPlaceHolders" , true ); builder.addPropertyValue("annotationClass" , Mapper.class); builder.addPropertyValue("basePackage" , StringUtils.collectionToCommaDelimitedString(packages)); BeanWrapper beanWrapper = new BeanWrapperImpl (MapperScannerConfigurer.class); Set<String> propertyNames = (Set)Stream.of(beanWrapper.getPropertyDescriptors()).map(FeatureDescriptor::getName).collect(Collectors.toSet()); if (propertyNames.contains("lazyInitialization" )) { builder.addPropertyValue("lazyInitialization" , "${mybatis.lazy-initialization:false}" ); } if (propertyNames.contains("defaultScope" )) { builder.addPropertyValue("defaultScope" , "${mybatis.mapper-default-scope:}" ); } registry.registerBeanDefinition(MapperScannerConfigurer.class.getName(), builder.getBeanDefinition()); } } public void setBeanFactory (BeanFactory beanFactory) { this .beanFactory = beanFactory; } } }
我们添加mybatis的包扫描:
1 2 3 String packageName = TestDataSourceAuto.class.getPackageName();AutoConfigurationPackages.register(context.getDefaultListableBeanFactory(), packageName);
查看控制台输出:
1 2 mapper1 来源:file [F:\Java\黑马全套java教程\第2阶段企业级开发—基础框架\7、spring高级45讲\代码\代码\show\target\classes\com\itheima\a41\mapper\Mapper1.class] mapper2 来源:file [F:\Java\黑马全套java教程\第2阶段企业级开发—基础框架\7、spring高级45讲\代码\代码\show\target\classes\com\itheima\a41\mapper\Mapper2.class]
发现能将我们的自定义mapper加入到容器中。
SpringBoot在启动时也会将报名进行注册,查看@SpringBootApplication注解:
1 2 3 4 5 6 7 8 9 10 11 12 13 14 15 16 17 18 @Target({ElementType.TYPE}) @Retention(RetentionPolicy.RUNTIME) @Documented @Inherited @SpringBootConfiguration @EnableAutoConfiguration @ComponentScan( excludeFilters = {@Filter( type = FilterType.CUSTOM, classes = {TypeExcludeFilter.class} ), @Filter( type = FilterType.CUSTOM, classes = {AutoConfigurationExcludeFilter.class} )} ) public @interface SpringBootApplication { }
进入@EnableAutoConfiguration注解中:
1 2 3 4 5 6 7 8 9 10 11 12 13 @Target({ElementType.TYPE}) @Retention(RetentionPolicy.RUNTIME) @Documented @Inherited @AutoConfigurationPackage @Import({AutoConfigurationImportSelector.class}) public @interface EnableAutoConfiguration { String ENABLED_OVERRIDE_PROPERTY = "spring.boot.enableautoconfiguration" ; Class<?>[] exclude() default {}; String[] excludeName() default {}; }
再进入@AutoConfigurationPackage注解:
1 2 3 4 5 6 7 8 9 10 @Target({ElementType.TYPE}) @Retention(RetentionPolicy.RUNTIME) @Documented @Inherited @Import({AutoConfigurationPackages.Registrar.class}) public @interface AutoConfigurationPackage { String[] basePackages() default {}; Class<?>[] basePackageClasses() default {}; }
再进入AutoConfigurationPackages.Registrar.class中:
1 2 3 4 5 6 7 8 9 10 11 12 static class Registrar implements ImportBeanDefinitionRegistrar , DeterminableImports { Registrar() { } public void registerBeanDefinitions (AnnotationMetadata metadata, BeanDefinitionRegistry registry) { AutoConfigurationPackages.register(registry, (String[])(new PackageImports (metadata)).getPackageNames().toArray(new String [0 ])); } public Set<Object> determineImports (AnnotationMetadata metadata) { return Collections.singleton(new PackageImports (metadata)); } }
我们可以发现在registerBeanDefinitions()方法中注册了包名。
MybatisAutoConfiguration总结:
MyBatis 自动配置类为 org.mybatis.spring.boot.autoconfigure.MybatisAutoConfiguration
它主要配置了两个bean
SqlSessionFactory:MyBatis核心对象,用来创建SqlSessionSqlSessionTemplate:SqlSession的实现,此实现会与当前线程绑定用ImportBeanDefinitionRegistrar的方式扫描所有标注了@Mapper注解的接口
用AutoConfigurationPackages来确定扫描的包
还有一个相关的bean:MybatisProperties,它会读取配置文件中带 mybatis. 前缀的配置项进行定制配置
@MapperScan注解的作用与MybatisAutoConfiguration类似,和MapperScannerConfigurer有如下区别:
@MapperScan扫描具体包(当然也可以配置关注哪个注解)@MapperScan如果不指定扫描具体包,则会把引导类范围内,所有接口当做Mapper接口MybatisAutoConfiguration关注的是所有标注@Mapper注解的接口,会忽略掉非@Mapper标注的接口
DataSourceTransactionManagerAutoConfiguration
TransactionManager是事务管理器,其作用是去执行底层事务的相关方法。
进入DataSourceTransactionManagerAutoConfiguration类:
1 2 3 4 5 6 7 8 9 10 11 12 13 14 15 16 17 18 19 20 21 22 23 24 25 26 27 28 29 30 31 32 33 34 @Configuration( proxyBeanMethods = false ) @ConditionalOnClass({JdbcTemplate.class, TransactionManager.class}) @AutoConfigureOrder(Integer.MAX_VALUE) @EnableConfigurationProperties({DataSourceProperties.class}) public class DataSourceTransactionManagerAutoConfiguration { public DataSourceTransactionManagerAutoConfiguration () { } @Configuration( proxyBeanMethods = false ) @ConditionalOnSingleCandidate(DataSource.class) static class JdbcTransactionManagerConfiguration { JdbcTransactionManagerConfiguration() { } @Bean @ConditionalOnMissingBean({TransactionManager.class}) DataSourceTransactionManager transactionManager (Environment environment, DataSource dataSource, ObjectProvider<TransactionManagerCustomizers> transactionManagerCustomizers) { DataSourceTransactionManager transactionManager = this .createTransactionManager(environment, dataSource); transactionManagerCustomizers.ifAvailable((customizers) -> { customizers.customize(transactionManager); }); return transactionManager; } private DataSourceTransactionManager createTransactionManager (Environment environment, DataSource dataSource) { return (DataSourceTransactionManager)((Boolean)environment.getProperty("spring.dao.exceptiontranslation.enabled" , Boolean.class, Boolean.TRUE) ? new JdbcTransactionManager (dataSource) : new DataSourceTransactionManager (dataSource)); } } }
TransactionAutoConfiguration
事务自动配置类有两个:
org.springframework.boot.autoconfigure.jdbc.DataSourceTransactionManagerAutoConfigurationorg.springframework.boot.autoconfigure.transaction.TransactionAutoConfiguration
前者配置了DataSourceTransactionManager用来执行事务的提交、回滚操作
后者功能上对标@EnableTransactionManagement,包含以下三个bean
BeanFactoryTransactionAttributeSourceAdvisor事务切面类,包含通知和切点TransactionInterceptor事务通知类,由它在目标方法调用前后加入事务操作AnnotationTransactionAttributeSource会解析@Transactional及事务属性,也包含了切点功能
如果自己配置了DataSourceTransactionManager或是在引导类加了@EnableTransactionManagement,则以自己配置的为准
ServletWebServerFactoryAutoConfiguration
编写测试代码,添加ServletWebServerFactoryAutoConfiguration、DispatcherServletAutoConfiguration、WebMvcAutoConfiguration、ErrorMvcAutoConfiguration等第三方配置
1 2 3 4 5 6 7 8 9 10 11 12 13 14 15 16 17 18 19 20 21 22 23 24 25 26 27 28 29 30 31 32 33 public class TestMvcAuto { @SuppressWarnings("all") public static void main (String[] args) { AnnotationConfigServletWebServerApplicationContext context = new AnnotationConfigServletWebServerApplicationContext (); context.registerBean(Config.class); context.refresh(); for (String name : context.getBeanDefinitionNames()) { String source = context.getBeanDefinition(name).getResourceDescription(); if (source != null ) { System.out.println(name + " 来源:" + source); } } context.close(); } @Configuration @Import(MyImportSelector.class) static class Config { } static class MyImportSelector implements DeferredImportSelector { @Override public String[] selectImports(AnnotationMetadata importingClassMetadata) { return new String []{ ServletWebServerFactoryAutoConfiguration.class.getName(), DispatcherServletAutoConfiguration.class.getName(), WebMvcAutoConfiguration.class.getName(), ErrorMvcAutoConfiguration.class.getName() }; } } }
运行启动类,查看控制台:
1 2 3 4 5 6 7 8 9 10 11 12 13 14 15 16 17 18 19 20 21 22 23 24 25 26 27 28 29 30 31 32 33 34 35 36 37 38 39 40 41 42 43 tomcatServletWebServerFactory 来源:class path resource [org/springframework/boot/autoconfigure/web/servlet/ServletWebServerFactoryConfiguration$EmbeddedTomcat.class] servletWebServerFactoryCustomizer 来源:class path resource [org/springframework/boot/autoconfigure/web/servlet/ServletWebServerFactoryAutoConfiguration.class] tomcatServletWebServerFactoryCustomizer 来源:class path resource [org/springframework/boot/autoconfigure/web/servlet/ServletWebServerFactoryAutoConfiguration.class] dispatcherServlet 来源:class path resource [org/springframework/boot/autoconfigure/web/servlet/DispatcherServletAutoConfiguration$DispatcherServletConfiguration.class] dispatcherServletRegistration 来源:class path resource [org/springframework/boot/autoconfigure/web/servlet/DispatcherServletAutoConfiguration$DispatcherServletRegistrationConfiguration.class] requestMappingHandlerAdapter 来源:class path resource [org/springframework/boot/autoconfigure/web/servlet/WebMvcAutoConfiguration$EnableWebMvcConfiguration.class] requestMappingHandlerMapping 来源:class path resource [org/springframework/boot/autoconfigure/web/servlet/WebMvcAutoConfiguration$EnableWebMvcConfiguration.class] welcomePageHandlerMapping 来源:class path resource [org/springframework/boot/autoconfigure/web/servlet/WebMvcAutoConfiguration$EnableWebMvcConfiguration.class] localeResolver 来源:class path resource [org/springframework/boot/autoconfigure/web/servlet/WebMvcAutoConfiguration$EnableWebMvcConfiguration.class] themeResolver 来源:class path resource [org/springframework/boot/autoconfigure/web/servlet/WebMvcAutoConfiguration$EnableWebMvcConfiguration.class] flashMapManager 来源:class path resource [org/springframework/boot/autoconfigure/web/servlet/WebMvcAutoConfiguration$EnableWebMvcConfiguration.class] mvcConversionService 来源:class path resource [org/springframework/boot/autoconfigure/web/servlet/WebMvcAutoConfiguration$EnableWebMvcConfiguration.class] mvcValidator 来源:class path resource [org/springframework/boot/autoconfigure/web/servlet/WebMvcAutoConfiguration$EnableWebMvcConfiguration.class] mvcContentNegotiationManager 来源:class path resource [org/springframework/boot/autoconfigure/web/servlet/WebMvcAutoConfiguration$EnableWebMvcConfiguration.class] mvcPatternParser 来源:class path resource [org/springframework/boot/autoconfigure/web/servlet/WebMvcAutoConfiguration$EnableWebMvcConfiguration.class] mvcUrlPathHelper 来源:class path resource [org/springframework/boot/autoconfigure/web/servlet/WebMvcAutoConfiguration$EnableWebMvcConfiguration.class] mvcPathMatcher 来源:class path resource [org/springframework/boot/autoconfigure/web/servlet/WebMvcAutoConfiguration$EnableWebMvcConfiguration.class] viewControllerHandlerMapping 来源:class path resource [org/springframework/boot/autoconfigure/web/servlet/WebMvcAutoConfiguration$EnableWebMvcConfiguration.class] beanNameHandlerMapping 来源:class path resource [org/springframework/boot/autoconfigure/web/servlet/WebMvcAutoConfiguration$EnableWebMvcConfiguration.class] routerFunctionMapping 来源:class path resource [org/springframework/boot/autoconfigure/web/servlet/WebMvcAutoConfiguration$EnableWebMvcConfiguration.class] resourceHandlerMapping 来源:class path resource [org/springframework/boot/autoconfigure/web/servlet/WebMvcAutoConfiguration$EnableWebMvcConfiguration.class] mvcResourceUrlProvider 来源:class path resource [org/springframework/boot/autoconfigure/web/servlet/WebMvcAutoConfiguration$EnableWebMvcConfiguration.class] defaultServletHandlerMapping 来源:class path resource [org/springframework/boot/autoconfigure/web/servlet/WebMvcAutoConfiguration$EnableWebMvcConfiguration.class] handlerFunctionAdapter 来源:class path resource [org/springframework/boot/autoconfigure/web/servlet/WebMvcAutoConfiguration$EnableWebMvcConfiguration.class] mvcUriComponentsContributor 来源:class path resource [org/springframework/boot/autoconfigure/web/servlet/WebMvcAutoConfiguration$EnableWebMvcConfiguration.class] httpRequestHandlerAdapter 来源:class path resource [org/springframework/boot/autoconfigure/web/servlet/WebMvcAutoConfiguration$EnableWebMvcConfiguration.class] simpleControllerHandlerAdapter 来源:class path resource [org/springframework/boot/autoconfigure/web/servlet/WebMvcAutoConfiguration$EnableWebMvcConfiguration.class] handlerExceptionResolver 来源:class path resource [org/springframework/boot/autoconfigure/web/servlet/WebMvcAutoConfiguration$EnableWebMvcConfiguration.class] mvcViewResolver 来源:class path resource [org/springframework/boot/autoconfigure/web/servlet/WebMvcAutoConfiguration$EnableWebMvcConfiguration.class] mvcHandlerMappingIntrospector 来源:class path resource [org/springframework/boot/autoconfigure/web/servlet/WebMvcAutoConfiguration$EnableWebMvcConfiguration.class] viewNameTranslator 来源:class path resource [org/springframework/boot/autoconfigure/web/servlet/WebMvcAutoConfiguration$EnableWebMvcConfiguration.class] defaultViewResolver 来源:class path resource [org/springframework/boot/autoconfigure/web/servlet/WebMvcAutoConfiguration$WebMvcAutoConfigurationAdapter.class] viewResolver 来源:class path resource [org/springframework/boot/autoconfigure/web/servlet/WebMvcAutoConfiguration$WebMvcAutoConfigurationAdapter.class] requestContextFilter 来源:class path resource [org/springframework/boot/autoconfigure/web/servlet/WebMvcAutoConfiguration$WebMvcAutoConfigurationAdapter.class] formContentFilter 来源:class path resource [org/springframework/boot/autoconfigure/web/servlet/WebMvcAutoConfiguration.class] error 来源:class path resource [org/springframework/boot/autoconfigure/web/servlet/error/ErrorMvcAutoConfiguration$WhitelabelErrorViewConfiguration.class] beanNameViewResolver 来源:class path resource [org/springframework/boot/autoconfigure/web/servlet/error/ErrorMvcAutoConfiguration$WhitelabelErrorViewConfiguration.class] conventionErrorViewResolver 来源:class path resource [org/springframework/boot/autoconfigure/web/servlet/error/ErrorMvcAutoConfiguration$DefaultErrorViewResolverConfiguration.class] errorAttributes 来源:class path resource [org/springframework/boot/autoconfigure/web/servlet/error/ErrorMvcAutoConfiguration.class] basicErrorController 来源:class path resource [org/springframework/boot/autoconfigure/web/servlet/error/ErrorMvcAutoConfiguration.class] errorPageCustomizer 来源:class path resource [org/springframework/boot/autoconfigure/web/servlet/error/ErrorMvcAutoConfiguration.class] preserveErrorControllerTargetClassPostProcessor 来源:class path resource [org/springframework/boot/autoconfigure/web/servlet/error/ErrorMvcAutoConfiguration.class] tomcatServletWebServerFactory`来源为`class path resource [org/springframework/boot/autoconfigure/web/servlet/ServletWebServerFactoryConfiguration$EmbeddedTomcat.class]
进入ServletWebServerFactoryConfiguration,其中支持多种内嵌服务器:
1 2 3 4 5 6 7 8 9 10 11 12 13 14 15 16 17 18 19 20 21 22 23 24 25 26 27 28 29 30 31 32 33 34 35 36 37 38 39 40 41 42 43 44 45 46 47 48 49 50 51 52 53 54 55 56 57 58 59 60 61 62 63 64 65 66 67 68 69 70 71 72 73 74 75 @Configuration( proxyBeanMethods = false ) class ServletWebServerFactoryConfiguration { ServletWebServerFactoryConfiguration() { } @Configuration( proxyBeanMethods = false ) @ConditionalOnClass({Servlet.class, Undertow.class, SslClientAuthMode.class}) @ConditionalOnMissingBean( value = {ServletWebServerFactory.class}, search = SearchStrategy.CURRENT ) static class EmbeddedUndertow { EmbeddedUndertow() { } @Bean UndertowServletWebServerFactory undertowServletWebServerFactory (ObjectProvider<UndertowDeploymentInfoCustomizer> deploymentInfoCustomizers, ObjectProvider<UndertowBuilderCustomizer> builderCustomizers) { UndertowServletWebServerFactory factory = new UndertowServletWebServerFactory (); factory.getDeploymentInfoCustomizers().addAll((Collection)deploymentInfoCustomizers.orderedStream().collect(Collectors.toList())); factory.getBuilderCustomizers().addAll((Collection)builderCustomizers.orderedStream().collect(Collectors.toList())); return factory; } @Bean UndertowServletWebServerFactoryCustomizer undertowServletWebServerFactoryCustomizer (ServerProperties serverProperties) { return new UndertowServletWebServerFactoryCustomizer (serverProperties); } } @Configuration( proxyBeanMethods = false ) @ConditionalOnClass({Servlet.class, Server.class, Loader.class, WebAppContext.class}) @ConditionalOnMissingBean( value = {ServletWebServerFactory.class}, search = SearchStrategy.CURRENT ) static class EmbeddedJetty { EmbeddedJetty() { } @Bean JettyServletWebServerFactory JettyServletWebServerFactory (ObjectProvider<JettyServerCustomizer> serverCustomizers) { JettyServletWebServerFactory factory = new JettyServletWebServerFactory (); factory.getServerCustomizers().addAll((Collection)serverCustomizers.orderedStream().collect(Collectors.toList())); return factory; } } @Configuration( proxyBeanMethods = false ) @ConditionalOnClass({Servlet.class, Tomcat.class, UpgradeProtocol.class}) @ConditionalOnMissingBean( value = {ServletWebServerFactory.class}, search = SearchStrategy.CURRENT ) static class EmbeddedTomcat { EmbeddedTomcat() { } @Bean TomcatServletWebServerFactory tomcatServletWebServerFactory (ObjectProvider<TomcatConnectorCustomizer> connectorCustomizers, ObjectProvider<TomcatContextCustomizer> contextCustomizers, ObjectProvider<TomcatProtocolHandlerCustomizer<?>> protocolHandlerCustomizers) { TomcatServletWebServerFactory factory = new TomcatServletWebServerFactory (); factory.getTomcatConnectorCustomizers().addAll((Collection)connectorCustomizers.orderedStream().collect(Collectors.toList())); factory.getTomcatContextCustomizers().addAll((Collection)contextCustomizers.orderedStream().collect(Collectors.toList())); factory.getTomcatProtocolHandlerCustomizers().addAll((Collection)protocolHandlerCustomizers.orderedStream().collect(Collectors.toList())); return factory; } } }
ServletWebServerFactoryAutoConfiguration总结:
提供ServletWebServerFactory
DispatcherServletAutoConfiguration
1 dispatcherServlet`来源为`class path resource [org/springframework/boot/autoconfigure/web/servlet/DispatcherServletAutoConfiguration$DispatcherServletConfiguration.class]
我们进入DispatcherServletConfiguration:
1 2 3 4 5 6 7 8 9 10 11 12 13 14 15 16 17 18 19 20 21 22 23 24 25 26 27 28 29 30 31 32 33 34 35 36 37 38 39 40 41 42 43 44 45 46 47 48 @AutoConfigureOrder(Integer.MIN_VALUE) @Configuration( proxyBeanMethods = false ) @ConditionalOnWebApplication( type = Type.SERVLET ) @ConditionalOnClass({DispatcherServlet.class}) @AutoConfigureAfter({ServletWebServerFactoryAutoConfiguration.class}) public class DispatcherServletAutoConfiguration { @Configuration( proxyBeanMethods = false ) @Conditional({DefaultDispatcherServletCondition.class}) @ConditionalOnClass({ServletRegistration.class}) @EnableConfigurationProperties({WebMvcProperties.class}) protected static class DispatcherServletConfiguration { protected DispatcherServletConfiguration () { } @Bean( name = {"dispatcherServlet"} ) public DispatcherServlet dispatcherServlet (WebMvcProperties webMvcProperties) { DispatcherServlet dispatcherServlet = new DispatcherServlet (); dispatcherServlet.setDispatchOptionsRequest(webMvcProperties.isDispatchOptionsRequest()); dispatcherServlet.setDispatchTraceRequest(webMvcProperties.isDispatchTraceRequest()); dispatcherServlet.setThrowExceptionIfNoHandlerFound(webMvcProperties.isThrowExceptionIfNoHandlerFound()); dispatcherServlet.setPublishEvents(webMvcProperties.isPublishRequestHandledEvents()); dispatcherServlet.setEnableLoggingRequestDetails(webMvcProperties.isLogRequestDetails()); return dispatcherServlet; } @Bean @ConditionalOnBean({MultipartResolver.class}) @ConditionalOnMissingBean( name = {"multipartResolver"} ) public MultipartResolver multipartResolver (MultipartResolver resolver) { return resolver; } } }
DispatcherServletAutoConfiguration总结:
提供DispatcherServlet
提供DispatcherServletRegistrationBean
WebMvcAutoConfiguration
WebMvcAutoConfiguration总结:
配置DispatcherServlet的各项组件,提供的bean见过的有
多项HandlerMapping
多项HandlerAdapter
HandlerExceptionResolver
ErrorMvcAutoConfiguration
ErrorMvcAutoConfiguration总结:
提供的bean有BasicErrorController
MultipartAutoConfiguration
MultipartAutoConfiguration总结:
它提供了org.springframework.web.multipart.support.StandardServletMultipartResolver
该bean用来解析multipart/form-data格式的数据
HttpEncodingAutoConfiguration
POST请求参数如果有中文,无需特殊设置,这是因为Spring Boot已经配置了 org.springframework.boot.web.servlet.filter.OrderedCharacterEncodingFilter对应配置server.servlet.encoding.charset=UTF-8,默认就是UTF-8
当然,它只影响非json格式的数据
自定义自动配置类 springboot的EnableAutoConfiguration原理也是基于@Import注解,只是读取的类型不一样,我们进入
EnableAutoConfiguration中:
1 2 3 4 5 6 7 8 9 10 11 12 13 @Target({ElementType.TYPE}) @Retention(RetentionPolicy.RUNTIME) @Documented @Inherited @AutoConfigurationPackage @Import({AutoConfigurationImportSelector.class}) public @interface EnableAutoConfiguration { String ENABLED_OVERRIDE_PROPERTY = "spring.boot.enableautoconfiguration" ; Class<?>[] exclude() default {}; String[] excludeName() default {}; }
进入@Import()注解中的类AutoConfigurationImportSelector:
1 2 3 4 5 6 7 8 9 10 11 12 public class AutoConfigurationImportSelector implements DeferredImportSelector , BeanClassLoaderAware, ResourceLoaderAware, BeanFactoryAware, EnvironmentAware, Ordered { public String[] selectImports(AnnotationMetadata annotationMetadata) { if (!this .isEnabled(annotationMetadata)) { return NO_IMPORTS; } else { AutoConfigurationEntry autoConfigurationEntry = this .getAutoConfigurationEntry(annotationMetadata); return StringUtils.toStringArray(autoConfigurationEntry.getConfigurations()); } } }
进入getAutoConfigurationEntry()方法:
1 2 3 4 5 6 7 8 9 10 11 12 13 14 15 protected AutoConfigurationEntry getAutoConfigurationEntry (AnnotationMetadata annotationMetadata) { if (!this .isEnabled(annotationMetadata)) { return EMPTY_ENTRY; } else { AnnotationAttributes attributes = this .getAttributes(annotationMetadata); List<String> configurations = this .getCandidateConfigurations(annotationMetadata, attributes); configurations = this .removeDuplicates(configurations); Set<String> exclusions = this .getExclusions(annotationMetadata, attributes); this .checkExcludedClasses(configurations, exclusions); configurations.removeAll(exclusions); configurations = this .getConfigurationClassFilter().filter(configurations); this .fireAutoConfigurationImportEvents(configurations, exclusions); return new AutoConfigurationEntry (configurations, exclusions); } }
再进入getCandidateConfigurations()方法:
1 2 3 4 5 protected List<String> getCandidateConfigurations (AnnotationMetadata metadata, AnnotationAttributes attributes) { List<String> configurations = SpringFactoriesLoader.loadFactoryNames(this .getSpringFactoriesLoaderFactoryClass(), this .getBeanClassLoader()); Assert.notEmpty(configurations, "No auto configuration classes found in META-INF/spring.factories. If you are using a custom packaging, make sure that file is correct." ); return configurations; }
这个方法调用了SpringFactoriesLoader的loadFactoryNames()方法,第一个参数为加载类型,我们进入getSpringFactoriesLoaderFactoryClass()方法:
1 2 3 protected Class<?> getSpringFactoriesLoaderFactoryClass() { return EnableAutoConfiguration.class; }
返回的是一个EnableAutoConfiguration类型。
因此我们只需要在配置中的键更改为org.springframework.boot.autoconfigure.EnableAutoConfiguration即可:
1 2 3 org.springframework.boot.autoconfigure.EnableAutoConfiguration =\ com.itheima.a41.A41_2.AutoConfiguration1,\ com.itheima.a41.A41_2.AutoConfiguration2
再使用@EnableAutoConfiguration即可。
1 2 3 4 5 6 7 8 9 10 11 12 13 14 15 16 17 18 19 20 21 22 23 24 25 26 27 28 29 30 31 32 33 34 35 36 37 38 39 40 41 42 43 44 45 46 47 48 49 50 51 52 53 54 55 56 57 58 59 60 61 62 public class A41_2 { @SuppressWarnings("all") public static void main (String[] args) throws IOException { AnnotationConfigServletWebServerApplicationContext context = new AnnotationConfigServletWebServerApplicationContext (); StandardEnvironment env = new StandardEnvironment (); env.getPropertySources().addLast(new SimpleCommandLinePropertySource ( "--spring.datasource.url=jdbc:mysql://localhost:3306/secondhandtradingplatform" , "--spring.datasource.username=root" , "--spring.datasource.password=2001" )); context.setEnvironment(env); context.registerBean("config" , Config.class); context.refresh(); for (String name : context.getBeanDefinitionNames()) { String resourceDescription = context.getBeanDefinition(name).getResourceDescription(); if (resourceDescription != null ) System.out.println(name + " 来源:" + resourceDescription); } context.close(); } @Configuration @EnableAutoConfiguration static class Config { @Bean public TomcatServletWebServerFactory tomcatServletWebServerFactory () { return new TomcatServletWebServerFactory (); } } static class MyImportSelector implements DeferredImportSelector { @Override public String[] selectImports(AnnotationMetadata importingClassMetadata) { return SpringFactoriesLoader.loadFactoryNames(MyImportSelector.class, null ).toArray(new String [0 ]); } } @Configuration static class AutoConfiguration1 { @Bean public Bean1 bean1 () { return new Bean1 (); } } @Configuration static class AutoConfiguration2 { @Bean public Bean2 bean2 () { return new Bean2 (); } } static class Bean1 { } static class Bean2 { } }
运行启动类,查看控制台:
1 2 bean1 来源:class path resource [com/itheima/a41/A41_2$AutoConfiguration1.class] bean2 来源:class path resource [com/itheima/a41/A41_2$AutoConfiguration2.class]
第三方的配置也已经生效。
条件装配底层 @Conditional()注解是spring提供的注入Bean时的条件,我们来看看它的原理。@Conditional()注解本身没有判断的逻辑,判断逻辑是实现了Condition接口的类。
我们自定义一个实现了Condition接口的类:
1 2 3 4 5 6 7 8 9 10 11 12 13 14 15 16 17 18 19 20 21 22 23 24 25 26 27 28 29 30 31 32 33 34 35 36 37 38 39 40 41 42 43 44 45 46 47 48 49 50 51 52 53 54 55 56 57 58 59 60 61 62 63 64 65 66 public class A42_1 { @SuppressWarnings("all") public static void main (String[] args) throws IOException { GenericApplicationContext context = new GenericApplicationContext (); context.registerBean("config" , Config.class); context.registerBean(ConfigurationClassPostProcessor.class); context.refresh(); for (String name : context.getBeanDefinitionNames()) { System.out.println(name); } } @Configuration @Import(MyImportSelector.class) static class Config { } static class MyImportSelector implements DeferredImportSelector { @Override public String[] selectImports(AnnotationMetadata importingClassMetadata) { return new String []{AutoConfiguration1.class.getName(), AutoConfiguration2.class.getName()}; } } static class MyCondition1 implements Condition { @Override public boolean matches (ConditionContext context, AnnotatedTypeMetadata metadata) { return ClassUtils.isPresent("com.alibaba.druid.pool.DruidDataSource" , null ); } } static class MyCondition2 implements Condition { @Override public boolean matches (ConditionContext context, AnnotatedTypeMetadata metadata) { return !ClassUtils.isPresent("com.alibaba.druid.pool.DruidDataSource" , null ); } } @Configuration @Conditional(MyCondition1.class) static class AutoConfiguration1 { @Bean public Bean1 bean1 () { return new Bean1 (); } } @Configuration @Conditional(MyCondition2.class) static class AutoConfiguration2 { @Bean public Bean2 bean2 () { return new Bean2 (); } } static class Bean1 { } static class Bean2 { } }
MyCondition1的逻辑是只有com.alibaba.druid.pool.DruidDataSource存在才注入Bean,MyCondition2的逻辑是只有com.alibaba.druid.pool.DruidDataSource不存在才注入Bean。
以上代码有几个缺点:
判断的类型写死在了代码中,我们更希望能作为参数传入
相似的逻辑写了两套,我们希望能统一成一套
其实Spring中的条件注解例如@ConditionalOnProperty组合了@Conditional()注解,实现了一些扩展功能。
1 2 3 4 5 6 7 8 9 10 11 12 13 14 15 @Retention(RetentionPolicy.RUNTIME) @Target({ElementType.TYPE, ElementType.METHOD}) @Documented @Conditional({OnPropertyCondition.class}) public @interface ConditionalOnProperty { String[] value() default {}; String prefix () default "" ; String[] name() default {}; String havingValue () default "" ; boolean matchIfMissing () default false ; }
我们可以自定义注解组合@Conditional()注解更优雅地实现:
1 2 3 4 5 6 7 8 9 10 11 12 13 14 15 16 17 18 19 20 21 22 23 24 25 26 27 28 29 30 31 32 33 34 35 36 37 38 39 40 41 42 43 44 45 46 47 48 49 50 51 52 53 54 55 56 57 58 59 60 61 62 63 64 65 66 67 68 69 70 71 72 public class A42_2 { @SuppressWarnings("all") public static void main (String[] args) throws IOException { GenericApplicationContext context = new GenericApplicationContext (); context.registerBean("config" , Config.class); context.registerBean(ConfigurationClassPostProcessor.class); context.refresh(); for (String name : context.getBeanDefinitionNames()) { System.out.println(name); } } @Configuration @Import(MyImportSelector.class) static class Config { } static class MyImportSelector implements DeferredImportSelector { @Override public String[] selectImports(AnnotationMetadata importingClassMetadata) { return new String []{AutoConfiguration1.class.getName(), AutoConfiguration2.class.getName()}; } } static class MyCondition implements Condition { @Override public boolean matches (ConditionContext context, AnnotatedTypeMetadata metadata) { Map<String, Object> attributes = metadata.getAnnotationAttributes(ConditionalOnClass.class.getName()); String className = attributes.get("className" ).toString(); boolean exists = (boolean ) attributes.get("exists" ); boolean present = ClassUtils.isPresent(className, null ); return exists ? present : !present; } } @Retention(RetentionPolicy.RUNTIME) @Target({ElementType.METHOD, ElementType.TYPE}) @Conditional(MyCondition.class) @interface ConditionalOnClass { boolean exists () ; String className () ; } @Configuration @ConditionalOnClass(className = "com.alibaba.druid.pool.DruidDataSource", exists = false) static class AutoConfiguration1 { @Bean public Bean1 bean1 () { return new Bean1 (); } } @Configuration @ConditionalOnClass(className = "com.alibaba.druid.pool.DruidDataSource", exists = true) static class AutoConfiguration2 { @Bean public Bean2 bean2 () { return new Bean2 (); } } static class Bean1 { } static class Bean2 { } }
以上代码就是通过注解传参地方式优雅地实现了条件判断。