FactoryBean FactoryBean是一个工厂Bean,是用来产生产品对象的,FactoryBean本身是由spring管理的,但其产生的产品类却是部分受到srping的管理,为什么这么说呢?下面做一个试验:
创建一个Bean2,由spring进行管理:
1
2
3
@Component public class Bean2 {}
创建一个Bean1,注意不直接交由spring管理,没有加@Component注解,但实现了BeanFactoryAware接口,我们看看在Bean1创建的各个时期会不会回调实现的方法。
1
2
3
4
5
6
7
8
9
10
11
12
13
14
15
16
17
18
19
20
21
22
23
24
25
public class Bean1 implements BeanFactoryAware { private static final Logger log = LoggerFactory.getLogger(Bean1.class); private Bean2 bean2; @Autowired public void setBean2 (Bean2 bean2) { log.debug("setBean2({})" , bean2); this .bean2 = bean2; } public Bean2 getBean2 () { return bean2; } @PostConstruct public void init () { log.debug("init" ); } @Override public void setBeanFactory (BeanFactory beanFactory) throws BeansException { log.debug("setBeanFactory({})" , beanFactory); } }
接下来创建一个Bean1FactoryBean,其实现了FactoryBean接口,泛型为Bean1,即生成类型为Bean1的bean,其中主要实现了三个方法:
getObjectType():获取生成的Bean的类型isSingleton():是否是单例,true为单例,false为多例getObject():具体生成Bean的逻辑
注意Bean1FactoryBean添加了@Component("bean1")注解,交由spring进行管理,取名为"bean1"
1
2
3
4
5
6
7
8
9
10
11
12
13
14
15
16
17
18
19
20
21
22
23
24
@Component("bean1") public class Bean1FactoryBean implements FactoryBean <Bean1> { private static final Logger log = LoggerFactory.getLogger(Bean1FactoryBean.class); @Override public Class<?> getObjectType() { return Bean1.class; } @Override public boolean isSingleton () { return true ; } @Override public Bean1 getObject () throws Exception { Bean1 bean1 = new Bean1 (); log.debug("create bean: {}" , bean1); return bean1; } }
编写启动类:
1
2
3
4
5
6
7
8
9
10
@ComponentScan public class A43 { public static void main (String[] args) { AnnotationConfigApplicationContext context = new AnnotationConfigApplicationContext (A43.class); Bean1 bean1 = (Bean1) context.getBean("bean1" ); System.out.println(bean1); } }
运行启动类,查看控制台:
1
2
[DEBUG] 21:22:32.003 [main] com.itheima.a43.Bean1FactoryBean - create bean: com.itheima.a43.Bean1@60bd273d com.itheima.a43.Bean1@60bd273d
我们根据名称获取Bean,比较奇怪的一点是我们获取的名称是"bean1",在一般情况下获取的应该是@Component("bean1")注解标注的类型,而Bean1FactoryBean获取的却是其生成的产品的类型,即Bean1。
观察输出,我们发现Bean1并不是由spring创建的,在创建过程中并没有调用依赖注入、初始化方法、 **setBeanFactory()**等方法。但spring并不是完全没有参与产品类的创建,我们给Bean1添加一个后处理器,分别在Bean1初始化前和初始化打印相应日志:
1
2
3
4
5
6
7
8
9
10
11
12
13
14
15
16
17
18
19
20
21
@Component public class Bean1PostProcessor implements BeanPostProcessor { private static final Logger log = LoggerFactory.getLogger(Bean1PostProcessor.class); @Override public Object postProcessBeforeInitialization (Object bean, String beanName) throws BeansException { if (beanName.equals("bean1" ) && bean instanceof Bean1) { log.debug("before [{}] init" , beanName); } return bean; } @Override public Object postProcessAfterInitialization (Object bean, String beanName) throws BeansException { if (beanName.equals("bean1" ) && bean instanceof Bean1) { log.debug("after [{}] init" , beanName); } return bean; } }
BeanPostProcessor可以在Bean初始化前做一些增强,也可以在Bean初始化后做一些增强。
运行启动类,查看控制台:
1
2
3
[DEBUG] 21:29:51.019 [main] com.itheima.a43.Bean1FactoryBean - create bean: com.itheima.a43.Bean1@38cee291 [DEBUG] 21:29:51.038 [main] com.itheima.a43.Bean1PostProcessor - after [bean1] init com.itheima.a43.Bean1@38cee291
我们发现初始化前的增强逻辑没有调用,却调用了初始化后增强的逻辑,而创建代理 就是在Bean初始化后进行的,因此产品对象是可以通过代理增强的。
所以说产品对象部分受spring管理。
注意产品对象单例并没有存放在BeanFcatory的单例池中,而是存在BeanFactory的factoryBeanObjectCache成员中。
另外,如果我们在getObjectType()方法中返回null,那么通过类型获取Bean的时候会报错:
1
2
3
4
5
Exception in thread "main" org.springframework.beans.factory.NoSuchBeanDefinitionException: No qualifying bean of type 'com.itheima.a43.Bean1' available at org.springframework.beans.factory.support.DefaultListableBeanFactory.getBean(DefaultListableBeanFactory.java:351) at org.springframework.beans.factory.support.DefaultListableBeanFactory.getBean(DefaultListableBeanFactory.java:342) at org.springframework.context.support.AbstractApplicationContext.getBean(AbstractApplicationContext.java:1172) at com.itheima.a43.A43.main(A43.java:19)
如果要获取FactoryBean本身,有两种方式:
通过类型获取
通过$+bean名称获取
1
2
System.out.println(context.getBean(Bean1FactoryBean.class)); System.out.println(context.getBean("&bean1" ));
FactoryBean总结:
它的作用是用制造创建过程较为复杂的产品,如SqlSessionFactory, 但@Bean已具备等价功能
被FactoryBean创建的产品
会认为创建、依赖注入、Aware接口回调、前初始化这些操作都是FactoryBean的职责, 这些流程都不会走
唯有后初始化的流程会走, 也就是产品可以被代理增强
单例的产品不会存储于BeanFactory的singletonObjects成员中, 而是另一个 factoryBeanObjectCache成员中
按名字去获取时, 拿到的是产品对象, 名字前面加&获取的是工厂对象
@Indexed原理 spring组件扫描的效率是非常低的,会扫描包下的所有类,一个一个解析注解,如果有@Component、@Bean等注解的话,就会生成BeanDefinition并加入容器中。spring的扫描范围非常大,会影响到spring的启动速度。因此,spring在5.0中做了一个优化,能解决此问题。
编写测试代码:
1
2
3
4
5
6
7
8
9
10
11
12
13
14
15
16
17
18
19
20
21
22
23
24
@Component public class Bean1 {} @Component public class Bean2 {} @Component public class Bean3 {} public class A44 { public static void main (String[] args) throws IOException, NoSuchMethodException, InvocationTargetException, IllegalAccessException { DefaultListableBeanFactory beanFactory = new DefaultListableBeanFactory (); ClassPathBeanDefinitionScanner scanner = new ClassPathBeanDefinitionScanner (beanFactory); scanner.scan(A44.class.getPackageName()); for (String name : beanFactory.getBeanDefinitionNames()) { System.out.println(name); } } }
运行启动类,查看控制台:
1
2
3
4
5
6
7
8
bean1 bean2 bean3 org.springframework.context.annotation.internalConfigurationAnnotationProcessor org.springframework.context.annotation.internalAutowiredAnnotationProcessor org.springframework.context.annotation.internalCommonAnnotationProcessor org.springframework.context.event.internalEventListenerProcessor org.springframework.context.event.internalEventListenerFactory
bean1、bean2、bean3都被加入到了容器中。
接下来我们添加依赖:
1 2 3 4 5 <dependency > <groupId > org.springframework</groupId > <artifactId > spring-context-indexer</artifactId > <optional > true</optional > </dependency >
并在target/classes目录下创建META-INF/spring.components文件,其内容为:
1 com.itheima.a44.Bean1 =org.springframework.stereotype.Component
再次运行启动类,查看控制台:
1
2
3
4
5
6
bean1 org.springframework.context.annotation.internalConfigurationAnnotationProcessor org.springframework.context.annotation.internalAutowiredAnnotationProcessor org.springframework.context.annotation.internalCommonAnnotationProcessor org.springframework.context.event.internalEventListenerProcessor org.springframework.context.event.internalEventListenerFactory
发现只有bean1被加入了容器中。
为什么呢?
在spring5.0以后ClassPathBeanDefinitionScanner的scan()方法并不是首先进行包扫描,它首先是找一个位于target/classesMETA-INF目录下的spring.components文件。如果这个文件提供了Bean的名称,则优先加载此文件中的Bean,后续就不会再走jar包扫描的过程了。
spring.components的配置格式为:
key为类的路径value为类上添加的注解
还记得我们添加的spring-context-indexer坐标吗?这个依赖的作用就是在编译阶段去找添加了@Index注解的类,如果有就生成位置文件加入到spring.components中。我们点开@Component注解:
1
2
3
4
5
6
7
@Target({ElementType.TYPE}) @Retention(RetentionPolicy.RUNTIME) @Documented @Indexed public @interface Component { String value () default "" ; }
发现@Component注解组合了@Indexed注解。但此时我们手动创建了这个文件,因此spring会直接使用我们创建的文件,而不是生成spring.components文件。
@Indexed的作用就是在编译阶段 ,解析@Indexed注解,在target/classesMETA-INF目录下生成spring.components文件,在运行时直接读取此文件加载BeanDefinition而不是重新扫描包。
**@Indexed**总结:
@Indexed的原理,在编译时 就根据@Indexed生成META-INF/spring.components文件, 扫描时如果发现META-INF/spring.components存在, 则以它为准加载BeanDefinition否则, 会遍历包下所有class资源 (包括jar内的)
代理进一步理解 spring代理有几个特点:
依赖注入和初始化 影响的是原始对象代理与目标是两个对象,二者成员变量并不共用数据
static方法、final方法、private方法均无法增强
代码演示第1个特点:
创建Bean1类,其中有初始化方法、依赖注入方法。
1
2
3
4
5
6
7
8
9
10
11
12
13
14
15
16
17
18
19
20
21
22
23
24
25
26
27
28
29
30
31
32
@Component public class Bean1 { private static final Logger log = LoggerFactory.getLogger(Bean1.class); protected Bean2 bean2; protected boolean initialized; @Autowired public void setBean2 (Bean2 bean2) { log.debug("setBean2(Bean2 bean2)" ); this .bean2 = bean2; } @PostConstruct public void init () { log.debug("init" ); initialized = true ; } public Bean2 getBean2 () { log.debug("getBean2()" ); return bean2; } public boolean isInitialized () { log.debug("isInitialized()" ); return initialized; } }
创建切面MyAspect ,对Bean1中的所有方法进行增强。
1
2
3
4
5
6
7
8
9
@Aspect @Component public class MyAspect { @Before("execution(* com.itheima.a45.Bean1.*(..))") public void before () { System.out.println("before" ); } }
创建启动类:
1
2
3
4
5
6
7
8
9
10
11
12
13
@SpringBootApplication public class A45 { public static void main (String[] args) throws Exception { ConfigurableApplicationContext context = SpringApplication.run(A45.class, args); Bean1 proxy = context.getBean(Bean1.class); System.out.println(proxy.getBean2()); System.out.println(proxy.isInitialized()); context.close(); } }
运行启动类,查看控制台:
1
2
3
4
5
6
7
8
[DEBUG] 17:07:35.297 [main] com.itheima.a45.Bean1 - setBean2(Bean2 bean2) [DEBUG] 17:07:35.297 [main] com.itheima.a45.Bean1 - init before [DEBUG] 17:07:35.913 [main] com.itheima.a45.Bean1 - getBean2() com.itheima.a45.Bean2@1a1c21b4 before [DEBUG] 17:07:35.913 [main] com.itheima.a45.Bean1 - isInitialized() true
我们发现,在初始化和依赖注入的时候代理是不生效的,说明在这两个阶段使用的是Bean的原始对象;我们拿Bean的实例时,实际上拿到的时Bean的代理对象,此时代理才生效。
代码演示第2个特点:
编写方法打印代理对象与目标对象的属性值:
1
2
3
4
5
6
7
8
9
10
11
12
public static void showProxyAndTarget (Bean1 proxy) throws Exception { System.out.println(">>>>> 代理中的成员变量" ); System.out.println("\tinitialized=" + proxy.initialized); System.out.println("\tbean2=" + proxy.bean2); if (proxy instanceof Advised advised) { System.out.println(">>>>> 目标中的成员变量" ); Bean1 target = (Bean1) advised.getTargetSource().getTarget(); System.out.println("\tinitialized=" + target.initialized); System.out.println("\tbean2=" + target.bean2); } }
调用此方法,查看控制台:
1
2
3
4
5
6
>>>>> 代理中的成员变量 initialized=false bean2=null >>>>> 目标中的成员变量 initialized=true bean2=com.itheima.a45.Bean2@640d604
我们发现代理对象中的成员变量是没有值的,因为代理对象没有参与依赖注入、初始化的过程,而目标对象中的成员变量是有值的。一般我们使用的是代理对象,而访问代理对象的属性时一般通过get、set方法,最终会访问目标对象中的值。
代码演示第3个特点:
在Bean1类中增加以下几个方法:
1
2
3
4
5
6
7
8
9
10
11
12
13
14
15
16
17
18
19
20
public void m1 () { System.out.println("m1() 成员方法" ); } final public void m2 () { System.out.println("m2() final 方法" ); } } static public void m3 () { System.out.println("m3() static 方法" ); } private void m4 () { System.out.println("m4() private 方法" ); }
然后通过代理对象调用:
1
2
3
4
5
6
7
Bean1 proxy = context.getBean(Bean1.class);proxy.m1(); proxy.m2(); proxy.m3(); Method m4 = Bean1.class.getDeclaredMethod("m4" );m4.setAccessible(true ); m4.invoke(proxy);
查看控制台:
1
2
3
4
5
before m1() 成员方法 m2() final 方法 m3() static 方法 m4() private 方法
只有成员方法被增强了。
static方法、final方法、private方法这些方法都不能使用方法重写机制进行增强,如果需要增强可以使用aspectj或者agent等在编译时增强的方式。
@Value装配底层 编写代码手动解析@Value注解:
首先编写Bean1,其中使用@Value注解注入了两个值,home属性从环境变量中取值,age属性的值是固定的。
1
2
3
4
5
6
public class Bean1 { @Value("${JAVA_HOME}") private String home; @Value("18") private int age; }
编写main()方法,创建容器并创建解析器。
1
2
3
4
5
6
public static void main (String[] args) throws Exception { AnnotationConfigApplicationContext context = new AnnotationConfigApplicationContext (A46.class); DefaultListableBeanFactory beanFactory = context.getDefaultListableBeanFactory(); ContextAnnotationAutowireCandidateResolver resolver = new ContextAnnotationAutowireCandidateResolver (); resolver.setBeanFactory(beanFactory); }
编写测试,其中DependencyDescriptor构造方法有两个参数:
传入需要解析的字段
是否必须有这个字段,如果为true,则必须要有此字段;为false,没有此字段则会报错
1
2
3
4
5
6
7
8
9
private static void test1 (AnnotationConfigApplicationContext context, ContextAnnotationAutowireCandidateResolver resolver, Field field) { DependencyDescriptor dd1 = new DependencyDescriptor (field, false ); String value = resolver.getSuggestedValue(dd1).toString(); System.out.println(value); value = context.getEnvironment().resolvePlaceholders(value); System.out.println(value); }
在main()方法中调用test1():
1
2
test1(context, resolver, Bean1.class.getDeclaredField("home" )); test1(context, resolver, Bean1.class.getDeclaredField("age" ));
查看输出:
1
2
3
4
${JAVA_HOME} C:\Path\jdk-14.0.1 18 18
能正确解析@Value注解中的值。
实际上在以上代码中并没有做类型转换的功能,我们可以打印一下类型:
1 System.out.println(value.getClass());
查看输出:
1
2
3
4
5
6
${JAVA_HOME} C:\Path\jdk-14.0.1 class java.lang.String 18 18 class java.lang.String
发现age也是String类型,说明此时只解析了数据但没有进行类型转换,我们手动做一下类型转换,使用的是spring提供的高级类型转换器:
1
2
3
4
5
6
7
8
9
10
11
12
private static void test2 (AnnotationConfigApplicationContext context, ContextAnnotationAutowireCandidateResolver resolver, Field field) { DependencyDescriptor dd1 = new DependencyDescriptor (field, false ); String value = resolver.getSuggestedValue(dd1).toString(); System.out.println(value); value = context.getEnvironment().resolvePlaceholders(value); System.out.println(value); System.out.println(value.getClass()); Object age = context.getBeanFactory().getTypeConverter().convertIfNecessary(value, dd1.getDependencyType()); System.out.println(age.getClass()); }
再次运行,查看输出:
1
2
3
4
5
6
7
8
${JAVA_HOME} C:\Path\jdk-14.0.1 class java.lang.String class java.lang.String 18 18 class java.lang.String class java.lang.Integer
成功进行了类型转换。
@Value注解除了能进行值注入,也支持依赖注入,可以使用spel表达式,以下代码就是通过spel表达式在Bean2中注入名称为bean3的Bean。
1
2
3
4
5
6
7
8
public class Bean2 { @Value("#{@bean3}") private Bean3 bean3; } @Component("bean3") public class Bean3 {}
要解析类似#{}的spel表达式,我们需要使用到BeanExpressionResolver:
1
2
3
4
5
6
7
8
9
10
11
12
13
14
15
16
17
18
private static void test3 (AnnotationConfigApplicationContext context, ContextAnnotationAutowireCandidateResolver resolver, Field field) { DependencyDescriptor dd1 = new DependencyDescriptor (field, false ); String value = resolver.getSuggestedValue(dd1).toString(); System.out.println(value); value = context.getEnvironment().resolvePlaceholders(value); System.out.println(value); System.out.println(value.getClass()); Object bean3 = context.getBeanFactory().getBeanExpressionResolver().evaluate(value, new BeanExpressionContext (context.getBeanFactory(), null )); Object result = context.getBeanFactory().getTypeConverter().convertIfNecessary(bean3, dd1.getDependencyType()); System.out.println(result); }
调用test3()方法:
1 test3(context, resolver, Bean2.class.getDeclaredField("bean3" ));
查看输出:
1
2
3
4
#{@bean3} #{@bean3} class java.lang.String com.itheima.a46.A46$Bean3@1c9b0314
@Value注解底层执行的顺序就和上面的顺序类似:
首先获取@Value原始内容
解析${}表达式
解析#{}表达式
进行必要的类型转换
@Value中还可以进行嵌套解析,例如Bean4中内层嵌套了${}表达式,外侧嵌套了#{}表达式,同时#{}也支持拼接操作,解析的步骤就是先解析内层,再解析外层。
1
2
3
4
static class Bean4 { @Value("#{'hello, ' + '${JAVA_HOME}'}") private String value; }
调用test3()方法测试:
1
2
3
4
#{'hello, ' + '${JAVA_HOME}'} #{'hello, ' + 'C:\Path\jdk-14.0.1'} class java.lang.String hello, C:\Path\jdk-14.0.1
能正确解析内容。
@Autowired装配底层 @Autowired注解使用场景较多,主要有以下几种方式:
根据成员变量的类型注入
根据参数的类型注入
结果包装为Optional
结果包装为ObjectProvider、ObjectFactory
对@Lazy注解的处理
接下来演示这几种方式的使用。
根据成员变量的类型注入
创建Bean2:
1
2
3
4
5
6
7
@Component("bean2") static class Bean2 { @Override public String toString () { return super .toString(); } }
创建Bean1,自动注入属性Bean2:
1
2
3
4
static class Bean1 { @Autowired private Bean2 bean2; }
解析成员变量的类型注入需要使用到DefaultListableBeanFactory的doResolveDependency()方法:
1
2
3
4
5
6
7
public static void main (String[] args) throws NoSuchFieldException, NoSuchMethodException { AnnotationConfigApplicationContext context = new AnnotationConfigApplicationContext (A47_1.class); DefaultListableBeanFactory beanFactory = context.getDefaultListableBeanFactory(); DependencyDescriptor dd1 = new DependencyDescriptor (Bean1.class.getDeclaredField("bean2" ), false ); System.out.println(beanFactory.doResolveDependency(dd1, "bean1" , null , null )); }
运行main()方法,查看输出:
1 com.itheima.a47.A47_1$Bean2@723ca036
根据参数的类型注入
在Bean1中添加方法注入:
1
2
3
4
5
6
static class Bean1 { @Autowired public void setBean2 (Bean2 bean2) { this .bean2 = bean2; } }
根据参数的类型注入和成员变量的类型注入类似,只不过创建DependencyDescriptor时,使用的是重载的构造方法,传入方法参数:
1
2
3
4
5
6
7
8
9
public static void main (String[] args) throws NoSuchFieldException, NoSuchMethodException { AnnotationConfigApplicationContext context = new AnnotationConfigApplicationContext (A47_1.class); DefaultListableBeanFactory beanFactory = context.getDefaultListableBeanFactory(); System.out.println(">>>>>>>>>>>>>>>>>>>>>>>>>>>>>>>>>>>>>>>>" ); Method setBean2 = Bean1.class.getDeclaredMethod("setBean2" , Bean2.class); DependencyDescriptor dd2 = new DependencyDescriptor (new MethodParameter (setBean2, 0 ), false ); System.out.println(beanFactory.doResolveDependency(dd2, "bean2" , null , null )); }
运行main()方法,查看输出:
1 com.itheima.a47.A47_1$Bean2@723ca036
结果包装为Optional
有时候注入Bean时会将其包装为Optional,例如:
1
2
3
4
static class Bean1 { @Autowired private Optional<Bean2> bean3; }
以上代码想要注入的是内嵌的Bean2类型,而不是Optional类型。
spring也支持解析内嵌类型,使用的是DependencyDescriptor的increaseNestingLevel()方法获取内嵌的类型。
1
2
3
4
5
6
7
8
9
10
11
12
public class A47_1 { public static void main (String[] args) throws NoSuchFieldException, NoSuchMethodException { AnnotationConfigApplicationContext context = new AnnotationConfigApplicationContext (A47_1.class); DefaultListableBeanFactory beanFactory = context.getDefaultListableBeanFactory(); DependencyDescriptor dd3 = new DependencyDescriptor (Bean1.class.getDeclaredField("bean3" ), false ); if (dd3.getDependencyType() == Optional.class) { dd3.increaseNestingLevel(); Object result = beanFactory.doResolveDependency(dd3, "bean3" , null , null ); System.out.println(Optional.ofNullable(result)); } }
运行main()方法,查看输出:
1 Optional[com.itheima.a47.A47_1$Bean2@723ca036]
结果包装为ObjectProvider、ObjectFactory
有时候注入Bean时会将其包装为ObjectFactory,例如:
1
2
3
4
static class Bean1 { @Autowired private ObjectFactory<Bean2> bean4; }
以上代码想要注入的是内嵌的Bean2类型,而不是ObjectFactory类型。
spring也支持解析内嵌类型,使用的是DependencyDescriptor的increaseNestingLevel()方法获取内嵌的类型。
同时只有在调用ObjectFactory的getObject()方法时,才想要拿到真正的Bean,因此我们可以延迟加载Bean,只有在调用ObjectFactory的getObject()方法时我们才真正执行初始化Bean的逻辑:
1
2
3
4
5
6
7
8
9
10
11
12
13
14
15
16
public static void main (String[] args) throws NoSuchFieldException, NoSuchMethodException { AnnotationConfigApplicationContext context = new AnnotationConfigApplicationContext (A47_1.class); DefaultListableBeanFactory beanFactory = context.getDefaultListableBeanFactory();d1, "bean1" , null , null )); DependencyDescriptor dd4 = new DependencyDescriptor (Bean1.class.getDeclaredField("bean4" ), false ); if (dd4.getDependencyType() == ObjectFactory.class) { dd4.increaseNestingLevel(); ObjectFactory objectFactory = new ObjectFactory () { @Override public Object getObject () throws BeansException { return beanFactory.doResolveDependency(dd4, "bean4" , null , null ); } }; System.out.println(objectFactory.getObject()); } }
运行main()方法,查看输出:
1 com.itheima.a47.A47_1$Bean2@723ca036
对@Lazy注解的处理
@Lazy注解的作用有:
当@Lazy放在类上,表示在启动的时候不会创建bean对象,当使用的时候才会创建
当@Lazy放在@Bean注解的方法上,表示在启动的时候不会创建bean对象,当使用的时候才会创建
当@Lazy放在@Autowired注解的属性上, 并不会直接给属性赋上真正的值,只是会赋值一个代理对象,当真正使用到这个属性的时候,才会去容器中找到一个符合的对象。在使用的时候,也会先执行代理对象的逻辑,然后再是真正bean对象的逻辑。
写在方法或者方法参数前面上,效果和写在属性上是一样的,开始注入的只是代理对象,当真正调用的时候才会调用对应对象的逻辑
写在构造方法或者构造方法参数前面上,和以上逻辑一样
修改Bean1类:
1
2
3
4
5
static class Bean1 { @Lazy @Autowired private Bean2 bean2; }
这里我们是将@Lazy放在@Autowired注解的属性上,因此会给属性赋值一个代理对象,这里使用的解析器是ContextAnnotationAutowireCandidateResolver:
1
2
3
4
5
6
7
8
9
10
11
public static void main (String[] args) throws NoSuchFieldException, NoSuchMethodException { AnnotationConfigApplicationContext context = new AnnotationConfigApplicationContext (A47_1.class); DefaultListableBeanFactory beanFactory = context.getDefaultListableBeanFactory(); DependencyDescriptor dd5 = new DependencyDescriptor (Bean1.class.getDeclaredField("bean2" ), false ); ContextAnnotationAutowireCandidateResolver resolver = new ContextAnnotationAutowireCandidateResolver (); resolver.setBeanFactory(beanFactory); Object proxy = resolver.getLazyResolutionProxyIfNecessary(dd5, "bean2" ); System.out.println(proxy); System.out.println(proxy.getClass()); }
运行main()方法,查看输出:
1
2
com.itheima.a47.A47_1$Bean2@723ca036 class com.itheima.a47.A47_1$Bean2$$EnhancerBySpringCGLIB$$537a559d
以上的很多种情况我们都用到了DefaultListableBeanFactory的doResolveDependency()方法,其实@Value注解、@Autowired注解最终都会进入doResolveDependency()方法的逻辑。
只不过doResolveDependency()会优先处理@Value注解的字符串类型
doResolveDependency()处理可以处理多种类型的注入,例如:
数组类型
List类型特殊类型,例如applicationContext
泛型
配合@Qualifier注解
接下来我们模拟doResolveDependency()对以上类型的注入步骤。
准备基础类:
1
2
3
4
5
6
7
8
9
10
11
12
13
14
15
16
17
18
19
20
21
22
23
24
25
26
27
28
29
30
31
32
33
34
35
36
37
38
39
40
41
42
43
44
45
46
47
48
49
50
51
52
interface Dao <T> {} interface Service {} static class Target { @Autowired private Service[] serviceArray; @Autowired private List<Service> serviceList; @Autowired private ConfigurableApplicationContext applicationContext; @Autowired private Dao<Teacher> dao; @Autowired @Qualifier("service2") private Service service; } @Component("dao1") static class Dao1 implements Dao <Student> {} @Component("dao2") static class Dao2 implements Dao <Teacher> {} static class Student {} static class Teacher {} @Component("service1") static class Service1 implements Service {} @Component("service2") static class Service2 implements Service {} @Component("service3") static class Service3 implements Service {}
模拟数组类型的解析
对于数组类型的解析主要思路是拿到数组中元素的类型,根据类型从容器中获取Bean,最后将这些Bean转换为数组进行返回:
1
2
3
4
5
6
7
8
9
10
11
12
13
14
15
16
17
18
19
private static void testArray (DefaultListableBeanFactory beanFactory) throws NoSuchFieldException { DependencyDescriptor dd1 = new DependencyDescriptor (Target.class.getDeclaredField("serviceArray" ), true ); if (dd1.getDependencyType().isArray()) { Class<?> componentType = dd1.getDependencyType().getComponentType(); System.out.println(componentType); String[] names = BeanFactoryUtils.beanNamesForTypeIncludingAncestors(beanFactory, componentType); List<Object> beans = new ArrayList <>(); for (String name : names) { System.out.println(name); Object bean = dd1.resolveCandidate(name, componentType, beanFactory); beans.add(bean); } Object array = beanFactory.getTypeConverter().convertIfNecessary(beans, dd1.getDependencyType()); System.out.println(array); } }
编写main()调用:
1
2
3
4
5
6
public static void main (String[] args) throws NoSuchFieldException, IllegalAccessException { AnnotationConfigApplicationContext context = new AnnotationConfigApplicationContext (A47_2.class); DefaultListableBeanFactory beanFactory = context.getDefaultListableBeanFactory(); System.out.println(">>>>>>>>>>>>>>>>>>>>>>>>>>>>> 1. 数组类型" ); testArray(beanFactory); }
查看输出:
1
2
3
4
5
6
>>>>>>>>>>>>>>>>>>>>>>>>>>>>> 1. 数组类型 interface com.itheima.a47.A47_2$Service service3 service2 service1 [Lcom.itheima.a47.A47_2$Service;@3de8f619
模拟list类型的解析
对于list类型的解析主要思路是拿到list中元素的类型,根据类型从容器中获取Bean,最后将这些Bean转换为list进行返回:
1
2
3
4
5
6
7
8
9
10
11
12
13
14
15
16
private static void testList (DefaultListableBeanFactory beanFactory) throws NoSuchFieldException { DependencyDescriptor dd2 = new DependencyDescriptor (Target.class.getDeclaredField("serviceList" ), true ); if (dd2.getDependencyType() == List.class) { Class<?> resolve = dd2.getResolvableType().getGeneric().resolve(); System.out.println(resolve); List<Object> list = new ArrayList <>(); String[] names = BeanFactoryUtils.beanNamesForTypeIncludingAncestors(beanFactory, resolve); for (String name : names) { Object bean = dd2.resolveCandidate(name, resolve, beanFactory); list.add(bean); } System.out.println(list); } }
编写main()调用:
1
2
3
4
5
6
public static void main (String[] args) throws NoSuchFieldException, IllegalAccessException { AnnotationConfigApplicationContext context = new AnnotationConfigApplicationContext (A47_2.class); DefaultListableBeanFactory beanFactory = context.getDefaultListableBeanFactory(); System.out.println(">>>>>>>>>>>>>>>>>>>>>>>>>>>>> 2. List 类型" ); testList(beanFactory); }
查看输出:
1
2
3
>>>>>>>>>>>>>>>>>>>>>>>>>>>>> 2. List 类型 interface com.itheima.a47.A47_2$Service [com.itheima.a47.A47_2$Service3@5fb759d6, com.itheima.a47.A47_2$Service2@4b8d604b, com.itheima.a47.A47_2$Service1@5e7cd6cc]
模拟特殊类型的解析
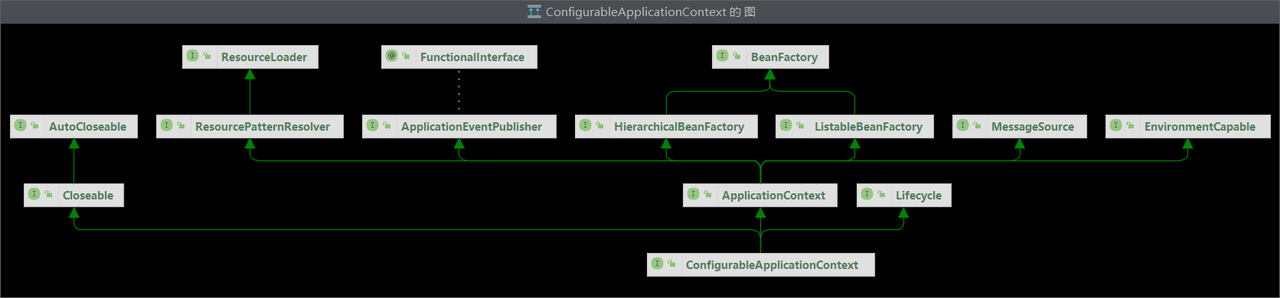
我们要注入一个特殊的类型ConfigurableApplicationContext,打开其类图:
ConfigurableApplicationContext其实是ApplicationContext的子类型,这种特殊类型并不是容器中的Bean。
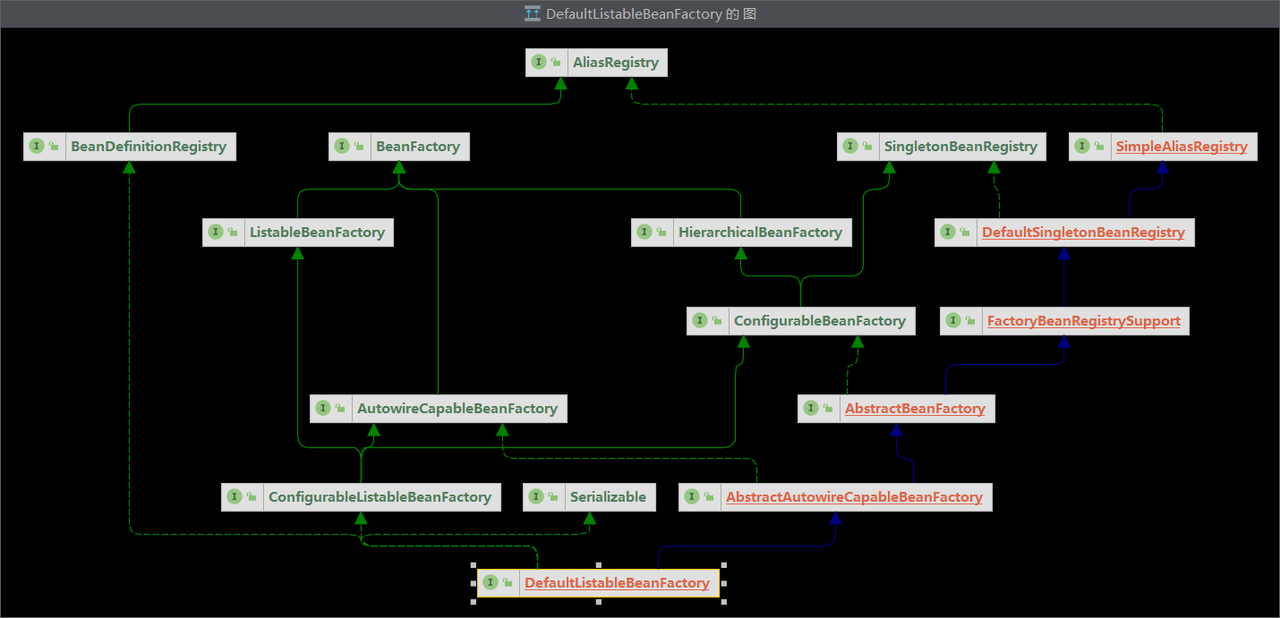
最终所有的Bean会在DefaultListableBeanFactory中,打开DefaultListableBeanFactory类图:
DefaultListableBeanFactory实现了DefaultSingletonBeanRegistry,进入DefaultSingletonBeanRegistry类中,它有一个singletonObjects属性:
1 private final Map<String, Object> singletonObjects = new ConcurrentHashMap (256 );
最终所有的Bean都会放在singletonObjects中,key为Bean的名称,value为Bean的实例对象。但这里面没有ApplicationContext、BeanFactory等特殊类型。
这些特殊类型其实是放在DefaultListableBeanFactory中的resolvableDependencies属性中:
1 private final Map<Class<?>, Object> resolvableDependencies;
resolvableDependencies的key为对象的类型,value为实例对象。这些特殊类型加入resolvableDependencies的时机是ApplicationContext调用refresh()方法。
进入AbstractApplicationContext类的refresh()方法:
1
2
3
4
5
6
public void refresh () throws BeansException, IllegalStateException { synchronized (this .startupShutdownMonitor) { this .prepareBeanFactory(beanFactory); }
进入prepareBeanFactory()方法:
1
2
3
4
5
6
7
8
9
10
protected void prepareBeanFactory (ConfigurableListableBeanFactory beanFactory) { beanFactory.registerResolvableDependency(BeanFactory.class, beanFactory); beanFactory.registerResolvableDependency(ResourceLoader.class, this ); beanFactory.registerResolvableDependency(ApplicationEventPublisher.class, this ); beanFactory.registerResolvableDependency(ApplicationContext.class, this ); beanFactory.addBeanPostProcessor(new ApplicationListenerDetector (this )); }
因此我们需要到resolvableDependencies中去取这些特殊类型。
编写测试代码:
1
2
3
4
5
6
7
8
9
10
11
12
13
private static void testApplicationContext (DefaultListableBeanFactory beanFactory) throws NoSuchFieldException, IllegalAccessException { DependencyDescriptor dd3 = new DependencyDescriptor (Target.class.getDeclaredField("applicationContext" ), true ); Field resolvableDependencies = DefaultListableBeanFactory.class.getDeclaredField("resolvableDependencies" ); resolvableDependencies.setAccessible(true ); Map<Class<?>, Object> dependencies = (Map<Class<?>, Object>) resolvableDependencies.get(beanFactory); for (Map.Entry<Class<?>, Object> entry : dependencies.entrySet()) { if (entry.getKey().isAssignableFrom(dd3.getDependencyType())) { System.out.println(entry.getValue()); break ; } } }
编写main()调用:
1
2
3
4
5
6
public static void main (String[] args) throws NoSuchFieldException, IllegalAccessException { AnnotationConfigApplicationContext context = new AnnotationConfigApplicationContext (A47_2.class); DefaultListableBeanFactory beanFactory = context.getDefaultListableBeanFactory(); System.out.println(">>>>>>>>>>>>>>>>>>>>>>>>>>>>> 3. applicationContext" ); testApplicationContext(beanFactory); }
查看输出:
1
2
>>>>>>>>>>>>>>>>>>>>>>>>>>>>> 3. applicationContext org.springframework.context.annotation.AnnotationConfigApplicationContext@2a40cd94, started on Fri Apr 14 21:28:31 CST 2023
模拟泛型的解析
对于泛型的解析,我们不仅要比较外层类型,还要比较内层泛型的类型,编写测试代码:
1
2
3
4
5
6
7
8
9
10
11
12
13
14
private static void testGeneric (DefaultListableBeanFactory beanFactory) throws NoSuchFieldException { DependencyDescriptor dd4 = new DependencyDescriptor (Target.class.getDeclaredField("dao" ), true ); Class<?> type = dd4.getDependencyType(); ContextAnnotationAutowireCandidateResolver resolver = new ContextAnnotationAutowireCandidateResolver (); resolver.setBeanFactory(beanFactory); for (String name : BeanFactoryUtils.beanNamesForTypeIncludingAncestors(beanFactory, type)) { BeanDefinition bd = beanFactory.getMergedBeanDefinition(name); if (resolver.isAutowireCandidate(new BeanDefinitionHolder (bd, name), dd4)) { System.out.println(name); System.out.println(dd4.resolveCandidate(name, type, beanFactory)); } } }
首先拿到属性的类型,根据属性类型获取所有Bean的名称,再根据Bean的名称获取BeanDefinition,BeanDefinition中就有Bean的泛型信息,最后使用ContextAnnotationAutowireCandidateResolver的isAutowireCandidate()方法匹配泛型。
编写main()调用:
1
2
3
4
5
6
public static void main (String[] args) throws NoSuchFieldException, IllegalAccessException { AnnotationConfigApplicationContext context = new AnnotationConfigApplicationContext (A47_2.class); DefaultListableBeanFactory beanFactory = context.getDefaultListableBeanFactory(); System.out.println(">>>>>>>>>>>>>>>>>>>>>>>>>>>>> 4. 泛型" ); testGeneric(beanFactory); }
查看输出:
1
2
3
>>>>>>>>>>>>>>>>>>>>>>>>>>>>> 4. 泛型 dao2 com.itheima.a47.A47_2$Dao2@29d80d2b
模拟@Qualifier的解析
ContextAnnotationAutowireCandidateResolver的isAutowireCandidate()方法可以匹配@Qualifier注解,我们使用此方法即可。
1
2
3
4
5
6
7
8
9
10
11
12
13
private static void testQualifier (DefaultListableBeanFactory beanFactory) throws NoSuchFieldException { DependencyDescriptor dd5 = new DependencyDescriptor (Target.class.getDeclaredField("service" ), true ); Class<?> type = dd5.getDependencyType(); ContextAnnotationAutowireCandidateResolver resolver = new ContextAnnotationAutowireCandidateResolver (); resolver.setBeanFactory(beanFactory); for (String name : BeanFactoryUtils.beanNamesForTypeIncludingAncestors(beanFactory, type)) { BeanDefinition bd = beanFactory.getMergedBeanDefinition(name); if (resolver.isAutowireCandidate(new BeanDefinitionHolder (bd, name), dd5)) { System.out.println(name); System.out.println(dd5.resolveCandidate(name, type, beanFactory)); } } }
编写main()调用:
1
2
3
4
5
6
public static void main (String[] args) throws NoSuchFieldException, IllegalAccessException { AnnotationConfigApplicationContext context = new AnnotationConfigApplicationContext (A47_2.class); DefaultListableBeanFactory beanFactory = context.getDefaultListableBeanFactory(); System.out.println(">>>>>>>>>>>>>>>>>>>>>>>>>>>>> 5. @Qualifier" ); testQualifier(beanFactory); }
查看输出:
1
2
3
>>>>>>>>>>>>>>>>>>>>>>>>>>>>> 5. @Qualifier service2 com.itheima.a47.A47_2$Service2@4b8d604b
考虑以下场景,有一个接口Service:
容器中有3个实现了此接口的Bean:
1 2 3 4 5 6 7 8 9 10 11 12 13 14 @Component("service1") static class Service1 implements Service {} @Component("service2") static class Service2 implements Service {} @Component("service3") static class Service3 implements Service {}
我们想依赖注入一个Service:
1 2 @Autowired private Service service;
在这种情况下,spring是不知道具体使用哪一个Service的实现,有两种方法可以解决:
在注入的时候加上@Qualifier注解指定Bean的名称
1 2 3 @Autowired @Qualifier("service2") private Service service;
使用@Primary注解,加了@Primary注解的Bean比同类型的Bean在注入时优先级更高,因此注入时会优先选择添加了@Primary注解的Bean
@Primary注解是在组件扫描的时候进行解析的,spring会将@Primary作为一个属性注入到BeanDefinition中,即当前Bean是否标记了@Primary注解,因此在spring不确定注入哪个Bean时会根据此标记进行筛选。
编写代码测试:
在Service2上添加@Primary注解:
1 2 3 4 5 @Primary @Component("service2") static class Service2 implements Service {}
模拟@Primary注解的解析:
1 2 3 4 5 6 7 8 9 private static void testPrimary (DefaultListableBeanFactory beanFactory) throws NoSuchFieldException { DependencyDescriptor dd = new DependencyDescriptor (Target.class.getDeclaredField("service" ), false ); Class<?> type = dd.getDependencyType(); for (String name : BeanFactoryUtils.beanNamesForTypeIncludingAncestors(beanFactory, type)) { if (beanFactory.getMergedBeanDefinition(name).isPrimary()) { System.out.println(name); } } }
编写main()调用:
1 2 3 4 5 public static void main (String[] args) throws NoSuchFieldException { AnnotationConfigApplicationContext context = new AnnotationConfigApplicationContext (A47_3.class); DefaultListableBeanFactory beanFactory = context.getDefaultListableBeanFactory(); testPrimary(beanFactory); }
查看输出:
如果既没有使用@Qualifier注解也没有使用@Primary注解,还有最后一道防线,也就是根据属性的名称进行区分,spring将根据属性的名称进行匹配。
修改属性名称:
1 2 @Autowired private Service service3;
模拟根据属性名称的解析:
1 2 3 4 5 6 7 8 9 private static void testDefault (DefaultListableBeanFactory beanFactory) throws NoSuchFieldException { DependencyDescriptor dd = new DependencyDescriptor (Target.class.getDeclaredField("service3" ), false ); Class<?> type = dd.getDependencyType(); for (String name : BeanFactoryUtils.beanNamesForTypeIncludingAncestors(beanFactory, type)) { if (name.equals(dd.getDependencyName())) { System.out.println(name); } } }
编写main()调用:
1 2 3 4 5 public static void main (String[] args) throws NoSuchFieldException { AnnotationConfigApplicationContext context = new AnnotationConfigApplicationContext (A47_3.class); DefaultListableBeanFactory beanFactory = context.getDefaultListableBeanFactory(); testDefault(beanFactory); }
查看输出:
以上三种方式的优先级如下:
使用@Qualifier注解进行匹配
使用@Primary注解进行匹配
使用Bean的名称进行匹配
事件监听器 实现ApplicationListener接口 spring中事件机制,可以实现业务的解耦,这也是观察者模式的典型应用。
下面我们看一段代码:
1 2 3 4 5 6 7 8 9 10 @Component static class MyService { private static final Logger log = LoggerFactory.getLogger(MyService.class); public void doBusiness () { log.debug("主线业务" ); log.debug("发送短信" ); log.debug("发送邮件" ); } }
以上代码有一个问题,就是主线业务与支线业务耦合,我们可以采用事件发布与监听的方式去解耦。
创建一个自定义事件,需要继承ApplicationEvent:
1 2 3 4 5 static class MyEvent extends ApplicationEvent { public MyEvent (Object source) { super (source); } }
在完成主线业务后发布一个事件:
1 2 3 4 5 6 7 8 9 10 11 @Component static class MyService { private static final Logger log = LoggerFactory.getLogger(MyService.class); @Autowired private ApplicationEventPublisher publisher; public void doBusiness () { log.debug("主线业务" ); publisher.publishEvent(new MyEvent ("MyService.doBusiness()" )); } }
监听事件可以实现ApplicationListener接口,同时设置泛型只关注目标类型的事件:
1 2 3 4 5 6 7 8 9 10 11 12 13 14 15 16 17 @Component static class SmsApplicationListener implements ApplicationListener <MyEvent> { private static final Logger log = LoggerFactory.getLogger(SmsApplicationListener.class); @Override public void onApplicationEvent (MyEvent event) { log.debug("发送短信" ); } } @Component static class EmailApplicationListener implements ApplicationListener <MyEvent> { private static final Logger log = LoggerFactory.getLogger(EmailApplicationListener.class); @Override public void onApplicationEvent (MyEvent event) { log.debug("发送邮件" ); } }
创建main()方法测试:
1 2 3 4 5 public static void main (String[] args) { AnnotationConfigApplicationContext context = new AnnotationConfigApplicationContext (A48_1.class); context.getBean(MyService.class).doBusiness(); context.close(); }
查看输出:
1 2 3 [DEBUG] 23:09:07.579 [main] com.itheima.a48.A48_1$MyService - 主线业务 [DEBUG] 23:09:07.595 [main] c.i.a.A48_1$EmailApplicationListener - 发送邮件 [DEBUG] 23:09:07.595 [main] c.i.a.A48_1$SmsApplicationListener - 发送短信
主线业务与支线业务已经解耦,如果不再需要发短信的功能,只需要取消事件监听即可,不需要修改主线业务的代码,这就是解耦的好处。
使用@EventListener注解 spring还支持通过@EventListener注解来监听事件,@EventListener注解标注的方法的参数类型就是监听的事件的类型,例如:
1 2 3 4 5 6 7 8 9 10 11 12 13 14 15 16 17 @Component static class SmsService { private static final Logger log = LoggerFactory.getLogger(SmsService.class); @EventListener public void listener (MyEvent myEvent) { log.debug("发送短信" ); } } @Component static class EmailService { private static final Logger log = LoggerFactory.getLogger(EmailService.class); @EventListener public void listener (MyEvent myEvent) { log.debug("发送邮件" ); } }
运行main()方法,查看输出:
1 2 3 [DEBUG] 23:09:07.579 [main] com.itheima.a48.A48_1$MyService - 主线业务 [DEBUG] 23:09:07.595 [main] c.i.a.A48_1$EmailApplicationListener - 发送邮件 [DEBUG] 23:09:07.595 [main] c.i.a.A48_1$SmsApplicationListener - 发送短信
以上事件的发布与监听是同步的,由一个线程执行,我们可以将其优化异步,通过其他线程来执行支线业务。
ApplicationEventPublisher底层是调用了SimpleApplicationEventMulticaster真正发事件,默认是单线程发送,我们可以设置用线程池来发送。
我们需要注入自己的SimpleApplicationEventMulticaster并设置线程池,注意Bean的名称必须为applicationEventMulticaster,这样才能覆盖原有实现:
1 2 3 4 5 6 7 8 9 10 11 12 13 14 15 16 17 18 19 20 21 22 23 @Bean public ThreadPoolTaskExecutor executor () { ThreadPoolTaskExecutor executor = new ThreadPoolTaskExecutor (); executor.setCorePoolSize(3 ); executor.setMaxPoolSize(10 ); executor.setQueueCapacity(100 ); return executor; } @Bean public SimpleApplicationEventMulticaster applicationEventMulticaster (ThreadPoolTaskExecutor executor) { SimpleApplicationEventMulticaster multicaster = new SimpleApplicationEventMulticaster (); multicaster.setTaskExecutor(executor); return multicaster; }
运行main()方法,查看输出:
1 2 3 [DEBUG] 23:20:33.307 [main] com.itheima.a48.A48_2$MyService - 主线业务 [DEBUG] 23:20:33.316 [executor-2] com.itheima.a48.A48_2$SmsService - 发送短信 [DEBUG] 23:20:33.317 [executor-1] com.itheima.a48.A48_2$EmailService - 发送邮件
已经是使用线程池中的线程去执行支线业务。
模拟事件监听原理 首先自定义一个Listener注解:
1 2 3 4 @Retention(RetentionPolicy.RUNTIME) @Target(ElementType.METHOD) @interface MyListener {}
实现逻辑解析我们自定义的注解,主要步骤如下:
获取容器中所有的Bean
获取每个Bean中的所有方法
判断方法上是否有我们自定义的注解
从方法参数中获取需要监听的事件类型
实现ApplicationListener接口,重写onApplicationEvent()方法
在onApplicationEvent()方法中判断发生的事件是否为监听器监听的事件类型
最后将我们实现的ApplicationListener加入AnnotationConfigApplicationContext中的ApplicationListener中
具体代码如下:
1 2 3 4 5 6 7 8 9 10 11 12 13 14 15 16 17 18 for (String name : context.getBeanDefinitionNames()) { Object bean = context.getBean(name); for (Method method : bean.getClass().getMethods()) { if (method.isAnnotationPresent(MyListener.class)) { context.addApplicationListener((event) -> { System.out.println(event); Class<?> eventType = method.getParameterTypes()[0 ]; if (eventType.isAssignableFrom(event.getClass())) { try { method.invoke(bean, event); } catch (Exception e) { e.printStackTrace(); } } }); } } }
我们可以在做一个优化,将以上逻辑写到一个后处理器中,我们可以实现SmartInitializingSingleton接口,这个接口会在所有单例对象初始化完毕之后调用。
1 2 3 4 5 6 7 8 9 10 11 12 13 14 15 16 17 18 19 20 21 22 23 @Bean public SmartInitializingSingleton smartInitializingSingleton (ConfigurableApplicationContext context) { return () -> { for (String name : context.getBeanDefinitionNames()) { Object bean = context.getBean(name); for (Method method : bean.getClass().getMethods()) { if (method.isAnnotationPresent(MyListener.class)) { context.addApplicationListener((event) -> { System.out.println(event); Class<?> eventType = method.getParameterTypes()[0 ]; if (eventType.isAssignableFrom(event.getClass())) { try { method.invoke(bean, event); } catch (Exception e) { e.printStackTrace(); } } }); } } } }; }
运行main()方法,查看输出:
1 2 3 4 5 6 7 8 9 org.springframework.context.event.ContextRefreshedEvent[source=org.springframework.context.annotation.AnnotationConfigApplicationContext@3bd94634, started on Fri Apr 14 23:44:32 CST 2023] org.springframework.context.event.ContextRefreshedEvent[source=org.springframework.context.annotation.AnnotationConfigApplicationContext@3bd94634, started on Fri Apr 14 23:44:32 CST 2023] [DEBUG] 23:44:33.068 [main] com.itheima.a48.A48_3$MyService - 主线业务 com.itheima.a48.A48_3$MyEvent[source=MyService.doBusiness()] [DEBUG] 23:44:33.078 [main] com.itheima.a48.A48_3$EmailService - 发送邮件 com.itheima.a48.A48_3$MyEvent[source=MyService.doBusiness()] [DEBUG] 23:44:33.078 [main] com.itheima.a48.A48_3$SmsService - 发送短信 org.springframework.context.event.ContextClosedEvent[source=org.springframework.context.annotation.AnnotationConfigApplicationContext@3bd94634, started on Fri Apr 14 23:44:32 CST 2023] org.springframework.context.event.ContextClosedEvent[source=org.springframework.context.annotation.AnnotationConfigApplicationContext@3bd94634, started on Fri Apr 14 23:44:32 CST 2023]
事件发布器 事件发布器对应的接口为ApplicationEventMulticaster,spring提供了一个比较常用的实现SimpleApplicationEventMulticaster,我们也可以自定义实现。
ApplicationEventMulticaster接口中有两个重要方法:
addApplicationListenerBean():收集所有的监听器multicastEvent():发布事件时会调用此方法
我们主要实现以上两个方法,其他方法我们可以用抽象类给空实现:
1 2 3 4 5 6 7 8 9 10 11 12 13 14 15 16 17 18 19 20 21 22 23 24 25 26 27 28 29 30 31 32 33 34 35 36 37 38 39 40 41 42 43 44 45 46 47 abstract static class AbstractApplicationEventMulticaster implements ApplicationEventMulticaster { @Override public void addApplicationListener (ApplicationListener<?> listener) { } @Override public void addApplicationListenerBean (String listenerBeanName) { } @Override public void removeApplicationListener (ApplicationListener<?> listener) { } @Override public void removeApplicationListenerBean (String listenerBeanName) { } @Override public void removeApplicationListeners (Predicate<ApplicationListener<?>> predicate) { } @Override public void removeApplicationListenerBeans (Predicate<String> predicate) { } @Override public void removeAllListeners () { } @Override public void multicastEvent (ApplicationEvent event) { } @Override public void multicastEvent (ApplicationEvent event, ResolvableType eventType) { } }
我们实现AbstractApplicationEventMulticaster抽象类:
在addApplicationListenerBean()方法中,我们获取listener的实例加入到listeners集合中
在multicastEvent()方法中,我们调用监听器的onApplicationEvent()方法
1 2 3 4 5 6 7 8 9 10 11 12 13 14 15 16 17 18 19 20 21 22 @Bean public ApplicationEventMulticaster applicationEventMulticaster (ConfigurableApplicationContext context) { return new AbstractApplicationEventMulticaster () { private List<ApplicationListener> listeners = new ArrayList <>(); public void addApplicationListenerBean (String name) { ApplicationListener listener = context.getBean(name, ApplicationListener.class); System.out.println(listener); listeners.add(listener); } public void multicastEvent (ApplicationEvent event,ResolvableType eventType) { for (ApplicationListener listener : listeners) { listener.onApplicationEvent(event); } } }; }
使用自定义的监听器,查看输出:
1 2 3 4 5 6 7 8 9 10 11 12 13 14 15 16 17 Exception in thread "main" java.lang.ClassCastException: class org.springframework.context.event.ContextRefreshedEvent cannot be cast to class com.itheima.a49.A49$MyEvent (org.springframework.context.event.ContextRefreshedEvent and com.itheima.a49.A49$MyEvent are in unnamed module of loader 'app') at com.itheima.a49.A49$EmailApplicationListener.onApplicationEvent(A49.java:120) at com.itheima.a49.A49$1.multicastEvent(A49.java:84) at org.springframework.context.support.AbstractApplicationContext.publishEvent(AbstractApplicationContext.java:421) at org.springframework.context.support.AbstractApplicationContext.publishEvent(AbstractApplicationContext.java:378) at org.springframework.context.support.AbstractApplicationContext.finishRefresh(AbstractApplicationContext.java:938) at org.springframework.context.support.AbstractApplicationContext.refresh(AbstractApplicationContext.java:586) at org.springframework.context.annotation.AnnotationConfigApplicationContext.<init>(AnnotationConfigApplicationContext.java:93) at com.itheima.a49.A49.main(A49.java:25)Exception in thread "main" java.lang.ClassCastException: class org.springframework.context.event.ContextRefreshedEvent cannot be cast to class com.itheima.a49.A49$MyEvent (org.springframework.context.event.ContextRefreshedEvent and com.itheima.a49.A49$MyEvent are in unnamed module of loader 'app') at com.itheima.a49.A49$EmailApplicationListener.onApplicationEvent(A49.java:120) at com.itheima.a49.A49$1.multicastEvent(A49.java:84) at org.springframework.context.support.AbstractApplicationContext.publishEvent(AbstractApplicationContext.java:421) at org.springframework.context.support.AbstractApplicationContext.publishEvent(AbstractApplicationContext.java:378) at org.springframework.context.support.AbstractApplicationContext.finishRefresh(AbstractApplicationContext.java:938) at org.springframework.context.support.AbstractApplicationContext.refresh(AbstractApplicationContext.java:586) at org.springframework.context.annotation.AnnotationConfigApplicationContext.<init>(AnnotationConfigApplicationContext.java:93) at com.itheima.a49.A49.main(A49.java:25)
发现报了一个错误,这是因为容器中存在其它的事件类型,例如ContextRefreshedEvent,但是我们需要监听的事件为MyEvent类型,因此调用onApplicationEvent()方法时,ContextRefreshedEvent会强制转换为MyEvent会抛出异常。
1 2 3 4 @Override public void onApplicationEvent (MyEvent event) { log.debug("发送短信" ); }
我们可以在调用时判断监听器监听的事件类型是否支持multicastEvent()方法传入的事件类型。
我们可以使用ApplicationListener的子接口GenericApplicationListener:
1 2 3 4 5 6 7 public interface GenericApplicationListener extends SmartApplicationListener { default boolean supportsEventType (Class<? extends ApplicationEvent> eventType) { return this .supportsEventType(ResolvableType.forClass(eventType)); } boolean supportsEventType (ResolvableType eventType) ; }
GenericApplicationListener提供了一个supportsEventType()方法,返回一个boolean值,表示当前监听器是否支持传入的事件类型。
我们可以使用GenericApplicationListener对ApplicationListener做一个封装:
1 2 3 4 5 6 7 8 9 10 11 12 13 14 15 16 17 18 19 20 21 22 23 24 25 26 27 28 29 30 31 32 33 34 35 36 37 38 39 @Bean public ApplicationEventMulticaster applicationEventMulticaster (ConfigurableApplicationContext context, ThreadPoolTaskExecutor executor) { return new AbstractApplicationEventMulticaster () { private List<GenericApplicationListener> listeners = new ArrayList <>(); public void addApplicationListenerBean (String name) { ApplicationListener listener = context.getBean(name, ApplicationListener.class); System.out.println(listener); ResolvableType type = ResolvableType.forClass(listener.getClass()).getInterfaces()[0 ].getGeneric(); System.out.println(type); GenericApplicationListener genericApplicationListener = new GenericApplicationListener () { public boolean supportsEventType (ResolvableType eventType) { return type.isAssignableFrom(eventType); } public void onApplicationEvent (ApplicationEvent event) { executor.submit(() -> listener.onApplicationEvent(event)); } }; listeners.add(genericApplicationListener); } public void multicastEvent (ApplicationEvent event, ResolvableType eventType) { for (GenericApplicationListener listener : listeners) { if (listener.supportsEventType(ResolvableType.forClass(event.getClass()))) { listener.onApplicationEvent(event); } } } }; }
完整代码如下:
1 2 3 4 5 6 7 8 9 10 11 12 13 14 15 16 17 18 19 20 21 22 23 24 25 26 27 28 29 30 31 32 33 34 35 36 37 38 39 40 41 42 43 44 45 46 47 48 49 50 51 52 53 54 55 56 57 58 59 60 61 62 63 64 65 66 67 68 69 70 71 72 73 74 75 76 77 78 79 80 81 82 83 84 85 86 87 88 89 90 91 92 93 94 95 96 97 98 99 100 101 102 103 104 105 106 107 108 109 110 111 112 113 114 115 116 117 118 119 120 121 122 123 124 125 126 127 128 129 130 131 132 133 134 135 136 137 138 139 140 141 142 143 144 @Configuration public class A49 { public static void main (String[] args) { AnnotationConfigApplicationContext context = new AnnotationConfigApplicationContext (A49.class); context.getBean(MyService.class).doBusiness(); context.close(); } @Bean public ThreadPoolTaskExecutor executor () { ThreadPoolTaskExecutor executor = new ThreadPoolTaskExecutor (); executor.setCorePoolSize(3 ); executor.setMaxPoolSize(10 ); executor.setQueueCapacity(100 ); return executor; } static class MyEvent extends ApplicationEvent { public MyEvent (Object source) { super (source); } } @Component static class MyService { private static final Logger log = LoggerFactory.getLogger(MyService.class); @Autowired private ApplicationEventPublisher publisher; public void doBusiness () { log.debug("主线业务" ); publisher.publishEvent(new MyEvent ("MyService.doBusiness()" )); } } @Component static class SmsApplicationListener implements ApplicationListener <MyEvent> { private static final Logger log = LoggerFactory.getLogger(SmsApplicationListener.class); @Override public void onApplicationEvent (MyEvent event) { log.debug("发送短信" ); } } @Component static class EmailApplicationListener implements ApplicationListener <MyEvent> { private static final Logger log = LoggerFactory.getLogger(EmailApplicationListener.class); @Override public void onApplicationEvent (MyEvent event) { log.debug("发送邮件" ); } } @Bean public ApplicationEventMulticaster applicationEventMulticaster (ConfigurableApplicationContext context, ThreadPoolTaskExecutor executor) { return new AbstractApplicationEventMulticaster () { private List<GenericApplicationListener> listeners = new ArrayList <>(); public void addApplicationListenerBean (String name) { ApplicationListener listener = context.getBean(name, ApplicationListener.class); System.out.println(listener); ResolvableType type = ResolvableType.forClass(listener.getClass()).getInterfaces()[0 ].getGeneric(); System.out.println(type); GenericApplicationListener genericApplicationListener = new GenericApplicationListener () { public boolean supportsEventType (ResolvableType eventType) { return type.isAssignableFrom(eventType); } public void onApplicationEvent (ApplicationEvent event) { executor.submit(() -> listener.onApplicationEvent(event)); } }; listeners.add(genericApplicationListener); } public void multicastEvent (ApplicationEvent event, ResolvableType eventType) { for (GenericApplicationListener listener : listeners) { if (listener.supportsEventType(ResolvableType.forClass(event.getClass()))) { listener.onApplicationEvent(event); } } } }; } abstract static class AbstractApplicationEventMulticaster implements ApplicationEventMulticaster { @Override public void addApplicationListener (ApplicationListener<?> listener) { } @Override public void addApplicationListenerBean (String listenerBeanName) { } @Override public void removeApplicationListener (ApplicationListener<?> listener) { } @Override public void removeApplicationListenerBean (String listenerBeanName) { } @Override public void removeApplicationListeners (Predicate<ApplicationListener<?>> predicate) { } @Override public void removeApplicationListenerBeans (Predicate<String> predicate) { } @Override public void removeAllListeners () { } @Override public void multicastEvent (ApplicationEvent event) { } @Override public void multicastEvent (ApplicationEvent event, ResolvableType eventType) { } } }
运行启动类,查看控制台:
1 2 3 4 5 6 7 com.itheima.a49.A49$EmailApplicationListener@5c7933ad com.itheima.a49.A49$MyEvent com.itheima.a49.A49$SmsApplicationListener@69c81773 com.itheima.a49.A49$MyEvent [DEBUG] 13:52:41.808 [main] com.itheima.a49.A49$MyService - 主线业务 [DEBUG] 13:52:41.821 [executor-1] c.i.a.A49$EmailApplicationListener - 发送邮件 [DEBUG] 13:52:41.821 [executor-2] c.i.a49.A49$SmsApplicationListener - 发送短信